

.svg)
.svg)
.png)

Enter Child Details

Add Profile Photo


Videos you might be interested in


Videos you might be interested in
Videos you might be interested in
Suggested for you
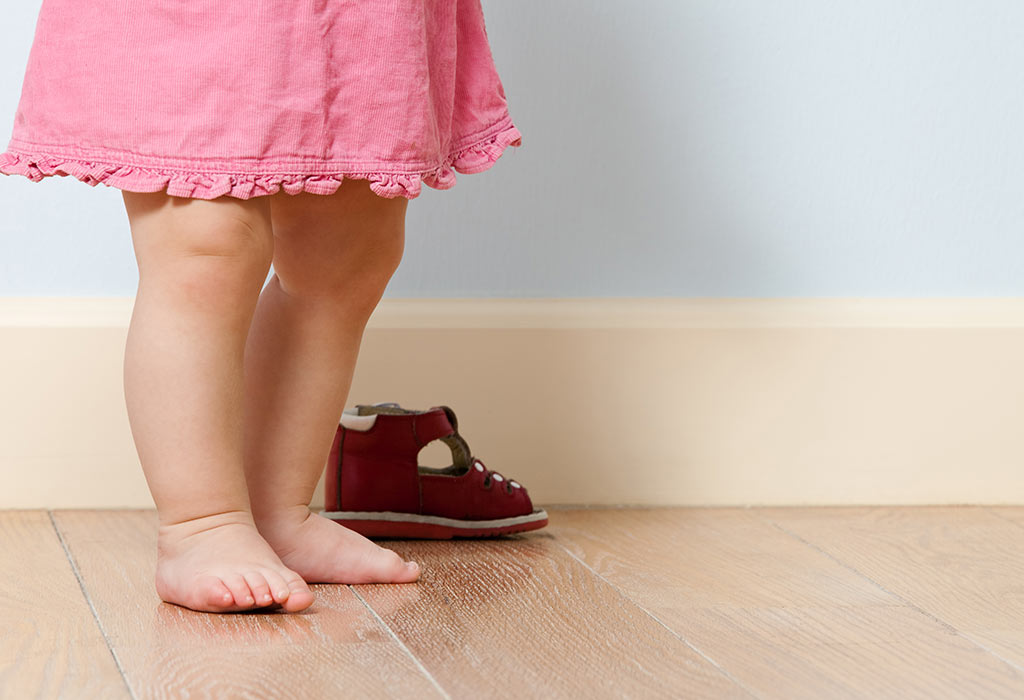
In-toeing and Out-toeing in Children - Is It Normal?
Seeing your toddler walk with one foot turned may worry you. It is normal for you to think if this condition is normal or is a result of physical deformity. In-toeing and out-toeing are not uncommon conditions but they are definitely debilitating for children in their early lives. If your child has trouble walking you must dig deeper to find out the cause and possible treatment options.
What Is In-toeing in Children?
Normally, while walking or running, we walk with our feet pointed and toes straight ahead. However, that may not be the case for everyone. In many children, you will notice that their feet may point towards each other. Such pigeon-toed kids are known to be suffering from a condition called as in-toeing.
Causes of In-toeing in Children
In-toeing is majorly caused due to genetic conditions and is usually passed on from one generation to the other.
1. Anteversion of the Femur
Sometimes the thigh bone of the child, called the femur, undergoes a twisting of sorts. This causes the kneecaps to point towards each other and give the child a pigeon-toed appearance when he walks. Squatting seems to make the condition worse. This condition is highly observed in girls than in boys.
2. Torsion of the Tibia
This is a condition that develops in a child even before birth. In order to fit within the mother’s uterus, the legs rotate. An untwisting takes place after birth, which allows a child to walk properly. However, if this does not take place, tibial torsion might set in which leads to feet pointing inwards. It exists while a child learns to walk and reduces after a while.
3. Curved Foot
One of the most popular causes for in-toeing is a curved foot. It is highly genetic and is a result of uterine position. The foot appears bent inward from the middle of the toes. Mild conditions can be corrected over time but severe bending with a stiff foot may require medical correction.
What Is Out-toeing in Children?
Out-toeing is the exact opposite of in-toeing. An out-toeing toddler can be observed immediately because his manner of walking is quite similar to that of a duck. While the chances of occurrence are minor in infants, it is also observed in older kids, too.
Causes of Out-toeing in Children
The causes for out-toeing in children range from some common ones to a few rare ones as well.
1. Cerebral Palsy
The existence of cerebral palsy in a child can cause various groups of muscles to not respond as effectively as possible. Many kids suffering from CP have been observed to experience an imbalance of sorts while walking around, too. Out-toeing emerges as a result of it, but it is majorly observed in a single leg and not both.
2. Retroversion of the Femur
In children, there exists a condition called as femoral retroversion. Here, the bone of the thigh, termed as the femur, can twist in the outer direction substantially, and be misaligned with the joint of the hip. As the twisting causes the angle to be skewed in the backward direction, the feet also point outwards as a result. Obesity is a major factor in causing this condition.
3. Presence of Flat Feet
Normal feet tend to have a natural curve to them or an arch of sorts. If those do not exist, the feet tend to be flat and even too flexible. This is not a rare condition and is commonly observed to result in an out-toeing of sorts. Thankfully, improvement takes place naturally and return to normalcy.
4. External Torsion of the Tibia
This is similar to the femoral retroversion; here a twisting of the bone in the outer direction takes place, the only difference being that it is the shin bone this time, called the tibia. Such a condition generally develops while the baby is within the mother’s womb and is in an improper position. Surgical intervention is required for correction since this condition does not resolve on its own.
5. Contracture of the Hip
A flexing of the baby’s hip occurs during pregnancy in order to be accommodated within the womb. If the uterus itself is positioned inappropriately, the flexing can cause the hips to be bent outward and remain so until birth. This causes some babies to be born with out-toed feet. Treatment is rarely required in this case since the body begins to correct itself once childbirth has completed.
How to Diagnose In-toeing and Out-toeing
Most doctors ask a child to walk and conclude from his gait whether he is suffering from in-toeing or out-toeing. In severe cases, an x-ray might be suggested to study the bone structure.
How to Treat In-toeing and Out-toeing in a Child
Figuring out how to correct pigeon-toed toddler poses numerous challenges since the condition itself depends heavily on the physical structure of the kid. Despite that, there are a bunch of techniques that can be undertaken in order to correct his gait as much as possible.
One of the primary ways to reduce the pressure on a pigeon-toed toddler is by keeping his weight in check. The presence of obesity can make the condition worse and lead to further degrading of his gait.
Most of the in-toeing or out-toeing that a child experiences, begin to resolve itself by the time he turns 3. However, sometimes when the degree of disfigurement is quite high and is accompanied by pain while walking, too. In such a condition, surgical intervention is the only way possible.
If the condition is not too severe, i.e., when a child is able to walk and play around with his pigeon-toed feet, but not as effectively and comfortably as other children, then a surgery might be avoided. In such a condition, other treatment techniques will be opted. These range from making use of special shoes or braces for support, as well as physiotherapy techniques to correct the bone movement.
The reason for the non-existence of multiple treatment techniques to handle the in-toeing or out-toeing of children is due to its tendency to resolve itself naturally. The cases are quite common and most of them have shown improvements throughout the passing years.
What Problems Do These Children Face in Future
Such children have difficulty in learning to walk properly in the beginning, but get better later on. Most kids do end up playing sports and participating in other activities just like any other child. The condition usually gets better with time.
When to See a Doctor
If the above techniques for correcting a child's gait and walking problems do not work for your child, it may result in something more serious. You should get in touch with your doctor if your child shows any of the following signs.
Worsening of the abnormalities after treatment.
Delays in different developmental milestones.
Presence of a foot that seems to be more outward than the other.
Complains from the child about pain in the leg and limping around.
The existence of in-toeing or out-toeing even after your child is 3-year-old.
When opting for pigeon-toed child treatment, it is essential to get your doctor’s go-ahead for it. It is best for things to improve by themselves and opt for supporting strategies if that were to be an option.
Also Read: Ways to Help and Prevent Child Walking on Tiptoes Read more
Rashmi has added a new answer
Guardian of 0 children
3 hours ago
Q. #asktheexperts what to give children when starting solids?

Rashmi
Mom of a 9 yr 8 m old girl
3 hours ago
A. After completing the time of six months you should start with dal water and rice water followed by all kind of fruits and vegetables porridge khichadi mash banana mash potato mash sweet potato dairy products and varieties made made out of ragi Suji and oats can also be given to your child
Suggested for you

Suggested for you
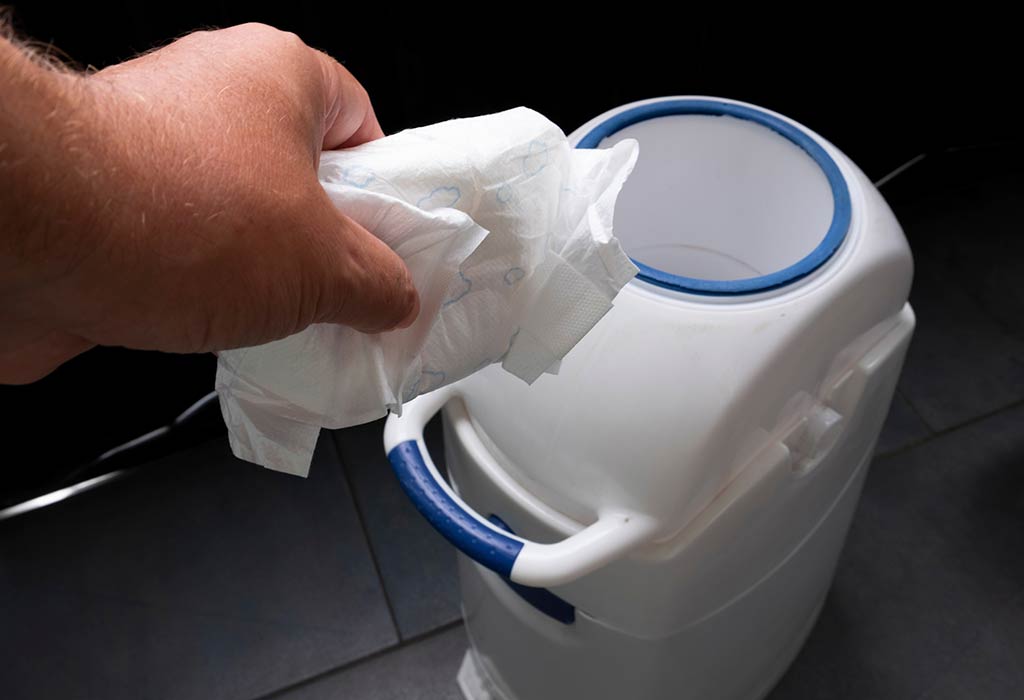
Diaper Pail - How It Works and Tips to Pick One
A diaper pail is one of the most used items for every parent. A diaper pail comes in handy when you pile up stacks of diapers and still keep the odor away from the room or your baby's lovely nursery setup. Here we bring you some good insight on the necessity of having a diaper pail, how to choose the right one, the advantages of having a diaper pail, and other points to keep in mind. Having the right diaper pail will indeed improve the quality of your life. Read on to know more.
What Is a Diaper Pail and Why Is It Necessary?
A diaper pail is a garbage or trash can designed specifically to store dirty and used diapers. It is a smart investment for parents that can be used for years, from day one when a baby arrives home until they grow into a toddler. With your baby growing, the need to use and change diapers will also increase. You will continue to see diapers piling up and the use of your diaper pail also increasing than ever before.
A diaper pail may not be an absolute necessity. While a regular trashcan can be used, in all probability, you will end up breathing from your mouth instead of your nose. Using a regular trashcan or a garbage bag may make the beautiful setup nursery of your little munchkin smelly and stinking within a short period.
People mostly want to prevent the spread of stench from dirty diapers and want a uniquely designed diaper disposal system. It will neutralize the odor and allow you to store a huge number of diapers, which will prevent you from frequently running to the outside trash to dump throughout the 24 hours cycle. This indeed saves time for new parents.
How Do You Choose a Diaper Pail?
Different models of diaper pails have different benefits. While all diaper pails try to overcome the stench issue, below are a few features that you might want to consider to choose the right diaper pail for your baby's nursery.
1. Convenient to Use
This one's important to consider. When changing a diaper, you will need to have one hand on your baby. Look for a diaper pail with a foot pedal that makes you go hand-free and easy to use. Additionally, having a child locking system on the diaper pail can be advantageous to keep curious kids away from opening and closing them continuously.
2. Odor Blocker
One of the primary reasons to buy a diaper pail is to keep the odor at bay. Hence, look for a diaper pail that has an odor control system. It's a good idea to pick diaper pails made of non-porous steel that have odor-blocking capacity better than the plastic ones, which would allow the smell to leak. Alternately the ones that come with scented bags to ward off the smell.
3. Correct Size
Ensure to pick a diaper pail that is of the right size. Two factors to consider while choosing the size would be, first being the space where the pail would be kept. It should easily accommodate the space identified. The second factor will be the number of used diapers that the pail would hold in it. That would control the frequency of emptying the can throughout the day or week.
4. Diaper Pail Liners
While you can always choose a typical kitchen trash bag, some diaper pails require special refill bags, like a scented or a deodorizing one. However, you can buy a diaper pail and liners separately too. Ensure to determine the cost for the refills when you surf to choose between different bags.
5. Ties on Bags
Bags would usually have a tie-off in the end. You would use your bags or buy refills with a tie-off available.
There are different options and choices of diaper pails available - you can choose from the hands-free diaper pail to the economical and even eco-friendly ones. You can also buy a diaper pail for cloth diapers to keep them separate.
How Do Diaper Pails Work?
A diaper pail's primary objective is to store dirty diapers made of cloth or disposable ones. Diaper pails block the unavoidable and unpleasant stench of the used and dirty diapers for several days at a stretch. It effectively seals the odor that's old and unpleasant. It also reduces the frequency at which you need to take the diaper garbage out and dump it in the trash outside your house on the garbage day.
Any classic diaper pail will have a clamp system and bags to seal off each diaper stuffed into the trash. As every individual diaper is contained, that sudden rush of smelly air will not pop out when the trash is opened or when the bags are changed. Some diaper pails come with a squeegee that will help you to push the other diapers inside and make space to put in more used diapers.
Advantages of a Diaper Pail
Diaper pails are easy to use. They are made of non-porous steel, which helps contain the odor much more effectively than plastic ones. Diaper pails come with a locking system; hence it comes in handy to keep curious toddlers away from all the mess they can create. Imagine you have twins or, for that matter, a pet; the diaper pails remain locked and closed. Despite prying on the lock, they will not be able to unlock it.
Hands-free foot pedal diapers are available that come in very handy at the time of change. You will not need to keep touching the lid with your hands to open them. These cans are durable and can be used as regular trash cans once the diaper days are over. These are simple and easy-to-use cans. You can load and empty them easily.
Steps to Clean a Diaper Pail
Cleaning a diaper pail is a smelly task. However, it is important to clean a diaper pail thoroughly as the diaper pails can be prone to sheltering mold and mildew that can be health risking. It could compromise the baby's and even the parents' health if not kept in check. At times the interior of the pail can retain the foul smell for long, even after the diapers have been long trashed. Below are the steps that you need to follow carefully to clean a diaper pail.
Step 1: Wear a rubber glove on each hand.
Step 2: Next steps are to remove and get rid of the dirty diapers from your diaper pail.
Step 3: The bag cartridge needs to be removed from the top of the diaper pail.
Step 4: Take the diaper pail outside in the backyard or put it in the bathtub for cleaning.
Step 5: You can use a garden hose or showerhead to properly rinse off the inside and the outside of the diaper pail.
Step 6: Squirt any dish soap or castile soap in the interior and exterior of the diaper pail.
Step 7: If you get any bad odor, you can neutralize it by sprinkling baking soda inside and outside the diaper pail.
Step 8: Allow five to ten minutes for the soap and the baking soda to set and penetrate properly
Step 9: Now, take a sponge or an old rag to scrub the diaper pail thoroughly. It's a good idea to keep a separate sponge just for cleaning the diaper pail.
Step 10: Now, you can rinse out the diaper pail thoroughly with water to clean the soap.
Step 11: To avoid mold and mildew from breeding inside the diaper pail, spray a concoction made of tree tea oil, vinegar, and borax. Now in circular motions, rub it in using another rag.
Step 12: Re-spray some borax solution inside the diaper pail.
Step 13: Allow the interiors of the pail air to dry for as long as probable. You can also dry it off properly with a cloth or a towel. Of course, the outside of the pail needs to be dried too.
Step 14: It is important not to leave any moisture once it has been cleaned and rinsed.
Steps to Clean Cloth Diaper Pail
The basic steps to clean cloth diaper genie are similar to how you clean a disposable diaper pail. Below listed are the cloth diaper pail ideas for cleaning.
Step 1: The first step is to wash the pail liner and the cloth diapers as you normally wash them.
Step 2: Now, use the showerhead, garden hose, or a diaper sprayer to spray the interiors and exteriors of the diaper pail.
Step 3: It is a good idea to have some water left in the bottom of the pail. This will help to effectively clean the soiled part of the diaper and soak up the smell too.
Step 4: Now, squirt any dish soap or a castile soap in the interior and exterior of the diaper pail.
Step 5: To neutralize any bad odor, you can try sprinkling some baking soda inside and outside of the diaper pail.
Step 6: Allow five to ten minutes for the soap and the baking soda to set and penetrate properly
Step 7: Take a sponge or an old rag to scrub the diaper pail thoroughly. It's a good idea to keep a separate sponge just for cleaning the diaper pail.
Step 8: Now, rinse the diaper pail thoroughly with water to clean the soap.
Step 9: To avoid any mold and mildew from breeding inside the diaper pail, do spray a concoction made of tree tea oil, vinegar, and borax. Now in circular motions, rub it in using another rag.
Step 10: Re-spray some borax solution inside the diaper pail.
Step 11: Allow the interiors of the pail air to dry for as long as probable. You can also dry it off properly with a cloth or a towel. Of course, the outside of the pail needs to be dried too.
Diaper Pail Safety Tips
There are no major risks related to diaper pails. However, being cautious about all small little things is important in ensuring hygiene and safety. Read below the tips:
Keep an Extra Diaper Pail: If you have multiple levels in your house, it is a good idea to keep a diaper pail on every level of the house for quick and easy accessibility. This, of course, will create some extra work in the long run; however, you would need to deal with far less serious odors.
Go for Scented Trash Bags: It is a common practice to line the pails with trash bags. You will easily find scented trash bags manufactured by different companies in the market. They are available in different sizes. You will need to pick the right size that fits your diaper pail. You will rid yourself of that 'in your face odor experience' when the can is opened. Also, it helps to keep smelling fresh in between different chores of cleaning.
Use Deodorized Bars: These are like quick fixes, even if it is temporary. You will need to replace these bars every week to cut down on the smelly odor in the air the moment you open the container of your Diaper pail. You can try those DIY ideas to make your bars.
Using Rubber Gloves: This one's the most important purchase you need to make to clean your diaper pails. Don't forget to wear rubber gloves when dealing with your diaper pail. It's an additional precaution you must take because, at times, you will be unpleasantly surprised just in case the liner gets torn and begins to leak.
Keep Disposable Gloves Handy: Wearing disposable gloves makes it easier for you to unload the contents into the toilet or even when you're using a hose to rinse stuff out.
Keep a Dedicated Sponge: Sponges used for cleaning can get mixed up with other sponges or cloths. Use a designated sponge to clean your diaper pail and keep changing them at the end of each month. Try to keep it inside an airtight bag to avoid other things in the cleaning closet.
Make Use of Essential Oils: There are essential oils available in the market that can help to mask smells and keep surroundings fresh. Try tangerine, lavender, grapefruit, and citrus oils with nice aromas and are safe to use around the kids.
The early months and years in the life of an infant or a toddler and even for the new mom, it is all about diapers. Depending on your budget and, more importantly, looking at the convenience of not having to run around the house with hands full of diapers, it's a good idea to have a diaper pail. With all the information stated above, you can take an informed decision about a diaper pail.
Also Read:
Usage of Diapers for Infant
Common Myths about Diapering
Side Effects of using Diapers for Infants Read more
Suggested for you

6 Things ALL Of Us Moms Have Done During a Sleepless Night With Our Babies
It’s way past midnight and your baby is still in mood for play. Wait, looks like all your rocking and lullaby-singing finally paid off and he seems to be drifting off to sleep. But sleep for you is still far away! You will need to check on your baby to ensure he is fine and be there for him the next time he wakes up crying and looking for you…
Sleepless nights are the norm for new mothers. This is why we have created a unique night routine list that totally works for us and helps us be, um, productive, creative and also kills our time as we wait...
We asked moms for their routine of a sleepless night with the baby! How many of these things have you done too?
1. Finished an Entire Chocolate Bar + A Big Packet of Chips
So? The whole world gets hungry when up in the middle of the night. Add to that post-pregnancy hormones, mood swings, and hunger (owing to the bland and tasteless diet we are often served after delivery) and you have a great excuse for some midnight munching. Just make sure your munching doesn’t wake up the little darling from his precious, precious sleep!
2. Scrolled Right to The End of The Facebook Feed
Who’s going on a vacation next weekend? Who’s getting married? Who’s kids just got the first prize in the Fancy Dress competition at school? We know all the answers! Why? Because when the baby went on one of his ten-minute naps, we scrolled all through our news feed on Facebook! Nothing better than social networking in the middle of the night, even though your eyes are probably watering from lack of sleep…
3. Checked The Internet for “What Kind of Mother Am I?”
Pop quizzes are so much fun. Especially when they tell you revealing and personal things such as which mother character from your favourite TV serial you most resemble, and which ice-cream flavour you should eat based on your parenting skills. Plus, no matter how much we do for our baby, so many of us still have that nagging doubt – are we doing enough? Are we a good mom? Time to seek help from the expert quizmasters…
4. Sent Baby Poop Pictures on WhatsApp Groups
Babies pee and poop so much and it fascinates us endlessly! Well, perhaps fascinate is too strong a word, but we do obsess a lot about whether the baby is pooping properly. As per doctors, the colour, texture, consistency, etc. of poop can reveal a lot about the baby’s health. So, while the little one is finally napping after you changed his diapers, it’s time to get those latest poop pictures evaluated…Thanks to our mommy friends on WhatsApp, we now find so much more mental solace than earlier!
We recommend you also download the World Of Moms mobile application so you can get some peace of mind during those sleepless nights. Promise we won’t make faces or irritated noises!
5. Spent Several Long Minutes in The Washroom, All Alone
Now, you know what we mean – going to the bathroom by yourself is a huge luxury when you are a new mom! If you do manage to go alone, chances are you will need to be out within seconds as your baby starts crying right then, or you get a panic attack that he hurt himself in some way. But now, during a quiet, sleepless night, when your baby is FINALLY napping, you can steal some precious minutes in the bathroom. Bliss!
6. Congratulated Yourself for Being The Superwoman Who Needs No Sleep
It’s almost 3 AM and the little baby looks far from asleep. In fact, he is quite hyperactive and seems to be in the mood for play! After you’ve rocked him and sung him a dozen lullabies, he finally seems to be slipping off into slumber. And here you are, wide awake from all the activity, dreading the morning when you will feel oh SO sleepy! You pat yourself on the back then, and marvel at how amazingly you manage to function with such little sleep. To think that there was a time when you could sleep in till midday and still feel groggy…What a superwoman you have now become!
How many of these things have you also done when up with your baby all night? Do share your experiences in the comments! Read more
Suggested for you

Bottlegourd peel chutney
Have you been throwing off the skin of bottle gourd after peeling it? If yes, don't do that now on. Here's a quick “Best out of waste” kind of chutney made from the peel of bottle gourd. The soothing bottle gourd has its benefits extended to not just its pulp, but its peel too. The skin is high in fibre and several vitamins. Use this uncommon, yummy and yet easy-to-make-recipe as an accompaniment to any paratha, thalipeeth or a pancake.
Serves
Preparation Time
Cooking Time
4 People
10 Minutes
5 Minutes
Ingredients
1 cup bottle gourd peel
1 onion
2 cloves garlic
1” ginger
4 green chillies
10 mint leaves
2 tbsp (tablespoon) coriander leaves
1 tbsp coconut
1 tsp (teaspoon) oil
Salt to taste
Method
Step 1
Heat oil, add onion, chillies and saute.
Step 2
Add the bottle gourd peels, ginger and garlic.
Step 3
Saute till raw smell leaves.
Step 4
Turn off the flame and allow to cool.
Step 5
Grind along with coconut, mint leaves, coriander leaves.
Step 6
Add required salt and half a cup of water for grinding.
Step 7
Temper, if required.
Step 8
Serve as an accompaniment.
Nutritional Information
Calories from Fat
11
Calories
25
Total Fat
1.5g 1%
Saturated Fat
0 mg
Saturated
0 g
Cholesterol
0mg 0%
Sodium
1.1mg
Total Carbohydrate
2g 1%
Dietary Fiber
0.9g 4%
Sugars
0 g
Protein
0.9g
*
Percent Daily Values are based on a 2000 calorie diet. Your daily values may be higher or lower depending on your calorie needs.
Read more
Suggested for you
Rashmi has added a new answer
Guardian of 0 children
3 hours ago
Q. can I take gevocet m during breastfeeding
Rashmi
Mom of a 9 yr 8 m old girl
3 hours ago
A. Please check with your doctor they will be able to confirm whether you can take this medicine or or not as a Dr who have a fair idea and they will know for what thing you are willing to take this medicine so whatever doubt you have associated there be able able able to clear it up for you
Rashmi has added a new answer
Guardian of 0 children
3 hours ago
Q. can I take zanocin 200 during breastfeeding
Rashmi
Mom of a 9 yr 8 m old girl
3 hours ago
A. I’m not aware about what medicine it is for I can only tell you that these basic medicines you can take throughout your lactation it’s not a problem the medicines that you could take before your pregnancy can always be taken during the time of lactation
Rashmi has added a new answer
Guardian of 0 children
3 hours ago
Q. #asktheexpert mam iam 33 weeks now when can I expect delivery date
Rashmi
Mom of a 9 yr 8 m old girl
3 hours ago
A. The basic delivery date is normally 39 to 3 40 weeks of your pregnancy whenever you are ready for your delivery and whenever you hit your labour that’s going to be the right time for you further move your Dr is going to tell you when are you going to deliver with the help of an ultrasound
Rashmi has added a new answer
Guardian of 0 children
3 hours ago
Q. iam 33 weeks pregnant now
Rashmi
Mom of a 9 yr 8 m old girl
3 hours ago
A. What is your question associated with your pregnancy that you haven’t mentioned clearly can you please repost your question providing all the necessary details so at least I know and understand what are you willing to ask and accordingly I can give you help and assistance on that
Jennifer has added a new answer
Expecting Mom due in 3 months
1 hour ago
Q. I am 23 weeks 1 day pregnant. I was feeling the movements actively until today. Baby movements were not that good or maybe I didn’t feel it that way today. Is it a cause of concern? Should I wait for a day or two or should I go and see my gynaecologist?
Please suggest!
Read moreJennifer
Mom of 6 children
52 mins ago
A. please consult ur gynae asap.
Check out this new Memory

Shahid Hussain
Father of a 2 yr 4 m old boy
New Memory
#stylishbaby

Like
Comment
Share
0 Likes
0 Comment
Check out this new Memory

Shifa
Mom of a 11 m old boy
4 mins ago
#grandphoto

Like
Comment
Share
0 Likes
0 Comment
Check out this new Memory
Shifa
Mom of a 11 m old boy
5 mins ago
#grandphoto

Like
Comment
Share
0 Likes
0 Comment
Check out this new Memory
Shahid Hussain
Father of a 2 yr 4 m old boy
5 mins ago
#kidno1

Like
Comment
Share
0 Likes
0 Comment
Check out this new Memory
Shahid Hussain
Father of a 2 yr 4 m old boy
11 mins ago
#babyphotochallenge

Like
Comment
Share
0 Likes
0 Comment
Tell us more about yourself get More Personalised
 Infant0 to 6 Months
 Baby6 Months to 2 Yrs
 Toddler2 to 4 yrs
 Kids4-6 yrs
 Big Kids6+ yrs
 Expecting
 Trying to Conceive

