

.svg)
.svg)
.png)

Enter Child Details

Add Profile Photo


Videos you might be interested in


Videos you might be interested in
Videos you might be interested in
Suggested for you

20 Months Old Baby Food - Ideas, Chart and Recipes
By the time your little one reaches the age of 20 months, he will start throwing tantrums. He won't accept what you feed him and those amazing breakfast that he loved earlier won't work anymore. Children are at a peculiar stage when they approach two years, and their eating habits change as well. In such scenarios, keeping certain quick-to-prepare recipes at your fingertips and opting for a meal plan that he willingly accepts, can make your life easier.
Video: Food Ideas for 20 Month Old Baby
https://www.youtube.com/watch?v=zKlpZIpwhN4
Nutrient Requirements of 20 Months Old Children
Even while putting together interesting lunch ideas for your 20-month child, it is important to keep in mind that certain nutrients are essential for a baby and you cannot do away with it. Following are the nutrient requirements of a 20-month-old child. Make sure your child gets these nutrients:
1. Calories
Calories help provide energy for the body. The key aspect here is to know the difference between a diet that provides good nutrition as well as enough calories that power the core of the body. A balance is necessary in order to avoid a meal plan that skews towards either direction.
2. Proteins
Proteins are considered to be the building blocks of the body and are essential for toddlers, especially in their development stage. Ensure that his diet consists of adequate protein.
3. Carbohydrates
Carbohydrates help provide fuel for the brain, muscles and nervous system.
4. Fibre
Fibre helps in proper bowel movement and proper digestion. A simple habit to ensure enough fibre content in your kid’s meal is to opt for whole food items instead of any processed stuff. Most of the times, many carbohydrate-rich food items have a substantial fibre content in them.
5. Sodium
Not many doctors or nutritionists stress on the necessity of sodium to be present in the child’s diet. All it takes is just 1 gram of sodium every day. Any reduction can severely hamper the nerve function in a kid.
6. Iron
Iron is required by the by the body for the proper functioning of the blood. Most kids that have an iron deficiency are primarily those that have a strong preference in their food choices. Iron supplements are barely needed, and most of it can also be obtained from vitamin C rich fruits or even utensils made from cast iron.
7. Vitamin D
Vitamin D is needed for children of this age as it helps to absorb calcium and improves bone growth. This can be found in milk and through adequate exposure to sunlight.
8. Water
Water helps in numerous bodily functions such as digestion, the creation of saliva and regulating body temperature. The activity of your child and the consumption of water needs to be directly proportional at all times. Even if your little one isn’t playing around all the time, keeping up with the daily water intake is essential in every way.
How Much Food Does Toddler Need at 20th Months?
The activities of your little one will begin to increase as he approaches the 2-year mark. Therefore, his calorie requirement will now begin to approach closer to 1400, even though his appetite stays more or less the same.
Best Foods for twenty-month-old Baby
Your dinner ideas for your little one can be enhanced by including certain foods in the diet of your 20-month-old baby.
1. Fruits
When it comes to including fruits for nutrition variety can make it so much easier. Mangoes, kiwi, berries of various types, grapes, bananas, and even dry fruits play a vital role in introducing numerous tastes and nutrients to your kid.
2. Eggs
Eating an egg every day can be great for your child’s health. Pair them up with bread to ensure a breakfast that provides all nutrients or even include them in various vegetable recipes.
3. Dairy Products
Apart from a glass of milk, there are multiple items such as cheese, yoghurt, kefir, that ought to be a part of your child’s diet. Lactose intolerant kids can opt for fortified alternatives.
4. Fatty Oils
Coconut oil and avocado oil have a special place in the diet of kids that are 20 months old. Appropriately served, these provide enough fat supply to the child, which creates energy reserves that keep the body going.
5. Vegetables
While leafy vegetables, as well as greens like peas, cauliflowers, broccoli and numerous other veggies, are good for your child, these are not the only sources. Simple tomato sauces and salsa do contain beneficial nutrients, too.
6. Meat
As your child comes closer to completing 2 years, you can start introducing small chunks of different meat items such as turkey, mutton, beef and so on. Make sure to start off slow and teach him to chew them properly.
7. Legumes And Nuts
Right from seeds such as hemp, chia, flaxseeds as well as legumes like peas, lentils, beans and many others, a couple of servings provided each day to your child would be a great addition to his nutrition.
8. Greens And Citrus Fruits
Leafy vegetables in a large proportion combined with fruits that are rich in vitamin C work together in providing the kid’s body with iron and helping it absorb within the system effectively. Red meat is known to do the same job, too.
9. Bread and Oatmeal
The reason oatmeal is highly recommended for kids, along with whole wheat bread, is the larger benefit, the inclusion of grain food items brings to their body. Quinoa is also suggested by most parents for kids between 1-2 years old.
10. Seafood
Seafood is a tad tricky since it does have some great benefits but also comes with the risk of arsenic or mercury poisoning. As long as you stick to specific fishes which are procured from reliable sources, your kids would benefit greatly from them.
Video: Diet Plan for a 20-Month-Old-Baby
https://www.youtube.com/watch?v=RzdtSS51gOU
20 Month Old Baby Food Chart/Meal Plan
Here’s a diet chart for a 20-month-old baby to help you with planning his meals.
Diet for a 20-month-old – Week 1, Day 1
Breakfast
1 egg or paneer (cottage cheese) paratha with green chutney
Mid-morning
Custard apple milkshake
Lunch
Jowar (sorghum)-wheat roti + masoor palak + a few cherry tomatoes
Evening
Peanut laddoo made with jaggery + milk
Dinner
Bajra (pearl millet) roti + baingan (bringal) bharta + dal
Diet for a 20-month-old – Week 1, Day 2
Breakfast
1 cup poha + 1 small glass fresh orange juice
Mid-morning
Pineapple raita
Lunch
Roti + dal + a sabzi of choice + a few slices of cucumber + hand pounded rice
Evening
Egg custard
Dinner
Shahi paneer with paratha and tomato and mushroom soup
Diet for a 20-month-old – Week 1, Day 3
Breakfast
Multigrain muffin + a glass of milk
Mid-morning
Pineapple slices with chaat masala or honey
Lunch
Multigrain roti + dal + a sabzi of choice + a few slices of boiled beetroot + hand pounded rice
Evening
Murmura (puffed rice) chivda with kesar (saffron) elaichi (green cardamom) milk
Dinner
Pudina (mint) paratha with lauki (bottle gourd) kofta
Diet for a 20-month-old – Week 1, Day 4
Breakfast
Idli + sambar + milk
Mid-morning
Peach/apple
Lunch
Paneer (cottage cheese)-pea pulao with spinach soup
Evening
2-3 homemade cookies with milk
Dinner
Dal dhokli with grated carrot dumplings
Diet for a 20-month-old – Week 1, Day 5
Breakfast
Boiled egg+ saffron-almond milkshake
Mid-morning
Muskmelon
Lunch
Roti + dal + a sabzi of choice + a few slices of cucumber + hand pounded rice
Evening
Anjeer (fig) and almond milkshake
Dinner
Bisi bele bath with curd
Diet for a 20-month-old – Week 1, Day 6
Breakfast
Rajgira (amaranth) puff porridge with almond and walnut powder
Mid-morning
Grilled sweet potato cut into different shapes
Lunch
Jowar (sorghum)-wheat roti + chole palak + a few cherry tomatoes
Evening
1 bowl of wheat porridge with walnut powder
Dinner
Navratna korma with paneer (cottage cheese) paratha and white butter
Diet for a 20-month-old – Week 1, Day 7
Breakfast
Vegetable upma with chikoo (sapota) milkshake
Mid-morning
Orange
Lunch
Multigrain roti + dal + a sabzi of choice + a few slices of boiled beetroot + hand pounded rice
Evening
Palak (spinach) soup with bread sticks and butter
Dinner
Mixed vegetable soup with dal khichdi
Diet for a 20-month-old – Week 2, Day 1
Breakfast
Dudh (milk) poha with chopped strawberries
Mid-morning
2-3 biscuits of choice
Lunch
Jowar (sorghum)-wheat roti + masoor (red lentil) palak (spinach) + a few cherry tomatoes
Evening
Strawberries and milk
Dinner
Paneer (cottage cheese) cutlets or grilled fish with coriander-tomato soup
Diet for a 20-month-old – Week 2, Day 2
Breakfast
Jowar (sorghum) puff kheer
Mid-morning
Kiwi slices
Lunch
Roti + dal + a sabzi of choice + a few slices of cucumber + hand pounded rice
Evening
Khakhara chaat
Dinner
Rajma (kidney beans) with toast
Diet for a 20-month-old – Week 2, Day 3
Breakfast
Boiled egg or paneer (cottage cheese) cubes
Mid-morning
Pear slices
Lunch
Multigrain roti + dal + a sabzi of choice + a few slices of boiled beetroot + hand pounded rice
Evening
Curd with any fruit (except pomegranate and grapes)
Dinner
Appe with coconut and dahi (curd) chutney
Diet for a 20-month-old – Week 2, Day 4
Breakfast
Appe with chutney
Mid-morning
Strawberry milkshake
Lunch
Paneer (cottage cheese)-pea pulao with spinach soup
Evening
Palak (spinach) dhokla
Dinner
Stuffed capsicums (stuffed with quinoa and paneer (cottage cheese)) in tomato sauce
Diet for a 20-month-old – Week 2, Day 5
Breakfast
Oats-almond kheer
Mid-morning
Custard apple mashed without seeds
Lunch
Roti + dal + a sabzi of choice + a few slices of cucumber+ hand pounded rice
Evening
Seviyan (vermicelli) upma + kesar (saffron) elaichi (green cardamom) milk
Dinner
Dal baati with grated carrot raita
Diet for a 20-month-old – Week 2, Day 6
Breakfast
Poha with capsicum and tomato + chocolate- walnut milkhake
Mid-morning
Fresh coconut barfi
Lunch
Jowar (sorghum)-wheat roti + chole palak + a few cherry tomatoes
Evening
Plain khakhara cut into bite-sized pieces mixed with curd
Dinner
Dal vadi with brinjal vegetable and bajra (pearl millet) roti
Diet for a 20-month-old – Week 2, Day 7
Breakfast
Banana pancakes
Mid-morning
Pumpkin soup with toast
Lunch
Multigrain roti + dal + a sabzi of choice + a few slices of boiled beetroot + hand pounded rice
Evening
Plain milk with poha (flattened rice)
Dinner
Curd rice with cucumber and carrot raita
Diet for a 20-month-old – Week 3, Day 1
Breakfast
Ragi (finger millet) dosa with sambar or chutney
Mid-morning
Pineapple yoghurt
Lunch
Jowar (sorghum)-wheat roti + masoor (red lentil) palak (spinach) + a few cherry tomatoes
Evening
Murmura (puffed rice) chivda with kesar (saffron) elaichi (green cardamom) milk
Dinner
Mixed vegetable soup + chole + paratha
Diet for a 20-month-old – Week 3, Day 2
Breakfast
Besan (gram flour) chilla with green chutney
Mid-morning
Plain khakhara cut into bite-sized pieces mixed with curd
Lunch
Roti + dal + a sabzi of choice + a few slices of cucumber + hand pounded rice
Evening
2-3 homemade cookies with milk
Dinner
Pongal with vegetable sambar
Diet for a 20-month-old – Week 3, Day 3
Breakfast
Banana-oats milkshake
Mid-morning
Mashed potato with grated paneer (cottage cheese)
Lunch
Multigrain roti + dal + a sabzi of choice + a few slices of boiled beetroot + hand pounded rice
Evening
Anjeer (fig) and almond milkshake
Dinner
Paneer (cottage cheese) cutlets or grilled fish with coriander-tomato soup
Diet for a 20-month-old – Week 3, Day 4
Breakfast
1 small bowl of papaya
Mid-morning
2-3 homemade cookies + milk
Lunch
Paneer (cottage cheese)-pea pulao with spinach soup
Evening
1 bowl of wheat porridge with walnut powder
Dinner
Rajma (kidney beans) with toast
Diet for a 20-month-old – Week 3, Day 5
Breakfast
Some jamun (black plum) or strawberries – (as per the season)
Mid-morning
Masala makhana (fox nuts) + banana milkshake
Lunch
Roti + dal + a sabzi of choice + a few slices of cucumber + hand pounded rice
Evening
Palak (spinach) soup with bread sticks and butter
Dinner
Appe with coconut and dahi (curd) chutney
Diet for a 20-month-old – Week 3, Day 6
Breakfast
Chikoo (sapota)
Mid-morning
Rajgira (amaranth) chikki dipped in milk
Lunch
Jowar (sorghum)-wheat roti + chole palak + a few cherry tomatoes
Evening
Mango lassi + murmura (puffed rice) chikki
Dinner
Dal chawal
Diet for a 20-month-old – Week 3, Day 7
Breakfast
Apple
Mid-morning
Pineapple cubes with chaat masala or honey
Lunch
Multigrain roti + dal + a sabzi of choice + a few slices of boiled beetroot + hand pounded rice
Evening
2-3 whole wheat crackers with hummus
Dinner
Grated cucumber with coconut rice
Diet for a 20-month-old – Week 4, Day 1
Breakfast
Dalia (broken wheat) upma with grated carrot and milk
Mid-morning
Grape and pear chaat
Lunch
Jowar (sorghum)-wheat roti + masoor (red lentil) palak (spinach) + a few cherry tomatoes
Evening
Mosambi (sweet lime) segments
Dinner
Chicken or soya kheema + paratha
Diet for a 20-month-old – Week 4, Day 2
Breakfast
Mixed grain dosa with mint and tomato chutney topped with paneer (cottage cheese)
Mid-morning
Sweet lime and orange juice
Lunch
Roti + dal + a sabzi of choice + a few slices of cucumber + hand pounded rice
Evening
Cucumber slices with dahi (curd) dip
Dinner
Palak (spinach) khichdi with curd or kadhi
Diet for a 20-month-old – Week 4, Day 3
Breakfast
Sattu (barley) porridge
Mid-morning
Pomegranate or watermelon juice
Lunch
Multigrain roti + dal + a sabzi of choice + a few slices of boiled beetroot + hand pounded rice
Evening
Pineapple sheera
Dinner
Vegetable + masoor (red lentil) soup + pulao
Diet for a 20-month-old – Week 4, Day 4
Breakfast
Pongal + milk
Mid-morning
Chikoo (sapota) + peach/apple
Lunch
Paneer (cottage cheese)-pea pulao with spinach soup
Evening
Mashed cheesy potato
Dinner
Mixed vegetable raita + vegetable pulao + moong dal (green gram split) soup
Diet for a 20-month-old – Week 4, Day 5
Breakfast
Thepla with chunda and milk
Mid-morning
Banana + apple chaat
Lunch
Roti + dal + a sabzi of choice + a few slices of cucumber + hand pounded rice
Evening
Ragi (finger millet) ladoo
Dinner
Vegetable biryani
Diet for a 20-month-old – Week 4, Day 6
Breakfast
Dalia
Mid-morning
Guava + pear with black salt
Lunch
Jowar (sorghum)-wheat roti + chole palak + a few cherry tomatoes
Evening
Palak (spinach) pakoda
Dinner
Chole with paratha and pumpkin soup
Diet for a 20-month-old – Week 4, Day 7
Breakfast
Vegetable- sooji (semolina) idli with coconut chutney
Mid-morning
Lunch
Multigrain roti + dal + a sabzi of choice + a few slices of boiled beetroot + hand pounded rice
Evening
Milk with powdered nuts
Dinner
Chicken or paneer (cottage cheese) curry with rice
Video: 20 Month Old Baby Food Recipes
https://www.youtube.com/watch?v=Z4MB9BbJI54
Food Recipes for 20 Months Old Baby
If you’re still figuring out what to feed my 20-month old that you can cook easily, these recipes can pave your way to make it happen.
1. Pumpkin Pancakes
These can be prepared and refrigerated in advance as well, to make for a quick and delicious breakfast.
Ingredients
Vanilla essence
Pumpkin puree
Eggs
Butter
Milk
Brown sugar
Salt
Nutmeg
Cinnamon
Baking powder
Whole wheat flour
How to Prepare
Mix flour, baking powder, cinnamon, nutmeg, salt and brown sugar together in a large bowl.
In another bowl, add milk, butter, eggs, puree and vanilla essence and mix it all well.
Pour this into the first bowl and whisk them until they are smooth. Let it sit for a while.
Use this batter to make pancakes on a pan coated with ghee at medium heat. Cook both sides to a golden brown colour and serve with honey or maple syrup.
2. Paneer Wheat Biscuits
Biscuits don’t have to be the same boring ones all the time. Here’s a great variant for you to try.
Ingredients
Salt
Curry leaves
Ajwain
Onion
Butter, salted
Baking powder
Whole wheat flour
Paneer, crumbled
How to Prepare
Preheat the oven to a temperature of 170 degrees and grease a tray.
Grind together curry leaves, ajwain and onions.
Take butter in a bowl and add paneer to it, while whisking it. Add in the flour along with other ingredients mixing it all together properly till it is stiff.
Cut out biscuit shapes from a thinly rolled layer of dough. Bake these in the oven for about 20 minutes and take them out once they get brown. Let them cool and then store in an airtight container.
3. Veg Manchurian
Homemade Chinese food is the best your kids will have, that is healthy and tasty at the same time.
Ingredients
Cornflour
Refined flour
Black pepper
Salt
Carrot
Cabbage
Cauliflower
Vegetable stock
Ketchup
Soy sauce
Ginger paste
Garlic
Onion
Oil
How to Prepare
Chop all veggies and mix them in a bowl with the flours to form a dough. Don’t add extra water.
Make balls from this dough and deep fry in a pan to a brown shade. Use a napkin to soak extra oil.
Take a pot and fry ginger garlic paste in it. Follow up by sautéing the onions and adding condiments and sauces.
Pour in the vegetable stock and let it boil. Add the cornflour paste to make it consistent and gently insert the fried balls in it.
4. Whole Wheat Cake
Give your little one a cake that is not just delicious but healthy all the way.
Ingredients
Baking powder
Banana
Dry fruits
Ghee
Jaggery
Milk
Wheat flour
How to Prepare
Fry the flour with ghee and let it cool down.
Blend the flour with jaggery and banana. Add fried nuts to the flour.
Coat a cooker plate with ghee and pour the mix into it. Add a little water to the cooker and let it cook on medium heat for half an hour without a whistle.
Let the cake cool down before serving.
5. Suji Kheer
A kheer might not seem like a meal for your child, but it turns out to be quite filling and lip-smacking than expected.
Ingredients
Water
Elaichi powder
Ghee
Suji, roasted
How to Prepare
Add water in a pan and let it boil.
Add the roasted suji and keep stirring to prevent the formation of lumps.
Let it cook for a bit then add some ghee, mixing it.
Once fully cooked, turn off the heat and add elaichi powder to it.
Feeding Tips
Keep a few tips in mind when preparing a meal plan and feeding your little one.
Make sure vegetables are included daily
Don’t force him to finish his plate if he doesn’t like it
Don’t let him eat too much of anything as well
If a child skips lunch, make sure the snack is judicious enough
Let dinners include meals that can be had luxuriously
If a child hates a food item, make sure you eat it as well
Let your kid sit with you on the same dinner table with the family
Keep track of allergies when introducing new food items
Choose to mash food items than giving him whole
Sugary items should be given within strict limits
Figuring out great snacks for a 20-month-old toddler won’t be as challenging as it seems, once you start looking at the possible combinations of everyday food items.
Disclaimer:
Each child is different and so use these meal plans as a trusted guide as per your discretion. You can modify the meals according to your child’s preferences / requirements.
Never force-feed a child.
While preparing formula, please follow the instructions on the box and use the measuring spoon provided with it.
While introducing solid food to a baby, initially, one needs to prepare watery gruels/soups. As a child gets older, the caretaker/ mother has to increase the thickness of the liquids slowly according to the child’s capacity to swallow. Foods that are too thick can cause stomach upset/ unnecessary load; while excessively watery food might cause the child to remain hungry.
Some kids may eat less on some days and that is absolutely alright. However, if a child eats less for more than 3-4 consecutive days, please visit a doctor to guide further.
A child may eat less during the teething phase or if he/she may not be feeling well. You could increase breast milk /formula feeds on those days. Re-introduce the foods once the child is back to normal.
Don’t stop feeding if the child is suffering from diarrhoea.
You can alter the taste of the food by adding some natural flavours like cinnamon, jeera powder, lemon juice, curry leaves etc. if the child doesn’t accept the food initially.
If your child suffers from an allergy to nuts, gluten or eggs, please consult your doctor before feeding him/her any foods that may contain them.
Also Read: 17 to 20 Months Old Baby Food Ideas Read more
Suggested for you

Shikakai for Hair - Incredible Benefits and Ways to Use
Shikakai has been used for hair care in India for hundreds of years. The pods, leaves and the bark of the Shikakai tree is a rich source of Vitamin A, C, D, E and K. It can be used in the form of shampoo to clean hair, used in making hair oil and even as hair masks to nourish the hair and help it to grow fast. But how do we use it? Do you want to know how we can make Shikakai shampoo, hair oil or hair masks at home? Here is an article to help you teach ways in which you can make hair products through this wonder shrub.
What are Shikakai and Its Herbal Properties?
Shikakai or Acacia Concinna is a climber with thorny, brown branches. The plant is full of vitamins and anti-oxidants which enhances hair growth and a lustrous mane. Owing to its anti-fungal and anti-bacterial properties, it can be used for medicinal purposes on wounds and skin problems.
Properties
Uses
Saponin
Works up a lather when water is added to it.
Vitamins (A, C, D, E, K)
Provides nourishment to the hair and promotes healthy and rapid hair growth.
Antioxidants
Moisturises the hair; prevents split ends, hair from getting brittle and greying.
Micro-nutrients
Nourishes the scalp and hair making it dandruff-free, smooth, tangle-free and lustrous.
Anti-bacterial and anti-fungal
Prevents lice, psoriasis, eczema, and scabies.
Shikakai Benefits for Hair
It is a well-known fact that Shikakai is an age-old remedy for hair related problems but did you know that it has other benefits too. Let us explore its several therapeutic benefits and uses.
1. Hair Growth
The herbal remedy of Shikakai for hair growth has been coming down through ages. Shikakai powder when mixed with henna powder and yoghurt adds sheen to your hair and also aids hair growth.
2. Cleanser
It acts as a hair cleanser. Although it does not work up a rich lather, it cleans your hair effectively without any harsh effects to the hair or scalp.
3. Anti-fungal and Anti-bacterial Properties
The anti-fungal and anti-bacterial properties prevent lice, dandruff or skin problems like scabies, psoriasis and eczema from occurring. Shikakai can also be used as an antiseptic to heal wounds.
4. Heals Wounds
When Shikakai paste mixed with turmeric paste is applied to cuts and bruises, it gets cured.
5. Anti-oxidants
The anti-oxidants repair damaged hair and prevents split ends. It also stops hair from getting brittle and coarse.
6. Controls Hair Fall
The vitamins and anti-oxidants prevent hair loss and as a result, cures balding too.
7. Used in Making Detergents
Due to the presence of saponins, it is used as an ingredient to make detergents and moreover being a good cleanser can effectively be used for cleaning purposes. The water used in boiling Shikakai and Reetha together can be used to wash delicate fabrics and remove solid stain marks.
8. Used for Good Oral Health
The herbal benefits of Shikakai are not only for hair and skin. Rinsing mouth regularly with Shikakai in lukewarm water aids good oral health. It further cures gum diseases and prevents bad breath and building up of plaque. Gurgling with Shikakai and warm water can cure tonsillitis and throat infection.
9. Balances Blood Sugar Level
Taking Shikakai powder regulates normal blood sugar levels. It neither allows the blood sugar level to decrease nor increase thereby keeping it balanced.
10. Cures Diseases
Apart from the skin and oral diseases, Shikakai helps cure Black fever (during malaria) and Jaundice. When the pods of the Shikakai are powdered and applied over the Leprosy affected area, it can cure the dreaded disease.
Ways You Can Use Shikakai in Daily Hair Care Routine
Shikakai has always been in a valuable resource when it comes to hair care and not without any reason. It is rich in anti-oxidants, vitamins, multi-nutrients and has anti-fungal, anti-bacterial properties which make it a remedial solution for hair care. Although, it can be used for several other purposes like skin care, oral hygiene, cleansing agents and medicines, Shikakai is best known for hair care. Listed below are several ways in which you can make different kinds of hair care products using the wonder plant.
1. DIY Shikakai Shampoo
Shikakai is said to be a fine cleanser, and so is Reetha. When you add Amla and Fenugreek seeds to these ingredients, it makes for a perfect shampoo enriched with anti-oxidants, micronutrients and vitamins. Thus this Shikakai shampoo for hair loss is the ultimate DIY shampoo which can very easily be made at home.
What You Will Need
Shikakai – 8 pods
Reetha – 12 seeds
Amla (Dry) – 1 cup
Fenugreek seeds – 2 tbsp.
Water – 1 big bowl
Method
De-seed the Reetha.
Then soak all the ingredients together in a big bowl for a night.
The next morning, boil all the ingredients together along with the water that they were soaked in.
Once the ingredients become soft, switch off the stove and keep it to cool.
After it cools down, strain the liquid and use it to wash hair.
In case of hair which has been oiled, you have to boil the ingredients until the liquid becomes very thick and turns dark brown. And if it is just a regular hair wash without any oil in the hair, you liquid consistency can be kept thin.
Amla and Fenugreek seeds condition and moisturises the hair. Therefore, it is essential to include these two along with Reetha and Shikakai for better results.
How Often to Use
This herbal concoction shampoo can be used as per requirement. However, it should be used at least once every week for good results.
2. DIY Shikakai Oil
The herbal oil mix of Shikakai along with Almond and Coconut works will work wonders for your hair. Almond and Coconut oil put together nourishes the hair and the scalp resulting in hair growth; Shikakai, on the other hand, acts as a conditioner and add shine and lustre to the hair.
What You Will Need
Almond oil – 1 cup
Coconut oil – 2 cups
Shikakai powder – 2 -3 tbsp.
1 clean and dry glass bottle (to keep the oil)
Method
Add all the ingredients together in the glass bottle.
Shake it many times.
Then let it sit for 7 – 10 days in a cool place.
How Often to Use
The oil can be used as per requirement. However, using it 2 -3 times a week of getting rid of hair woes.
3. DIY Shikakai Hair Packs
Have you ever experienced bad hair days? Are you scared that one day you may become bald with the alarming speed in which your hair is falling? Are you greying earlier than your age? If you are down with hair problems, try out the Do-It-Yourself Shikakai hair packs listed below.
Shikakai and Curd Paste
This Shikakai hair mask has a host of benefits. It helps to nourish and moisturise the hair. The mask which contains curd is a rich source of good bacteria which help to prevent dandruff and skin problems in the scalp.
To prepare this mask, take 1 tablespoon each of Shikakai powder, Amla powder, Olive/Coconut/Almond oil and a cup of curd. Mix everything well and keep it aside for an hour or so.
Apply it on your hair and scalp. Keep it for an hour or till it dries. Then wash it off.
To get a good result, you must apply this mask once a week or once in 15 days. In the case of long hair, you can add more to each of the ingredients.
Pack for Dry Hair
This remedial solution of Shikakai for dry hair along with Amla and Fenugreek is an excellent Ayurvedic pack. The anti-oxidants of Shikakai and Amla help fight hair damage; Fenugreek adds more nourishment to the hair and makes it more manageable.
Make a paste of the ingredients put together with a little lukewarm water. Keep it aside for some time and then apply it on your hair. Once the pack dries up, wash your hair.
Applying this pack every alternate day or twice a week can help your dry, frizzy tresses become shiny and smooth.
Anti-Grey Hair Pack
An excellent pack made of Shikakai for grey hair blended with Henna powder, Amla powder, curry leaf powder and hibiscus flower works wonders for premature greying of hair. Henna is a natural colouring agent does no harm to the hair follicles, and on the other hand, Shikakai and Amla being rich in anti-bodies prevent hair damage and nourish it. Curry leaves and Hibiscus both prevents the hair from greying before time.
To make this paste, you need to take about 1/4th cup of Amla powder, ½ cup of Henna powder, a paste of 5-6 fresh Hibiscus flowers, 1/4th cup of fresh Curry leaf. Mix all of it with a little black brewed tea.
You can apply this pack once a week or once in 15 days. However, avoid using too much Henna powder since overusing it can dry up your hair.
Hair Fall Remedy Pack
Shikakai for hair fall is an excellent remedy. Therefore this pack with Shikakai, Amla, Reetha and eggs is the go-to solution for hair fall.
To prepare this pack, mix 2 tbsp each of Shikakai, Amla and Reetha (all in powder form) with 2 eggs, juice of 2-3 lemons and a little lukewarm water. Then apply it after keeping it aside for half an hour. Once dry, wash it off.
Apply the pack every alternate day or twice a week to stop hair fall.
Anti – Dandruff Pack
The main ingredients in this pack are Shikakai and Neem which have anti-microbial properties. This prevents dandruff and dry scalp.
Make a paste with 2 tbsp each of Neem leaf powder, Shikakai powder and Reetha powder together with a little water. Apply it on the scalp and hair. Once dry, wash it off.
Use this pack once or twice a week.
How to Make Shikakai Powder?
Now that you have been told how to use Shikakai powder for hair washes let us learn how to make Shikakai powder.
Dry the Shikakai pods in the sun. You may dry the bark of Shikakai plant and also leaves if you have them.
Once it is fully sun-dried, grind the pods (and the bark and leaves) together in a grinder to make a fine powder.
There are plenty of branded hair products in the market. However, nothing can match the goodness of natural products like Shikakai. Try it, and you will never use any other thing.
Also Read:
Natural Remedies for Glowing Winter Skin
How to Avoid Beauty Parlour Disasters
Beauty Secret Tips for Skin & Hair From Our Kitchen Shelves Read more
Suggested for you

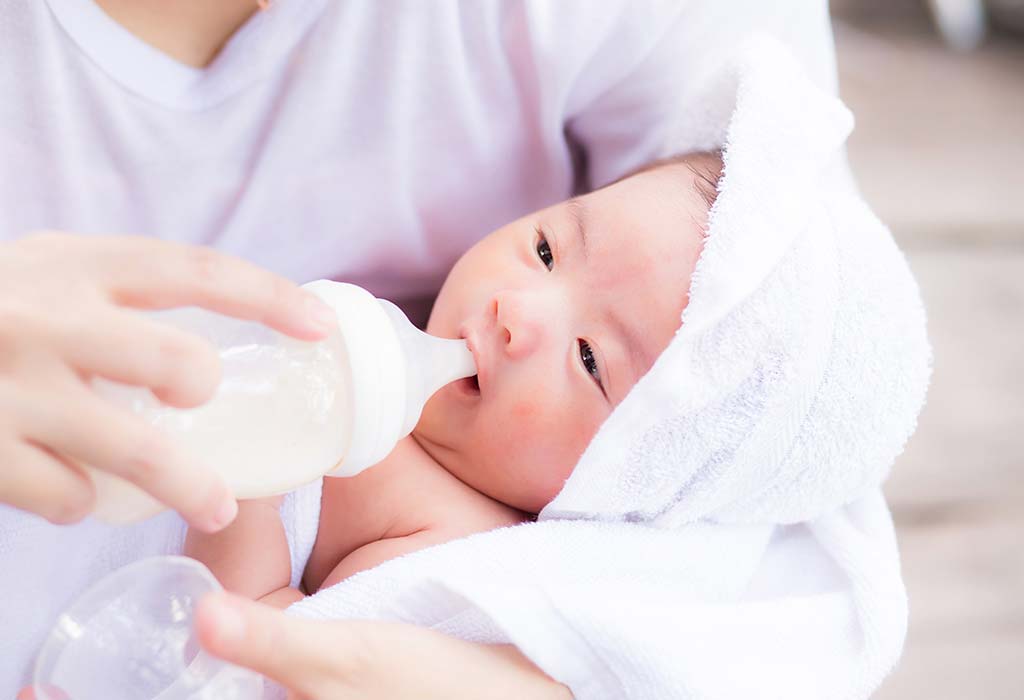
Cold in Infants: Causes, Treatment & Home Remedies
Children catch a cold very often and that is primarily because their immune system is very immature. An infant may catch a cold if he/she is exposed to any one of the 200 viruses responsible for a common cold. Using medication for new-born or infants is not advisable until necessary. You can resort to home remedies listed out in this article to treat your infant’s cold unless your doctor thinks otherwise.
Common Cold in Babies
Common cold in babies is not very serious and is commonly seen in all growing kids. According to experts, children will get about 8 to 10 spells of cold by the time they are 2 years old. It is heart-wrenching to see little infants struggling to feed and stay uncomfortable throughout the night, but there is nothing to worry about as you can do multiple things to ease your baby’s discomfort.
How Can You Differentiate Cold From Flu, Some Other Illness or Allergies?
Differentiating between cold and flu can be a little tricky. If your little one has a running nose with clear mucus that may turn thicker in the following weeks, then your baby probably just has a cold. If the cold is accompanied by fever, then just watch your baby when the fever goes down. If your baby is active and playful when the fever is down, then it is only a cold but if your baby is restless and weak even when the fever is down, then it could mean that your baby is down with flu. Also, if your baby has a running nose accompanied by a cough and without fever, then your little one is probably just down with cold.
Flu or any other illness in children will come abruptly and will most likely be accompanied by diarrhoea or vomiting. Allergy, on the other hand, has similar symptoms but is easy to differentiate. Allergies will not cause your little one to run a fever. The common symptoms of allergy in children are itchy and watery eyes and nose. There are repeated attacks of sneezing and skin develops rashes due to itching. Also, you will observe that in case of allergy, the mucus coming out of your baby’s nose will be clear all throughout and will not change colour or thicken.
What are the Common Causes?
Newborn baby cold can be caused by 200 viruses but the most common virus responsible for the common cold in babies is Rhinovirus. Common cold usually infects the nose and the throat. Now, the interesting fact about the cold is that once infected by a certain cold virus, your child becomes immune to that virus. But since there are many cold-causing viruses, hence your baby may suffer from several bouts of cold by the time he is 2 years old. Since cold is a communicable disease, this is how it enters your baby’s system:
Through Air: usually when an infected person coughs, talks, or sneezes, he/she may spread the virus
Through touch: when an infected person touches your baby, he or she will pass the virus to your baby
Through infected surfaces: your baby may get a virus by touching an infected toy or any other surface where the virus stays for 2 hours or longer.
Your baby will be at a higher risk of catching a common cold because of his/her immature immune system. Exposer to other children who may already be suffering from cold can also put your baby at a high risk of catching a cold. The climatic changes also make your baby susceptible to cold.
Signs and Symptoms of Infant Cold
You may observe following signs and symptoms in your baby if he/she is infected by cold:
Cough
Sore throat
Reddened eyes
Running nose
Earache
Fever up to 101° F (38° Celsius)
Loss of appetite
Swollen lymph nodes under the armpits, back of the head and on the neck
Your baby is going to be restless and may stay awake due to the stuffy nose. Feeding will also become a problem. Since your baby will not be able to blow his/her nose, you will have to clean the mucus. Your baby will find it difficult to breathe through the nose and that will make the baby irritable.
Complication
Common cold when severe can cause few undesirable complications like:
Severe ear infection which is caused when the bacteria or virus enters the space behind the eardrum.
In some cases, cold provokes wheezing. This is irrespective of the fact whether your child suffers from asthma. Wheezing can become worse in children with asthma during cold.
An unresolved common cold may lead to another condition called sinusitis.
Other complications include pneumonia, bronchiolitis, and croup.
Treatment for Cold
Common cold doesn’t require a very serious treatment. You can do few simple things to ease the symptoms and the distress. If the cold becomes severe and doesn’t go away even after a week, consult your doctor to ensure it is nothing serious.
Ensure that your baby gets a lot of rest.
Try and give your baby some extra feed. If your baby is on formula milk or solids, ensure that he/she drinks a lot of water. You can also give your baby fruits rich in vitamin C or juices to keep him hydrated.
If your baby is 3 months and above, you can give your baby paracetamol for fever. But please ensure you consult your doctor before doing so. Self-medication is a strict no. Please do not give any medication for cold without consulting the doctor.
In case of congestion, elevate your baby’s head by putting two soft towels under his/her head. Avoid the use of pillows as it may suffocate the baby.
Wipe your baby’s nose to remove the flowing mucus. Use a mild petroleum jelly to moisturize the skin around the nose to avoid any skin irritation.
If your baby is finding it difficult to feed due to his/her stuffy nose, then speak to your doctor and request your doctor to prescribe saline nasal drop to clear the nose block.
Ensure that any external products you use that are not home remedies, e.g. Vapo-rub, are applied only after a doctor's recommendation.
If your baby only has a stuffy nose without any other symptoms of common cold, then check his/her nostrils for any foreign particle.
Home Remedies for Infant Cold
Home remedies work like magic in some cases and relieve babies as well as adults with a cough and cold. Here are some of them that may help your little one.
Extra Fluids
If your baby is an infant, ensure that you encourage him/her to take an extra feed and if your baby is older than 6 months then give him/her fruits rich in Vitamin C, homemade juice, and lots of water. For infants who are on formula milk, give them water in a separate feed bottle. This will help to keep your baby hydrated.
Spray Saline and Suck Out Mucus
Tilt your baby’s head backwards, and put two drops of saline water in each nostril to soften the mucus. Keep your baby’s head in that position for about 20 seconds. Then, squeeze the bulb of the syringe, insert the rubber tip of the bulb syringe inside one nostril, close the other nostril with one finger, slowly release the bulb to collect the mucus and saline water, then gently remove the syringe. Clean the syringe by squeezing the mucus out and repeat the same with the other nostril.
Use Humidifier
Keep the air inside the house moistened. Use a humidifier in your baby’s room. Dry climate can worsen cold and cough in infants.
Encourage Rest
Let your baby sleep and take rest as much as possible. When not asleep, ensure that your baby is involved in some quiet activities. Don’t let your little one get excited. If your baby is old enough then read to him or play his favourite video. Remember the more your baby rests, the faster he/she will heal.
Watch for Warning Signs
Watch for warning signs. If the home remedies do not help to improve your baby’s condition, then get in touch with a doctor and seek his/her advice. If your baby is extremely uncomfortable, crying during feeds, constantly touching his/her ears while crying, or has teary eyes, then your baby may be suffering from something more than cold.
Help Baby to Cough it
It is very difficult to get mucus out of your baby’s throat. Room humidifier, saline drops on nostrils and a gentle rub on the chest with a doctor recommended vaporiser can help to soften the mucus on the chest which your baby may just puke it out. Your doctor may also suggest nebulisation, if necessary.
Tips to Minimise Chances of Getting Sick by Cold
By following basic hygiene at home and outside, you can help to minimize the number of times your baby gets cold. Here are few preventive measures that will minimize the chances of your baby falling sick by a cold.
Ensure that all members of the family, friends and outsiders wash their hands before picking the baby up.
Always wash your hands and use a sanitizer before changing and cleaning the baby.
Keep your baby away from the sick and infected people as much as possible. Cold is a communicable disease, hence, as an infected person can transfer the virus to your baby even without touching him/her.
Also, ensure that your baby doesn’t get exposed to smoking. This can cause respiratory problems in your little one.
If your baby is on solids, give your baby fruits rich in vitamin-C or juices to keep him hydrated and ensure that he drinks a lot of water.
Breastfeed your infant as much as you can so that he/she can reap all the benefits of breastmilk.
Use a room humidifier during dry weather conditions to keep the air inside your home moistened.
When to Consult a Doctor
For babies younger than 3 months, consult the doctor at the first sign of cold and fever. For babies between 3 to 6 months, consult the doctor if the fever goes up to 101° F (38° C). And for babies above 6 months, you can wait to consult the doctor if the fever shoots to 102° F (39° C). Irrespective of your baby’s age you must consult the doctor if:
The fever lasts for more than 2 days.
If you observe rapid breathing, wheezing or gasping.
If your baby pulls or rubs his/her ears while crying. Babies who cry while feeding or abnormally need immediate attention.
Gloopy or tearing eyes which may mean that your baby is suffering from pinkeye.
Extreme uneasiness or change in sleeping or eating habits.
If the remedies used for cold fail to work.
If the symptoms of cold last and worsen after 5 to 7 days of cold.
Is it Safe to Give Over-the-Counter(OTC) Cough and Cold Medicine to a Baby?
OTC is a strict no for children below 6 months. In fact, it has been observed that OTC causes side effects in children. Cold and cough medications don’t prevent your baby from cold or even shorten the period of cold. It may only give your baby some temporary relief. It is definitely not worth taking the risk.
A common problem among children of all ages, cold is a little harder to manage in infants as they are unable to expel mucus without help. It is important to monitor them and to know when to reach out to a doctor for a remedy.
Also Read: 13 Home Remedies For Cold And Flu In Babies & Kids Read more
Suggested for you
Journey of a Non Breastfeeding Mom and Her Baby
It’s quite easy for people to judge you about not breastfeeding your child, but only a mother can feel how painful it is to not experience that beautiful bond which the baby and mother develops during breastfeeding.
My child is 17.5 months old and he is exclusively on top feed since day 1. I don’t know what was the reason but I tried everything possible so that I can also produce milk for my baby. But destiny had different choices for my baby and he could not have his mother’s milk.
I ate each and everything which elders suggested, had many medicines, lactation powders, consulted so many gynacologists, lactation experts and what not. I cried so much initially and was really depressed but I just could not see my baby crying and not giving him top feed and trying to feed him mine ( when I know I was not able to produce any milk for him, it was just few drops which was obviously not enough to satisfy him)
Many docters advised me to try to latch only on me and not to give him bottle at all but I could not just see him crying so badly for milk.
I decided to give him formula feed only and used to pump like hours and give him few drops that I could collect in bottle to him in the whole day in between.
He used to had reflux problem very much and I was always into cleaning his vomittings and changing his clothes. But I didn’t give up.
Those initial 6 months were so painful and I was literally depressed when people used to judge and comment about it. Many people said your baby’s immunity will be very low, he will get ill very frequently, his digestive system will get hampered and bla bla but I decided to ignore all this and continued my journey with my baby. I will develop his immunity by making him eat healthy foods and will surely do all that I can to make him a healthy kid.
At the end I think it’s all about our body and nature. It is something natural and beyond our control.
I wish and pray no mother and baby should experience all this and each baby should get his mother’s feed ?
Disclaimer: The views, opinions and positions (including content in any form) expressed within this post are those of the author alone. The accuracy, completeness and validity of any statements made within this article are not guaranteed. We accept no liability for any errors, omissions or representations. The responsibility for intellectual property rights of this content rests with the author and any liability with regards to infringement of intellectual property rights remains with him/her. Read more
Suggested for you
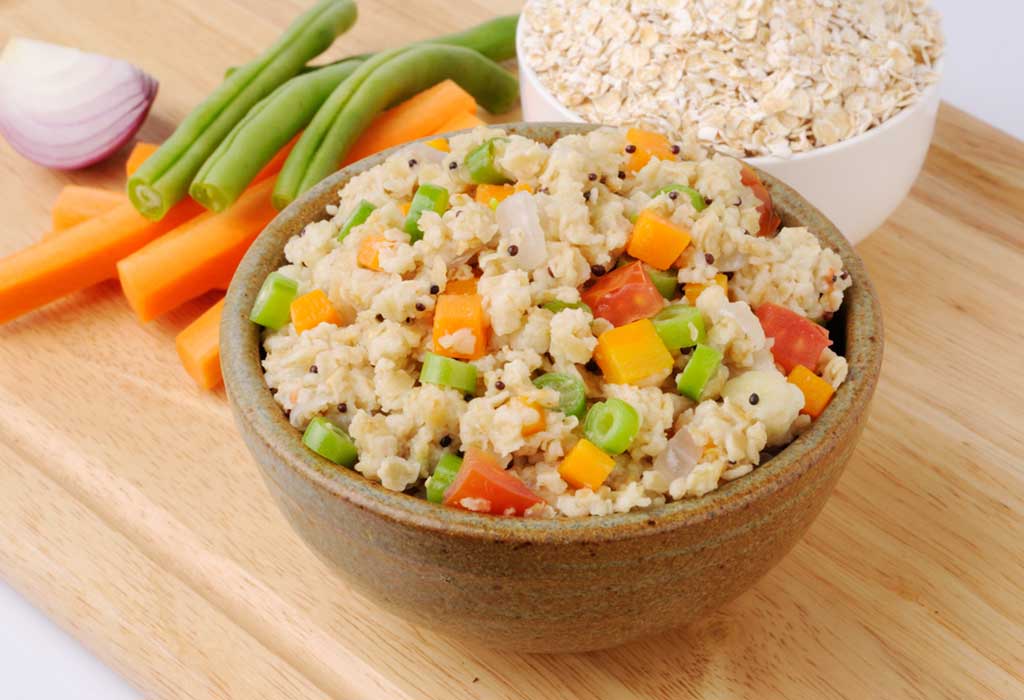
Simple and healthy oats recipe for 1 - 2 years old kids.
Ingredients:
Oil / desi ghee -1/2tsp
Mustard seed - 1/4 tsp
Ginger garlic paste - 1/4 tsp
Salt - As per your taste (Asp)
Red chilli powder - a pinch (Asp)
Turmeric powder - a pinch
Oats - 1/4 cup
Carrot shredded - 1 tbsp
Boneless chicken - small piece diced
Tomatoe - 1/2 (diced)
Corrainder leaves finely chopped - 1/2 tsp
Method:
1. Heat oil in a pan on medium flame.
2. Add mustard seeds ( you can also add cumin seeds or chopped onions alternatively) to the oil.
3. Add ginger garlic paste to it when the mustard seeds starts crackling (or till onions get translucent) .
4. Add diced chicken and stir fry for about 2 - 3 minutes.
5. Add grated carrots and diced tomatoes to the pan.
6. Keep stirring continuously, so that it does not stick to the pan and get burned.
7. Then add oats to it and mix thoroughly.
8. Add salt, turmeric and red chilli powder ( you can also substitute it to black pepper powder, adding these spices in very little amount develops taste in kids) to it and add a cup of water, then cover n cook on low flame for about 7 - 8 minutes.
9. Check if the chicken is nice and tender, then add Corrainder leaves to it.
And baby's healthy food is ready!
Note:
You can also grind this in to a fine paste after it cools down a bit, if ur child does not like to get chunks in his bite :).
And also keep the consistency of the oats depending upon your child. Many other vegetables can also be added to keep variation. Because kids usually get bored with same repeated taste. Diced Potatoes, finely sliced cabbage, spinach leaves can also be added to it and in this recipe oats can also be replace by coursly grinded rice. Read more
Suggested for you
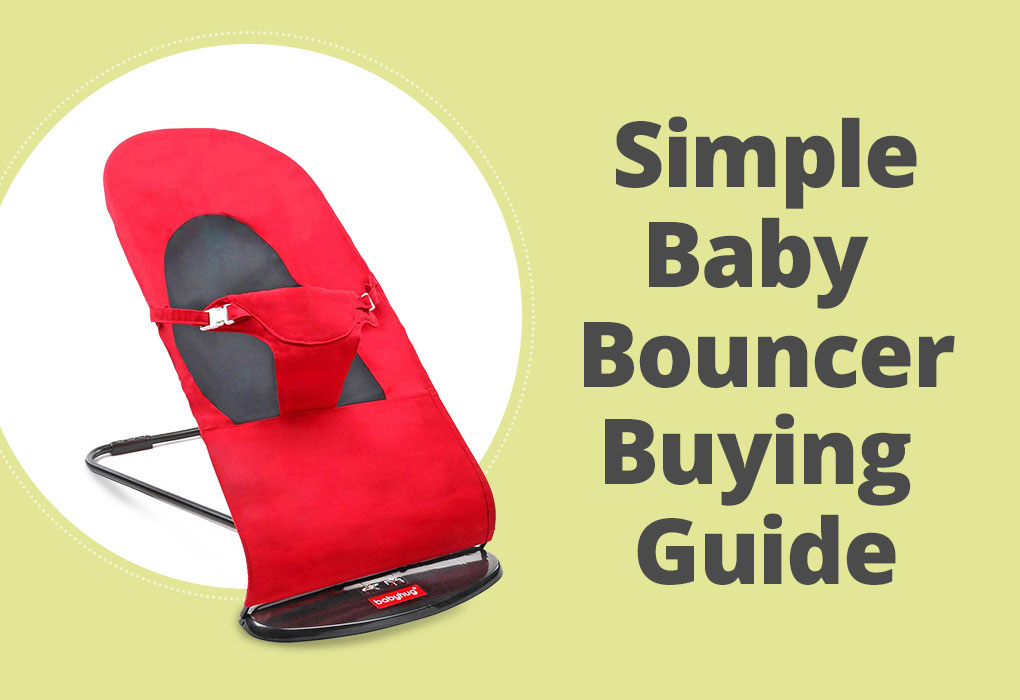
The Complete Baby Bouncer Buying Guide
Overview
Nothing beats holding your baby in your arms. But as a new mother, you need some 'me'-time to get back to your prime physical and emotional state. A baby bouncer is the perfect answer to the times when you want to have your hands for yourself � to put up your feet and catch up on your reading, or to whip up a nutritious meal for yourself and your family, or to attack those pending emails and tasks from work. Baby bouncers are comfy and entertaining accessories for your baby and you. They ease the stress of early motherhood by being the 'mother's arms' for her child when she needs her arms for herself.
What is a Baby Bouncer?
A Baby bouncer, in simple words, is a soft, comfortable bassinet fixed over a metal frame, which bounces with the movement of your baby.
Baby Bouncer - A safe, comfort zone for your bundle of joy
Baby bouncers are useful baby products for babies in their early stages of development, providing them with a safe and secure environment in both your presence and absence. It is a place where babies find comfort in the padded seat with a sturdy frame, allowing them to recline at ease in a comfortable position. The design of a baby bouncer comfortably provides full support to the baby's entire body. When the baby kicks, the seat responds with a springy up-and-down motion. This not only satisfies the baby's desire for movement, but also helps the baby develop the muscles necessary for crawling.
Some baby bouncers come with added features that help in soothing and entertaining your baby. The battery-operated music boxes play happy or peaceful tunes to calm your baby into a restful state. The vibration feature helps relax your baby when in a fussy mood. You can even hang soft toys within your baby's arm's reach. Some bouncers have dancing lights that flash according to your baby's movements in the bouncer.
When to Start and Stop Using a Baby Bouncer?
Baby bouncers indeed make your life a lot easier by holding and entertaining the apple of your eye while you complete your daily chores. However, over-use of any gadget can spell harm to the baby, and you certainly do not want that to happen. There are various factors you need to consider to determine whether it is ok to use a bouncer for your baby or not.
Weight
Every baby bouncer comes with a manufacturer's guidelines specifying the exact weight capacity of the bouncer. Most manufacturers specify an upper weight limit of 9 to 11 kg. (A heavier child may tip off the seat.) Some seats do accommodate toddlers and bigger kids, with weight limits ranging from 5 to 8 kg. One must refer to these specifications at the time of purchase.
Age
The ideal age of using a baby bouncer, specified on the bouncer seat guide, ranges from 0 � 7 months. However, the use of the baby bouncer is subject to change depending on factors other than age, i.e. baby's weight and development.
Growth and Development
Every baby reaches developmental milestones at different ages - some might learn to sit up unassisted by the age of 5 months while others might accomplish the same at 7 months of age. Look out for signs of development in your baby. If you baby is attempting to climb out of the seat, or has learned to sit up unassisted, it is time to stop using the bouncer seat, irrespective of your child's chronological age.
With Preemies
Premature babies require greater neck, back and tummy support than normal babies. Also, being smaller in size than normal newborns, preemies will not be the right fit for a bouncer. Therefore, it is best to avoid using bouncers for premature babies. If you feel that your baby is healthy enough to enjoy a bouncer, please consult your paediatrician before starting to use the bouncer for your baby.
Don't Make it a Habit
It becomes very tempting for mothers to keep their babies in the bouncer for longer periods of time as they get to use both hands and get a lot of work done then. However, letting your baby spend too much time in the bouncer might not be a great idea. Babies remain in a reclined position in a bouncer at all times, and this prevents them from indulging in other playful activities necessary for their growth and development.
Reclining Seat
You should place your newborn in the bouncer only when it is in a full reclining position. This is the safest position for your baby. A semi-reclined position might press on the chest and block your baby's airflow.
Features and Characteristics of a Baby Bouncer
Features of a Baby Bouncer
Baby Bouncer
Having a detailed knowledge of the major features of a baby bouncer will help you make an informed buying decision. With that aim in mind, we have listed below some of the important features provided by the various baby bouncer manufacturers.
Frame
A basic bouncer seat consists of a lightweight frame made of metal wire, tubular metal or heavy-gauge plastic. Covered with a soft, removable, washable pad that conforms to a baby's shape, bouncer seats are springy and bounce or rock when your baby moves. The frame also adds to the sturdiness of the bouncer.
Safety Harness
The second most important feature in a baby bouncer is the safety harness. Bouncers come with three-point or five-point harnesses. Most baby bouncers have a soft three-point safety belt that goes around babies' waist and in-between their legs. This keeps them from falling or slipping out of the seat.
Reclining Seat
Bouncers offer you three different reclining positions to choose from. You can quickly transit your baby's playtime to sleeping time by changing the bouncer's reclining position - all you have to do is adjust the bouncer's upright position to a reclined one. However, be sure to transfer your baby to a crib or bassinet after the baby falls asleep.
Head and Neck Support
Head and neck support is of utmost importance for newborns. Until the age or 3-4 months, babies cannot hold their heads up. Their skull bones are soft and fragile. A head rest attached to the bouncer seat supports baby's delicate head and neck. It also helps to avoid any head injuries by cushioning the hard frame of the bouncer.
Padded Seat
Seat padding can vary from basic to extra thick to comfortably thin. A nicely padded baby bouncer will be very comfortable for your little one.
Removable and Washable Seat Cover
Many types of baby bouncers come with removable seat covers suitable for machine washing. This is an important feature, as the bouncer is guaranteed to get dirty. Easy to wash feature maintains the cleanliness of your baby bouncer.
Toy Bar
Simply lying down in a bouncer will bore any baby. Most bouncers come with an attachable toy bar. When attached within reach of your baby's arms, it will entertain your baby and provide sensory stimulation. Toy bars allow you to add toys like soft plush animals, teethers and squeaking toys, and only begin to amuse babies once they have crossed the age of 4 months.
Canopy
Sometimes, when you take your baby outdoors to the park, etc., the rays of the sun could prove to be hazardous to the baby's skin and delicate eyes. Canopies provide the necessary shade to babies while they are still comfortably seated in their bouncers.
Music and Vibration Unit
Most bouncers come with an inbuilt music, vibration unit, which when turned on adds gentle vibrations to the bouncer seat, helping to pacify and relax the baby. The bouncer plays happy or peaceful sounds to lull your child into a restful state.
Characteristics of a Baby Bouncer
Bounciness
Bouncers, well, have to bounce, don't they? The bouncing movement can be provided in two different ways – naturally or through a battery operated mechanism. Natural bouncing helps strengthen the motor skills of babies. Their movement bounces the chair, causing them to have lots of fun. However, if your baby is extremely active and loves extra fun, you can choose the battery-operated alternative that will increase the fun quotient. For younger babies, gently help them bounce using your hand and feet.
Fabric
The fabric used on the bouncer seat comes in direct contact with your baby’s delicate skin, and needs to be soft, non-slippery, smooth and comfortable. It also needs to be free from health-hazardous substances and allergens. The most preferred material would be soft cotton. Such a fabric is gentle on the skin and safe to chew or suck on, making it a perfect material for little babies to relax and play in.
Body Support
The bouncers are designed to provide comfort to your baby, by ensuring proper head and back support. Headrests prevent your baby's head from flopping around when trying to wriggle.The fitted, padded fabric of the seat moulds itself to your baby's weight and size, ensuring that your baby is comfortable and protected.
Grippers
Grippers provide a firm grip on the surface and keep the bouncer stable when vibrating mode is on.
Portability
Bouncers are compact and easy to carry along with your luggage. Their size and simple design make them ideal for storage and transport. If you are going to be waiting at the airport or relaxing on a vacation, your baby can enjoy too, on the bouncer.
Multi-Utility
An advantage of bouncers is that they can be used as bouncers as well as chairs. Once your baby has outgrown the bouncer's age or weight limits and can sit upright unattended, you can turn the fabric around and use the bouncer as a chair.
Comfort
A soft, comfortable fabric used in a bouncer provides maximum comfort to babies. They experience the freedom to bounce, swing and enjoy the world outside your arms while still being ensconced in the soft luxury of the fabric. Leading baby bouncer manufacturers ensure that the fabric is eco-friendly and made of non-hazardous material, so it is even ok if your baby ends up inadvertently teething it.
MP3 Player/iPhone/iPod Hook Up
MP3 player/iPhone/iPod hook up are of great help to listen to soothing music, sounds of your baby's choice while you take a relaxing shower.
Compact Fold
It should be easy to pack up and store when not required.
Motion, Speed, Sound and Light Control Unit
The bouncer which allows swing motion offers a control panel which allows motion, speed, sound and light settings in accordance to your baby's preference.
Trendy
Baby bouncer seats come in a variety of sizes, colours, themes, etc. Some even offer changeable seat covers and matching toy bars. These little angels are probably going to be tomorrow's fashionistas, so why fence away from trends and colours? Let them be today's trendsetter too.
As the competition in the market is increasing, manufacturers are coming up with new never-thought-before features for their bouncers, trying to make their product stand out from the rest.
Pros and Cons of a Baby Bouncer
Baby bouncers are fast becoming one of the staples in the baby development arsenal of new parents. Here are the pros & cons of a baby bouncer to help you choose the right one for your bundle of joy.
Pros
Cons
Vibration unit: Many bouncers come with an inbuilt vibration mechanism with adjustable speed. The calming vibrations can effectively soothe crying and fussy babies and lull them to sleep.
Weight restrictions: Baby bouncers can be used only for a very specific weight range (up to 12kgs).They cannot be used for premature babies, who are below the weight limit. It can prove hazardous to them.
Music box: Baby bouncers come with additional features like a built-in music box or soft plush animals hanging from a play bar that babies can easily grab and play with. These keep the babies engaged in other developmental activities, when in bouncers.
Age restrictions: Bouncers can be used only till the baby is about 6 to 7 months old.
Portable: Unlike cribs and elaborate swings, most baby bouncers are portable. They allow new parents to get out of their homes and spend time outdoors without worrying about engaging their babies.
Preference over cribs or beds to sleep in: Babies tend to stay in their bouncers for as long as possible and even like to sleep in them. This can be a hindrance for crib training. You can resolve this by restricting your baby's bouncer time and encouraging intermittent usage of the crib.
Fabric: All recognized brands of baby bouncers undergo a quality check by JPMA (Juvenile Products Manufacturers Association) and adhere to the usage of skin friendly fabrics and materials. This ensures that a baby doesn't get a rash or skin problem by staying in the bouncer for a long time.
Wide base placement hazard: A baby bouncer is considered to have a good design and balance if it has a wide enough base to absorb jerky motion. However, this wide base can become a placement hazard, so be careful about placing the baby bouncer around the house.
Ergonomic design: Baby bouncers are designed to better suit the delicate, growing spines of babies. So your baby can lie in the bouncer comfortably, without experiencing any discomfort or ill effects at a later stage.
Reference:- 1-http://jpma.org/
What to Look for in a Baby Bouncer?
There are many variants of baby bouncers available in the market for varied price ranges. Even the most basic ones are approved by JPMA or similar governing authorities before being sold for retail. The more advanced ones are designed with paediatric help and undergo numerous quality checks to ensure the development of best possible products. You must, therefore, clearly know what to look for in a baby bouncer and how to look for it.
So here is mentioning those critical features you should keep an eye out for:
Safety Features
Baby bouncers come with safety belts (and water hooks if you intend to use them in a paddling pool) to ensure that the baby isn't hurt due to any erratic movement. Parents must check the tensile strength and ruggedness of the safety features at the time of buying a baby bouncer.
Weight Capacity
Since the calming mechanism of a baby bouncer involves bouncing and vibrating, most baby bouncers come with a weight restriction. If the baby is below the specified weight limit, the vibrations can be uncomfortable or topple the baby. If the baby is above the specified weight limit, then the baby bouncer may not work properly. Thus, parents must check the weight restriction for a baby bouncer, determine the usage term of the bouncer and then decide how much to invest in it accordingly.
Body and Base Design
The body of a bouncer must be pliant and designed in such a way that the delicate frame and developing spinal cord of the baby is sufficiently supported. A wide base is also essential to ensure that the contraption remains balanced while the baby is in it. Thus, parents must check for these features while selecting a baby bouncer.
Quality Textile and Materials
As a baby spends a good amount of time in the baby bouncer, it is quite important to have a bouncer with good quality textile and materials, which are baby skin-friendly. Many baby bouncers even ensure that the surface material is chewable and doesn't cause any rash or skin problem for babies. A bouncer can get messy in no time, and the fabric must therefore be easy to clean. Check to see if the seat cover can be removed easily for cleaning, and whether or not it is machine washable.
Portability
Little babies get used to a particular routine, schedule and space much more quickly than you think they do. If they do fall in love with the comfort of their new bouncer, they will probably want to be in it all the time. Thus, it should be lightweight and easy to move around with. Check to see if the bouncer can be folded or easily taken apart for storage or travel. If you are planning a family, you might want to dismantle and store it away until your next sweetheart arrives into this world.
Interactive Features
Baby bouncers come with additional interactive features such as felt toys and music boxes, which can keep a baby engaged on a bouncer for long intervals of time. Parents must consider these carefully before selecting a baby bouncer.
Price
Lastly, a baby can only use the bouncer in the initial developmental months. Parents must keep this in mind, consider the competitive prices offered in the market and select a baby bouncer that doesn't burn a hole in their pocket yet serves their purpose sufficiently.
Types of Baby Bouncers
Bouncers can fulfil your newborn baby’s need for constant movement. Their gentle motion calms babies and lulls them to sleep, making your life easier.
While there are a number of brands available in the market, they can all be categorized into three broad categories:
1. Simple Baby Bouncers
Simple baby bouncers have a simple design that helps babies have fun while also letting them get some physical action by moving their arms and legs.
2. Battery-operated or Vibrating Baby Bouncers
In contrast to simple baby bouncers that have only a limited range of movement, battery-operated bouncers offer a lot more options. These are quite similar to the simple, non-powered bouncers, with the difference that they produce a vibrating motion with a battery-operated motor. These are an excellent choice if your baby enjoys constant motion.
3. Combination Baby Bouncers
Combination bouncers, as the name suggests, are bouncers combined with another baby device.
There are two types of combination bouncers:
Bouncer Rockers
Bouncer rockers are a combination of bouncers and rockers. These bouncers can be easily converted into rockers, by providing a variation in the type of movement offered to the baby. Basically, the movement pattern of a bouncer is low in intensity - perfect for infants. But as infants grow, they require a more intense movement and therein comes the need for a rocker. Bouncer rockers can thus be used right from the early days of your baby’s life until toddler-hood.
Bouncer Swings
Bouncer swings are a combination of bouncers and swings. Such bouncers have a detachable bouncer seat. So when children learn to sit by themselves, the bouncer seat can be placed into a swing frame, thereby converting it into a swing.
Dos and Don'ts
Baby bouncers are a must buy for all parents. However, it is important for you to consider its usability, comfort and convenience, and the cost associated with it, before making an informed buying decision.
While Buying a Bouncer
Dos
Think well about how you would be using the bouncer before deciding on which type of bouncer to buy. If you want to be completely hands-free while still keeping your baby engaged, then go for a battery-operated model.
Study brand reviews and look at the major features of all the models. Most big brands offer plenty of attractive features like, a toy tray along with toys in multiple colours, selection of fabric for bouncer seat, durability, etc.
Make sure that the bouncer you are planning to buy has passed the safety standards of organizations like JPMA.
Look out for sharp edges, frayed ends or loose fittings.
Buy combination bouncers according to your baby's preference. If your baby does not like to swing, go for a bouncer rocker instead.
If buying offline, take your baby along and try a bouncer model by placing the baby in it. If buying online, be sure to buy from trusted websites that are capable of providing you with all the necessary information and are also capable of recommending a good model suited to your needs.
Don'ts
Don't buy a bouncer model if your baby is already over or nearing the upper weight limit specified for the model. Before buying one, check that the age and weight limits specified are appropriate for your needs for your child.
Don't buy bouncers without asking for a demonstration. Check out the music volume levels and ensure that it isn't too loud or brash, as it could end up irritating babies instead of soothing them. Similarly, check for other functions like speed, different motions, etc.
While Using a Bouncer
Dos
Use baby bouncers only up to six or seven months or until your baby begins to sit independently.
Make sure that the fittings have been made properly and that there are no sharp edges left unnoticed while assembling the baby bouncer.
Make sure the fabric is dry and clean.
Wrap your baby properly and make sure that your baby is not placed inside the bouncer without a diaper.
Make sure to always keep the bouncer within your reach.
When placing the baby bouncer on the floor, make sure that it is kept away from hazardous things like cables, cords, heaters, sharp things, etc. Place your baby in the bouncer only after you are sure that you have completely understood and followed the manufacturer's instructions.
Don'ts
Don't use bouncers for babies weighing above 11 kg or above the specified weight limit of a bouncer.
Don't place the baby bouncer with your baby inside, on an elevated surface like tabletop or soft surfaces like bed, sofa or couch. The bouncing movement could slide the bouncer to the edge and lead to a fall.
While shifting bouncer chairs along with baby from one place to another, don't carry it by frame or the toy bar. These features are almost brittle and aren't supposed to be used as handles.
Avoid leaving your baby in the bouncer for long periods of time and give the baby some floor time, in your supervision. Experts recommend mandatory time for natural movements such as crawling, tummy time, etc. for the growth of your baby's limbs and other organs.
FAQs
1. My Child Sleeps Better in The Bouncer Than on The Bed. Is it Safe to Let Her Sleep in The Bouncer?
Most baby bouncers are designed to provide babies with a soothing and comforting ambiance. The bouncing motions and vibrations, along with soft music, are most conducive to a happy baby sleep. However, bouncers are not designed for a long period usage. Hence, it is not recommended to let your baby sleep in the bouncer. What you can do, is transfer the baby to a bed or crib once she sleeps.
2. I am Worried If There Will Be Any Issues Related to Spinal Alignment if My Baby Sits in a Baby Bouncer.
There has been no strong proof of spinal alignment associated with baby bouncer usage. However, letting your baby remain in bouncers for long periods can hamper the spine development13. Hence, use the bouncer only for short periods of time, under your supervision, and your baby should be just fine.
3. Can I Use Bouncers for Both My Kids?
Most bouncers can only be used for kids who cannot yet sit independently, so you might want to check the bouncer's weight limit before letting both your kids use them. In any case, a bouncer can, and should, hold only one kid at a time. However, using a bouncer for one child in combination with a baby carrier or stroller for another can help you easily manage both your kids simultaneously, without getting too harrowed.
4. Is It Ok If I Use The Bouncer for My Two Months Old Baby?
Bouncer can be used for baby right from birth. However, if your child is a preemie, you might want to consult your paediatrician before determining whether the bouncer is suitable for your baby.
5. My Baby is So Attached to her Bouncer That She is Reluctant to Play on The Floor. What Do I Do?
Bouncer or not, floor time is highly important for babies. Most bouncers are compact, foldable and lightweight. So try distracting the baby with a toy or book while putting away the bouncer for some time to give the baby adequate floor time. You can always set up the bouncer back quickly when you need to attend to something else and require the baby to be safe while you are distracted.
6. My Daughter is Colicky. Can a Bouncer Help Her Feel More Comfortable?
The vibrations/ movements of a bouncer are a godsend for colicky babies. Placing them on a bouncer works more effectively than comforting them by holding them in the arms or putting them down on their tummy.
7. Is It Safe to Feed My Four-month-old on a Bouncer?
Bouncer seats are not designed for feeding. Babies can choke or get injured by the feeding utensil. This is unavoidable on any moving baby seat, including swings. You are supposed to hold baby when feeding using a bottle, and for solids, you are supposed to use high chairs or convertible baby boosters/feeding chairs to prevent injury to your baby.
Reference:-
12-//www.healthlinkbc.ca/healthfiles/hfile107.stm
13-http://blog.intellidance.ca/blog/2-15-2011/c-s-how-nurture-your-babys-spine-development
Read more
Rayan has added a new answer
Guardian of 0 children
2 hours ago
Q. #asktheexpert
good morning Ma'am..
My son is 4 months old. He gets stomach pain/ gas everyday at any time.. He cries for long when he gets pain.. I am giving him Colic aid everyday from last one month.. Only after giving colic aid he stops crying... what should I do to avoid his pain and medicine??
Read more
Rayan
Mom of 2 children
1 hour ago
A. Hello mam! If it is due to colic pain /gas, it is common in newborns. Make sure that you burp your baby after every feed. Don't feed just before your baby is to sleep. Make a routine like feed, play and sleep. Burp inbetween feedings. Colic pain will stop automatically at 5 or 6 months. So don't worry. Happy parenting!
Dr Sameer awadhiya has added a new answer
Guardian of 0 children
1 hour ago
Q. #asktheexpert
baby having nose block.. sleeping problem
what should I do?

Dr Sameer awadhiya
Paediatrician
1 hour ago
A. nasal blockage can be relieved by using nasal saline drops like nasoclear saline drops in thecg nose followed by nasal aspirator to take out the secretions very ghently
steam inhalation can also be helpful in this condition
Nikitha has added a new answer
Expecting Mom due in 2 months
59 mins ago
Q. At what month does the baby go from breech position to cephalic position?
Nikitha
Mom of a 9 yr 5 m old boy
37 mins ago
A. hello nearing your delivery it will happen.any concern then it would be better to check with your doctor and she will be able to guide you better on examination of the same and advise you accordingly which would be better and also safe
Dr Vandan H Kumar has added a new answer
Guardian of 0 children
58 mins ago
Q. @ the time of birth baby weight 2.475kg but after completed 6weeks baby weight approx 3kg, why baby weight gain very slow, till breast-feeding milk and urinate 6-7 times and potty 2-3 times. can u please suggest why slow in progress in weight gain???
Read more
Dr Vandan H Kumar
Paediatrician
56 mins ago
A. the average birth weight of neonates is about 3 kg.
during the first few days after birth, the newborn loses
extracellular fluid equivalent to about 10% of the body
weight.
most infants regain their birth weight by the age of 10 days. subsequently, they gain weight at a rate of
approximately 25 to 30 g per day for the first 3 months of life.
thereafter they gain about 400 g weight every month,
for the remaining part of the first year. x
an infant usually doubles his birth weight (taken as 3 kg) by the age of 5 months. the birth weight triples at 1 year and is four times at 2 years of age.
the weight of ca child at the age of three years is usually
five times that of the birth weight.
Manisha Singh has added a new answer
Trying To Conceive
52 mins ago
Q. #asktheexpert mera baby 3 month ka h use gas bhuat banti h is karan wo bhuat rota hai

Manisha Singh
Expecting Mom due in 1 month
22 mins ago
A. it's very common for babies having gas problem ...you should recommend your doctor for this
Sai Prasanthi R L has added a new answer
Trying To Conceive
50 mins ago
Q. Hi
what to give 6 months old baby to eat

Sai Prasanthi R L
Mom of a 10 yr 2 m old boy
27 mins ago
A. Hello dear! Once your baby completes 6 months you can start giving small quantities of semi solids like homemade cerelac, mashed bananas, apple puree, ragi and so on. Continue with breastfeeding. Keep Babyhug tummy roll on handy
Check out this new Memory

Pranjali
Mom of a 5 m old boy
2 mins ago
#babyofsummer24

Like
Comment
Share
0 Likes
0 Comment
Check out this new Memory

Sarangaa
Mom of a 3 m old girl
2 mins ago
#cutestbaby

Like
Comment
Share
0 Likes
0 Comment
Check out this new Memory

Simita
Guardian of a 2 m old girl
3 mins ago
My 2 month old daughter

Like
Comment
Share
0 Likes
0 Comment
Check out this new Memory

Priyanka jamdade
Mom of a 8 m old girl
4 mins ago
#cutestbaby

Like
Comment
Share
0 Likes
0 Comment
Check out this new Memory

Payal
Mom of a 9 m old girl
4 mins ago

Like
Comment
Share
0 Likes
0 Comment
Tell us more about yourself get More Personalised
 Infant0 to 6 Months
 Baby6 Months to 2 Yrs
 Toddler2 to 4 yrs
 Kids4-6 yrs
 Big Kids6+ yrs
 Expecting
 Trying to Conceive

