

.svg)
.svg)
.png)

Enter Child Details

Add Profile Photo


Videos you might be interested in


Videos you might be interested in
Videos you might be interested in
Suggested for you

How to Remove Underarm Hair - Easy Tricks and Home Remedies
Summers are here, and it is time to wear our sleeveless, short and breezy summer dresses! With it, however, comes the buggery of keeping the body sans the annoying body hair, including your underarms. Well, hair removal on other parts of the body still does not cause as much treachery as the underarm hair as it is one of the most delicate areas of our body. However, in this post, we shall be talking about some easy tricks and home remedies that can ease your underarm hair removal woes. Read this post to learn more!
Simple Ways to Remove Underarms Hair
Here are some simple ways of removing underarms hair:
1. Using an Epilator
One of the easiest and most convenient options for getting rid of unwanted underarm hair is using an epilator.
What You Will Need
Epilator
Any moisturizing gel
What to Do
Take a warm water bath to soften the skin. This makes hair removal less painful and easier.
Raise and stretch your arm and keeping the epilator at 45 degrees, start removing the hair by keeping the epilator settings on the lowest mode.
Move the epilator in all directions of the hair growth to remove hair.
Apply the gel to soothe the skin.
Pros
Gentler than waxing
Efficient and fast
Hair does not grow back soon
Cons
It may result in ingrown hair
It is painful
2. Waxing Underarm Hair
Underarm hair wax is one of the most widely used options of removing underarm hair.
What You Will Need
Wax
Wax Strips
Talcum powder
Wooden spatula
Moisturizer
Towel
What to Do
Wash the underarm area with warm water and mild soap to soften the skin.
Wipe and apply powder.
Heat wax in the microwave or wax heater.
Raise the arm and stretch the skin.
Using the wooden spatula spread the wax in the direction of hair growth.
Keep the wax strip and press it firmly on the wax.
Remove the strip against the direction of the hair with one quick motion.
Repeat until all hair is removed.
Clean the underarm with water to remove the traces of wax and moisturise the skin.
Pros
Hair takes longer to grow again
Gives a smooth texture to the skin
Helps in exfoliating the skin
Cons
May lead to ingrown hair
It is painful
3. Using a Razor
If you are looking for painless ways of trimming underarm hair, well, a razor is a great option for you!
What You Will Need
Razor
Body wash/shaving cream
Body lotion
What to Do
While in the shower, use a body wash to lather around your underarm area.
Shave the underarm area in the direction of the hair growth by raising your arm. If you do not have very sensitive skin, you can shave in the opposite direction of the hair growth for a close shave.
Rinse with water, pat dry and apply moisturiser to soothe the skin.
Pros
Does not cause any pain
Helps in exfoliating the skin
A faster way to remove hair
Cons
May darken the underarm skin
May cause ingrown hair
Hair grows back within a few days
4. Using Depilatory Creams
There are many hair removal creams that are available in the market that can help in removing unwanted underarm hair. However, a patch test is recommended if you have sensitive skin.
What You Will Need
Depilatory cream
What to Do
Using a mild soap or body wash clean your underarm area and pat dry.
Apply the cream and leave for the stipulated time.
Clear off the cream using the depilatory spatula.
Wash the area with cold water and pat dry.
Apply lotion to moisturise the skin.
Pros
No pain
Not messy
Hair removal in a few minutes
Cons
Such creams are usually very smelly
May darken the skin
May cause ingrown hair
5. Using Tweezers
If you do not have dense hair growth in your underarm region, you can opt for plucking the underarm hair too.
What You Will Need
A good pair of tweezers
Aftershave lotion
Towel
What to Do
Get into the shower and take a bath with warm water. This helps in aiding hair removal by softening the skin.
Rub the underarms with a towel to exfoliate the region.
By lifting and stretching your arm upwards, start tweezing the hair in the direction of the hair growth.
Apply aftershave lotion as you finish.
Pros
Better than waxing as it causes lesser pain
Hair takes longer to grow back
Cons
May cause ingrown hair
Takes long to remove hair
Causes pain
Natural Remedies for Underarms Hair Removal
Apart from the above-mentioned ways, there are some natural remedies that you can opt for underarm hair removal. If you are looking for ways on how to remove underarm hair naturally, well, here are some tried and tested remedies that you can try:
1. Honey and Lemon
This combo works effectively in getting rid of underarm hair! The moisturising properties of honey and the lightening properties of lemon also benefit the underarm skin too. This may work as a great permanent armpit hair removal home remedy if used on a regular basis.
What You Will Need
1 teaspoon lemon juice
3 tablespoon honey
A towel
What to Do
Take both the ingredients in a bowl and mix well.
Wash the underarm skin with a mild soap and water. Pat dry.
Using your fingertips, take the mixture and apply liberally on your underarm region and leave it on for 15 to 20 minutes.
Take the towel, soak in warm water and use the warm towel to wipe off the mixture from the skin.
You can do this 2-3 times a week.
You can leave the mixture overnight and wash it in the morning.
Pros
Good for the skin
Hair density decreases with regular usage
Cons
It only thins out hair
May not result in complete hair removal
It does not show results at once
2. Turmeric Paste
If you want to know how to get rid of underarm hair in a natural way, try using turmeric paste for the same.
What You Will Need
4 to 5 tablespoons turmeric powder
3 to 4 tablespoon rosewater or milk
A soft washcloth
What to Do
Take turmeric powder; add rosewater in it to make a paste of a smooth consistency. Add more rosewater if required.
Take a warm water bath or wash your armpits with warm water and soap. Pat dry.
Using the tips of your fingers apply the turmeric paste on your armpits and let it sit on the skin for half an hour.
Soak the washcloth in warm water, squeeze extra water. Wipe the underarm area with the cloth. You can wash your underarms if you wish.
You can use this remedy every day or on alternate days.
Apply the paste at night and wash it in the morning for best results.
Pros
Gentle on the skin
Reduces the density of the hair growth
Cons
It only thins out the hair
It does not cause complete hair removal
It is time-consuming
It does not show immediate results
3. Turmeric and Papaya
This mixture is great for removing hair in an all-natural way and without causing any pain for discomfort.
What You Will Need
3 to 4 tablespoons raw papaya
1 to 2 tablespoon turmeric powder
A towel
What to Do
Take grated raw papaya in a bowl, add turmeric powder it and mix well.
Apply the mixture on your armpit skin and massage the mixture on the skin using small circular motions.
Leave the mixture on the skin for 15 to 20 minutes.
Soak the towel in warm water; ring the towel to expel extra water.
Use the towel to scrape off the mixture from the skin.
Do this every day for the best results or you can do it on alternate days too.
Make sure to use raw papaya and not a ripe one because raw papaya helps in breaking down the hair follicles, thus preventing the hair from growing back.
Pros
Causes no pain
Gentle on the skin
Cons
Does not work effectively in removing the hair
It only reduces the density of the hair
4. Cornstarch and Egg White
Here is an easy and no-fuss remedy for removing armpit hair.
What You Will Need
½ tablespoon cornstarch
One egg
1 tablespoon sugar
What To Do
Break the egg in a bowl, separate the yolk from the white and discard.
Add cornstarch and mix well to make a smooth paste.
Add sugar and mix until it dissolves completely.
Wash the armpit skin with warm water and pat dry.
Apply the egg mixture in the direction of the hair growth.
Once the mixture dries up, peel it off in the opposite direction of the hair growth.
Follow this procedure once or twice a week for reducing hair growth.
Do not add egg yolk as it may affect the efficacy of the remedy.
Pros
Nourishes the underarm skin by gently exfoliating it
Thins the hair growth
Cons
Leads to partial hair removal
The remedy smells bad
These are some easy ways of removing underarm hair at home. We hope you will make use of some of the ways to get rid of the unwanted hair and flaunt your beautiful sleeveless dresses!
Also Read:
Natural Remedies for Dark Underarms
Home Remedies for Unwanted Facial Hair
Laser Hair Removal: Is It Worth The Hype? Read more
Suggested for you
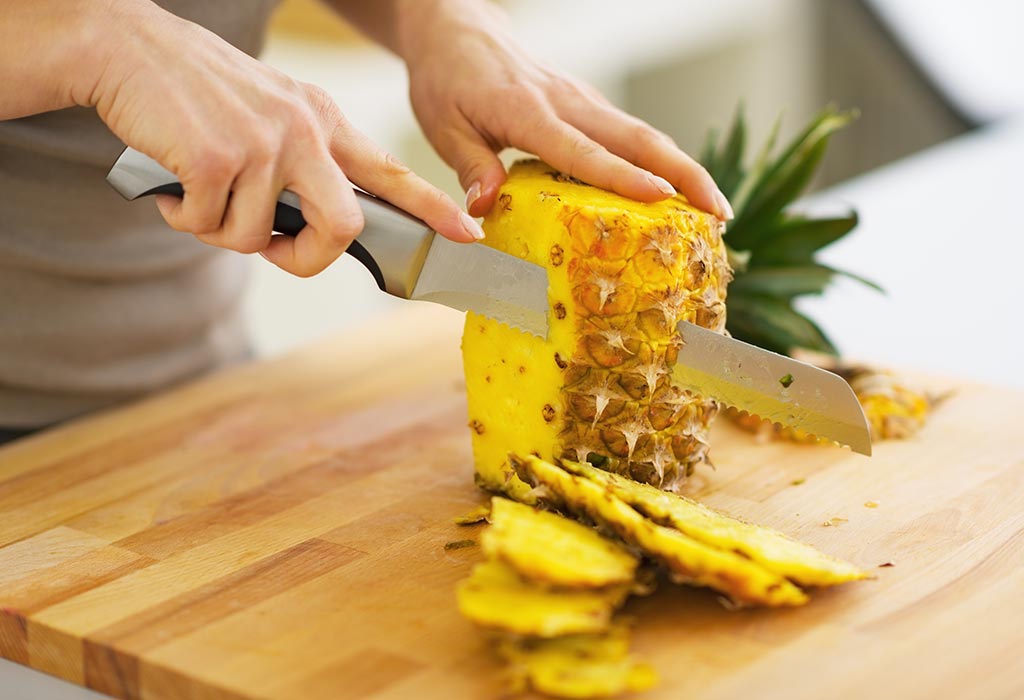
Is Eating Pineapple during Breastfeeding Safe?
Most women are aware that eating fruits during pregnancy and while breastfeeding their baby is quite important, as fruits are extremely nutritious and babies also get the taste of a variety of nutritive elements that support their growth. Including pineapple in a pregnant woman's diet is recommended, especially in the last stage of pregnancy, as it is known to induce labour. However, when it comes to consuming this fruit while nursing, it cannot be surely stated that it is safe for a baby. Since what you eat and drink is ultimately used to form the milk in your body, it indirectly will be consumed by the baby. Therefore, being informed about the safety of eating pineapple is of utmost importance.
Can a Breastfeeding Mom Eat Pineapple?
A mother who is breastfeeding can make pineapples a part of her diet, but only after she has been breastfeeding her baby for about 5-6 months. There are various studies that strongly indicate that a higher presence of citric fruits in the diet of a woman can be harmful to the baby’s body. This also tends to include pineapple, since it has a pretty strong flavour and an acidic content, which could be quite strong for the baby.
Nutritional Value of Pineapples
Pineapples are a pretty important fruit for breastfeeding moms since they are immensely rich in numerous vitamins and a few elements that are very specifically found only in itself. A simple cup full of pineapple chunks contains a nutritional distribution as follows.
Element
Percentage of daily value required
Pantothenic acid
7%
Folate
7%
Fibre
8%
Vitamin B1
11%
Vitamin B6
11%
Copper
20%
Manganese
67%
Vitamin C
105%
Source: http://www.whfoods.com/genpage.php?tname=foodspice&dbid=34
Benefits of Eating Pineapple for Nursing Moms
While the evidence of pineapple juice increasing breast milk in a lactating woman might not be conclusively proved, there are many other benefits of consuming this fruit for a mother and her baby.
The presence of various substances in pineapple that contain antiemetic and diuretic properties are quite useful for new mothers.
Regular consumption of pineapples is also known to bring about a substantial reduction in the pain experienced in joints and various muscles of the body.
If a mother has an infection of any sort and is not healing, the recovery period can be accelerated by eating pineapples.
The content of fibre and numerous elements help in stimulating the digestive process and treating various disorders of the stomach, as well as constipation, consequently reducing haemorrhoids.
Since consuming pineapples helps in controlling hypertension by diluting the volume of blood as well as removing any blood clots, the health of the cardiological system is improved and the heart remains in an optimal condition.
Any bouts of an extreme headache, dizziness or sleeplessness are highly reduced when including pineapples in your diet.
When and How to Introduce Pineapple to a Breastfeeding Mom's Diet
Before you eat pineapples in the breastfeeding stage, it is essential to get a confirmation from your doctor. Usually, mothers are recommended to wait for their baby to be at least 5-6 months old before consuming pineapples. This is because the immunity system of the baby is still developing early on, and the probiotic organisms are in a vulnerable stage of growth. The introduction of the strong elements of the fruit to the child could cause an allergy or even indigestion, ruining the thriving nature of those bacteria.
Hence, it is best to eat a small portion of a pineapple in the form a pulp in beginning. Once the baby shows no adverse reactions to your milk for a week, you can continue eating pineapple chunks in controlled portions. However, refrain from consuming it on an empty stomach.
Is Canned Pineapple Safe for Nursing Mothers?
While canned pineapples seem juicier and better looking than actual fresh pineapples, they should be strongly avoided by nursing mothers. Not only does the canning process rob the fruit of its important nutritive elements, but the long storage also increases the amount of sugar and calories already present and other chemicals too, which could be harmful.
How to Choose Fresh Pineapples
When going to the supermarket to purchase pineapples, there are certain aspects of the fruit that need to be examined before buying. This ensures you pick only the best and fresh ones every time.
Hold a pineapple close to your ear and tap on it. The sound should be dull or almost absent.
The crust of a fresh pineapple is generally elastic and a bit soft. The tail is also green and separates easily from the fruit.
A ripe pineapple has a peel that has a consistent shade of yellow-brown colour all over, without any blemishes or spots.
How to Prepare, Eat, and Store a Pineapple Safely
To avoid consuming any bacteria or germs that can harm the baby while breastfeeding, it is essential that you clean, prepare, and store a pineapple in a safe and hygienic manner. Here are some tips to keep in mind when consuming pineapple.
Wash your hands and rinse the pineapple thoroughly under running water. This helps in getting rid of any microbes and germs on the surface.
Cut the skin of the pineapple cleanly and cut it into your desired shape and size.
Store the pineapple chunks in an airtight container and refrigerate.
Consume the pineapple within 2 days of refrigeration.
Avoid buying cut pineapple from vendors, as you cannot be assured of the hygiene practices kept in mind while cleaning and cutting it.
The connection between pineapple juice and breastfeeding might not make sense early on since every fruit seems to bring only benefits to the one who eats it. By knowing the right time to eat it and the right way to consume it, a nursing mother can derive benefits from it while ensuring the well-being of her child.
Also Read: Eating Banana during Breastfeeding Read more
Suggested for you
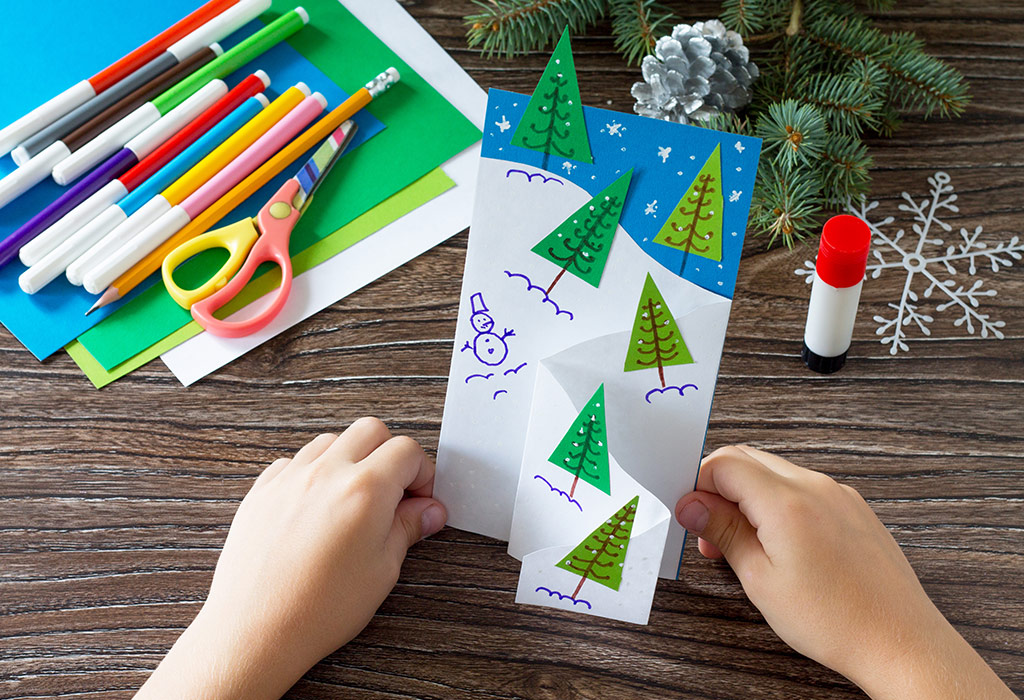
15 Easy To Make Christmas Card Ideas For Kids
Now that Christmas is around the corner, we’re all getting ready with our Christmas cards to be sent out. While a card from a store sounds nice, wouldn’t it be better if you did something creative? It costs a lot less, and you can also get the kids involved in the activity. We’ve created a list of 15 Christmas cards for kids to make this season.
Top DIY Christmas Card Ideas For Kids
Making a Christmas card is a fun and entertaining activity with an emphasis on creating a keepsake with sentimental value. The DIYs mentioned below are easy and wouldn’t take more than an hour each.
1. Magnet Sheets
Not all kids have perfect motor skills, which makes drawing complex figures a difficult task. Worry not! There’s a hack that you can use to let your kids make some basic shapes.
Material Needed
Pine/ Gift Shaped Fridge magnet, pencil, eraser, sketch pen, crayons
Steps
Use a pencil to trace the fridge-magnet on a card.
Use crayons to fill the pattern in.
Add an appropriate season’s greeting.
2. Buttons
Old or discarded buttons can be used to create the image of a row of Christmas ornaments.
Material Needed
Buttons, pencil, sketch pen, eraser, glue
Steps
Use a pencil to draw the string that holds all the Christmas ornaments together.
Draw a small connecting string attached to the main string.
Glue the buttons onto the card so that they appear to be hanging from the connecting strings. Your kids can even use multi-coloured buttons to make the card look radiant.
Use a black sketch pen to darken the pencil shade.
3. Footprint Reindeer
This is another DIY that can use the active involvement of your little one.
Material Required
Large red bindi (about an inch), non-toxic brown paint, plastic eyes, black sketch pen, a few twigs, glue
Steps
Apply the paint to your toddler’s foot and ask them to stamp the card for about a minute.
Use glue to apply two plastic eyes in the area below the toes.
Apply a large bindi at the tip of the heel (this will be the nose).
Use some glue to place two twigs on either side of the toes (ears).
4. Clip Art
This DIY allows kids to put up images that are too complex for them to draw, such as Santa on his sleigh.
Material Needed
Scissors, glue, printer, desktop/PC, internet connection
Steps
Find and print images on an A4 size paper.
Cut and stick the images onto the card.
The letters M-E-R-R-Y-C-H-R-I-S-T-M-A-S can be printed out separately and glued together to spell the same on the card.
5. Fingerprint Tree
A fun to-do project, this is one of those Christmas card ideas that needs teamwork and can be done by siblings.
Material Required
Pencil, scale, non-toxic green paint, sketch pen
Steps
Draw a vertical line (the trunk) in the middle of the card. The line should cover up 3/4th of the space of the card.
Draw a horizontal line (bottom branch) from the base such that it intersects the vertical line at roughly 1/6th the distance from the bottom. The length of this line should be about ½ the length of the vertical line.
Draw lines that join the end-points of the horizontal line with the top end of the vertical line such that a triangle is formed.
Use a sketch pen to darken the pencil shade.
The kids can now dip their thumbs in green paint and use it to fill up space in the triangle.
6. Paper Plate Santa
Make a 3-D image of Santa on your card using a paper plate!
Material Required
Red chart paper, paper plate, cotton swabs, sketch pen
Steps
Use a scissor and cut a paper plate in half.
Cut out red chart paper in the shape of a triangle such that the base is the same length as the diameter of the paper plate.
Use glue to stick the base of the triangle to the cut section of the plate.
Use a sketch pen to draw a nose and eyes.
Glue the cotton ball along the circumference of the plate such that it looks like the beard.
Glue the Paper Santa onto the card with a Christmas message.
7. Handprint Christmas Tree
This is a DIY where you can involve your infant in the project (with some supervision, of course!)
Material Required
Non-toxic green paint, yellow paper, brown-coloured crayon, scissors, glue
Steps
Use a crayon to make a small trunk for the tree.
Dip your child’s palm into the paint and press it on the card to make leaves. If you are using your toddler’s palms, use multiple prints to make a tree.
Cut the yellow paper into a star and stick it to the top of the tree.
8. Felt Paper
This involves a lot of cutting and allows versatility in terms of what images you want on the card.
Material Required
Multiple sheets of felt paper of different colours, scissors, glue, sketch pen
Steps
Choose the image of a Christmas tree, gift boxes, or even just plain text reading “Merry Christmas.”
Cut the felt paper with a scissor to the shape that you picked and stick it onto the card.
9. Potato Snow Man
Any leftover potatoes in the house? Use one of them to help you out with the card.
Material Required
Potato, knife, paintbrush, white acrylic paint, red felt paper, scissors, glue, sketch pen
Steps
Cut the potato in half and make sure it's cut evenly.
Use a paintbrush to apply the paint onto the cut surface of the potato. Avoid dipping the potato into the paint as it can cause the paint to spread unevenly.
Press the painted potato onto the card.
Cut felt paper into a heart and a carrot for the nose and embellishments.
Use a sketch pen to draw eyes and stick-arms, and write a Christmas message.
10. Fingerprint Christmas Lights
This is similar to the button project done earlier, except that the buttons are replaced by paint.
Material Required
Pencil, scale, non-toxic paint, sketch pen
Steps
Draw a squiggly line diagonally across the page.
Your kids can dip their fingers in paint and apply pressure on the card. Make sure they do it in such a way that the tip of their fingers just barely touches the line.
Write a Christmas greeting to complete the card.
11. Twig Christmas Tree
Do you have a garden at home or stay near a park? Go on a twig hunt to build your very own miniature Christmas tree.
Material Required
Bundle of twigs, cardboard, scissors, glue, sketch pen
Steps
Cut the cardboard into the shape of a pine tree.
Place the twigs horizontally/vertically onto the pine-shaped cardboard cutting with the help of some glue.
Cut out the twigs in the shape of the cardboard below so that it takes the shape of a pine tree.
Use some glue to stick the cardboard onto the card.
Use a sketch pen to add some season’s greetings.
12. Embroidery Thread Tree
This is the toughest DIY from the list and must only be done by children who are 10-12 years old, with adult supervision.
Material Required
Compass, pencil, eraser, scissors, embroidery thread, needle, scotch tape, A4 size paper, glue
Steps
Use a pencil to lightly draw the shape of a pine tree onto the card.
Use a compass to punch holes across the outline before using an eraser to remove the pencil shade.
Pass the thread through all the holes of the card with the help of the needle and fasten it from the inside of the card using scotch tape.
Stick an A4 paper with glue to the inner part of the card to conceal the thread work.
Use a sketch pen to write a season’s greetings.
13. Hand-Shape Reindeer
A DIY variant of the Foot reindeer, this one involves the palms.
Material Required
Non-toxic brown paint, scissors, twigs, red bindi, plastic eye, red felt paper, sketch pen
Steps
Apply the paint on the palm of your kid's hands and make them put an imprint on the card. Make sure that the fingers are imprinted at the bottom, denoting the legs.
Glue a plastic eye on the base of the thumb imprint.
Stick the bindi at the tip of the thumb imprint denoting the nose.
Stick two small twigs at the base of the thumb, a little away from the eyes.
Cut the felt paper in the shape of a heart and place it at the centre of the hand imprint.
Use a sketch pen to write a Christmas greeting.
14. Nail Polish Gifts
Have some old nail paints lying around? Use it to keep your kids busy and make some beautiful Christmas cards while they’re at it!
Material Required
Nail polish, pencil, sketch pen
Steps
Draw a pattern of your choice on the card with a pencil and darken it with a sketch pen.
Use the nail paint to fill in the colours and add a Christmas greeting.
15. Washi Tape Family Photo
This is one of the few Xmas card ideas that indirectly involves the whole family.
Material Required
Washi tape, pencil, scale, scissors, family photo
Steps
Place the picture on the card and make a note of where the edges of the photograph fall.
Make cuts along the card to hold the photo.
Use a pencil and a ruler to make a border.
Stick washi tape between the photo and the border.
Cut out the area that is not covered by the washi tape.
Handmade cards have a greater emotional value than store-bought cards. While the kids themselves can make most of these cards, make sure you supervise them if they are using objects like scissors and needles. Try out as many of these easy Christmas cards for kids and brighten your family and friends' celebrations with these handmade Christmas cards. Have fun!
Also Read:
Fun Christmas Craft Activities for Children
Interesting Facts & Information About Christmas for Children Read more
Suggested for you

4 Beauty Tips Mum Teaches Best
There are no ugly women, just lazy ones’, says Coco Chanel! So make use of some of those beauty lessons we learned from our moms and step up your beauty game just how mom envisioned it to be. Tap into these beauty tips and blush with compliments in no time.
One of the most nostalgic memories from childhood is the whiff of that sweet, unforgettable smell that came from our mother’s room right after she got ready for the day. Mixes of all those enigmatic fragrances and her beauty routine will forever in ways define our mothers to us! Hasn’t our mother’s dressing table always been the first step to understanding beauty? Here, take a cue from their treasure trove of beauty tips.
Beauty Lessons No One Teaches Better than Mom
1. The Kitchen Beauty Ninja
Admit it, no one has better beauty secrets than our mothers. Precisely why, here is a quick guide to beauty tips from moms around the world.
Mom’s beauty tips are indeed incomplete without the ancient home remedies she learned from her mother and grandmom. Aka DIY’s, have forever been every mom’s most chosen beauty go-to. For pigmented lips, a honey and sugar scrub could do wonders. Have an early morning routine? A quick tomato peel scrub for the face can make the skin glow. Bad hair day? Watch her give you a bowl of curd to apply to your scalp. Rinse it off well with shampoo. This hair mask not only kills dandruff, but it works well for anti-hair fall therapy!
2. The Faithful-s
would be incomplete without a mention of their favourite products. Over time, every mother has a few faithfuls she urges or suggests you to use. It could be anything from a hydrating cold cream, a particular face oil, to that red lipstick she's been wearing since she was 20 years old. Your mom is the biggest example of how well her favourite products worked for her!
3. The Quickies for the Busy Bees
No beauty tip is good enough if it’s going to take away all our time. That's where mom's quick fix beauty hacks come to play. Never leave home without your essentials. A lip balm and some wet tissues! A lip balm that suits your skin tone can instantly make you look fresh. Wipe away all the grease from the traffic or the sweat you work up in the kitchen with just a wipe. And if wet wipes aren’t your thing, carry tissues and a rose water spray. Feel the burst of freshness!
4. The Day of Indulgence
One of our favorite beauty tips from moms is that one day’s cheat routine. Don’t you deserve it? Spare some time especially for your beauty care. Maybe every alternate Sunday afternoon or squeeze it on a Thursday night. These few hours are just for you! Do your meds-peds and grab your home facial kit. There are a number of these facial kits available at general stores. Not only do these save you a bomb of money, they are also less time consuming than going through that entire spa ritual!
The beauty tips we can learn from our mothers are quite endless. Include these tips in your daily routine and look stunning day in and day out. Want more? Let us know and we’ll come back with a bigger bunch of mother’s beauty hacks just for you. Read more
Suggested for you

Suggested for you

Sarika gupta has added a new answer
1 hour ago
Q. why can't I add child details in my profile

Sarika gupta
Mom of 2 children
1 hour ago
A. Hello there ma’am please do not worry about it too much and please add in your profile aftwr login and still is you find any difficulty then you should contact first cry customers service department.
Take care
Rayan has added a new answer
Expecting Mom due this month
1 hour ago
Q. right now I am 39 week pregnant but never feel any type of pain is it ok my due date is 5/5/24

Rayan
Mom of 2 children
46 mins ago
A. Hello mam, It's normal mam. don't worry a lot.Since your due date is near, eat healthy and sip your drinks. Keep yourself hydrated. Happy parenting and welcome new mom!!!
Indhumathy Ravikumar has added a new answer
Guardian of 0 children
1 hour ago
Q. #asktheexpert my newborn baby girl breast is hard n feel like lump

Indhumathy Ravikumar
Mom of 2 children
45 mins ago
A. please give gentle massage on breast before bathing.. and then squeeze the curdled milk in it.. after that keep pumping the breast from time to time.. it will cure with in two weeks..
Dr Ghouse has added a new answer
Trying To Conceive
1 hour ago
Q. after c section when we start physical relation?

Dr Ghouse
Paediatrician
59 mins ago
A. after 8 weeks or after proper healing of the wounds. if there is no relief it is better you see your doctor for proper examination particularly physical examination if there is need for doing investigations to find out the problem and treatment ok
Rayan has added a new answer
Guardian of 0 children
1 hour ago
Q. #asktheexpert
good morning Ma'am..
My son is 4 months old. He gets stomach pain/ gas everyday at any time.. He cries for long when he gets pain.. I am giving him Colic aid everyday from last one month.. Only after giving colic aid he stops crying... what should I do to avoid his pain and medicine??
Read moreRayan
Mom of 2 children
41 mins ago
A. Hello mam! If it is due to colic pain /gas, it is common in newborns. Make sure that you burp your baby after every feed. Don't feed just before your baby is to sleep. Make a routine like feed, play and sleep. Burp inbetween feedings. Colic pain will stop automatically at 5 or 6 months. So don't worry. Happy parenting!
Dr Sameer awadhiya has added a new answer
Guardian of 0 children
6 mins ago
Q. #asktheexpert
baby having nose block.. sleeping problem
what should I do?

Dr Sameer awadhiya
Paediatrician
3 mins ago
A. nasal blockage can be relieved by using nasal saline drops like nasoclear saline drops in thecg nose followed by nasal aspirator to take out the secretions very ghently
steam inhalation can also be helpful in this condition
Check out this new Memory

Poongodi
Guardian of a 3 m old girl
New Memory
3rd month photo

Like
Comment
Share
0 Likes
0 Comment
Check out this new Memory
Kapila Sharma
Guardian of a 7 m old girl
New Memory
#cutestbaby

Like
Comment
Share
0 Likes
0 Comment
Check out this new Memory
Reshly Debbarma
Mom of a 5 m old boy
2 mins ago
He loves to roll over whenever his Papa is around

Like
Comment
Share
0 Likes
0 Comment
Check out this new Memory

Aftaab
Father of a 4 yr 2 m old girl
2 mins ago
#cutestbaby

Like
Comment
Share
0 Likes
0 Comment
Check out this new Memory

g sravani
Mom of a 1 yr 8 m old girl
2 mins ago

Like
Comment
Share
0 Likes
0 Comment
Tell us more about yourself get More Personalised
 Infant0 to 6 Months
 Baby6 Months to 2 Yrs
 Toddler2 to 4 yrs
 Kids4-6 yrs
 Big Kids6+ yrs
 Expecting
 Trying to Conceive

