

.svg)
.svg)
.png)

Enter Child Details

Add Profile Photo


Videos you might be interested in


Videos you might be interested in
Videos you might be interested in
Suggested for you

Simple Home Remedies for Facial Hair Removal
Although the problem of facial hair is rarely serious, it can cause embarrassment to some women. Therefore, we have come up with an article to help women come out of this problem through the use of easy-to-do home remedies without having to spend oodles.
Causes of Thick Facial Hair in Women
All women have facial hair which is very fine, and therefore, not noticeable. However, there are few who may have thick facial hair. The fuzz of hair on a woman’s face can be due to a number of reasons. Let us discuss them in detail.
Hormonal problems are one of the main causes of facial hair in women.
If hormones are not the ones for the fuzz on your face, blame it on your genes.
Some underlying health issues like Polycystic ovarian disorder can also cause this problem.
Cushing syndrome can also cause hirsutism.
Virilization, a condition in which a female develops secondary male sexual characteristics causes thick facial hair in women.
Women suffering from congenital adrenal hyperplasia produce less of androgen and cortisol hormones, causing hirsutism.
Home Remedies to Remove Unwanted Hair on Face
Facial hair in women can be quite a nuisance. It can make even the prettiest face look odd. Therefore, removing them is the only solution. However, getting it removed professionally can pinch your pockets. Therefore, use the following home remedies to get rid of the unwanted fuzz from your face.
1. Lemon Juice and Sugar
This is an ancient beauty technique to remove unwanted hair.
Ingredients
Sugar
Lemon juice
How to Make
Mix sugar, lemon juice and very little water.
Stir it well to dissolve the sugar until the sugar becomes a sticky granular paste.
How often to Use
Apply this every alternate day.
Why does It Work?
When the pack is applied, it sticks to the hair and when removed, the hair too comes off. The lemon juice bleaches the rest of the hair.
Suitable Skin Type
All skin types
Precaution
People with dry skin should not keep the pack in the face for more than 15-20 minutes.
2. Banana and Oatmeal
Apply the paste and massage it in a circular motion against the direction of hair growth.
Ingredients
Powdered oatmeal
Ripe banana
How to Make
Mash a banana.
Blend it with the powdered oatmeal.
How often to Use
Apply it once a week.
Why does It Work?
The oatmeal helps in removing the hair along with dead skin, and the banana moisturises the skin.
Suitable Skin Type
All skin types
Precaution
After scrubbing the paste on your face, make sure you wash it off with cold water or apply ice over the skin.
3. Lemon and Honey
Sprinkle a little of maida on the hairy area and apply the paste towards the direction of hair growth. Then put a cloth strip on top of it, press it and pull it out against the direction of hair growth.
Ingredients
Sugar
Lemon juice
Honey
Maida
Cotton cloth strips
How to Make
Mix the lemon juice, sugar and honey together to make a smooth paste.
Add water as required.
Heat the mix in the microwave for 2-3 minutes.
How often to Use
You may use it 2-3 times a week.
Why does It Work?
The paste is sticky and is effective in pulling out the extra hair.
Suitable Skin Type
All skin types but especially for dry skin.
Precaution
Check the temperature of the mix before you apply it on your skin.
4. Oatmeal, Honey, and Lemon Juice
Apply the pack and massage it in a circular motion against the direction of hair growth. Wash it off with cold water.
Ingredients
Oatmeal (coarsely ground)
Honey
Lemon juice
How to make
Blend all the ingredients together into a paste.
Add water, if required.
How often to Use
You can apply the pack once in two days.
Why does It Work?
The coarseness of the oats rubs against the skin and removes hair, honey moisturises the skin and lemon juices act as a bleaching agent.
Suitable Skin Type
All skin types
Precaution
Lemon juice, when used in excess, can cause the skin to dry up and become flaky.
5. Turmeric and Milk
Apply the mask over the area of unwanted hair and let it dry. Wash it off with warm water.
Ingredients
Rice flour
Turmeric powder
Milk
How to Make
Mix all the ingredients together.
If required, add water.
How often to Use
You can apply this every day.
Why does It Work?
The coarseness of the rice flour rubs against the skin and removes hair. The milk moisturises it, and the turmeric acts as an antiseptic.
Suitable Skin Type
Good for dry and normal skin types.
6. Potato, Lentil, and Lemon Juice
Apply the pack. Once dry, massage it in a circular motion to remove it.
Ingredients
Potato
Lentils
Lemon juice
Honey
How to Make
Grate the potato and extract the juice.
Grind the soaked lentils into a fine paste.
Add the lemon juice, honey and potato juice to the lentil paste.
How often to Use
Use this 1-2 times a week.
Why does It Work?
Potato juice, honey and lemon juice acts as bleaching agents and lighten the skin and hair colour, and the lentils help in pulling out the extra hair.
Suitable Skin Type
All skin types
Precaution
Some people may be allergic to potatoes and people with sensitive skin should avoid using lemon juice as it may cause skin irritation.
7. White of Egg
Apply the pack and let it dry. Then peel off the mask and wash your face with cold water.
Ingredients
Egg white
Corn starch
Sugar
How to Make
Beat all of the ingredients together. There should be no lumps of the cornstarch.
How often to Use
Repeat the mask twice a week.
Why does It Work?
The egg white, cornstarch and sugar become sticky and stick to the hair. When the mask is peeled off, the hair also comes out.
Suitable Skin Type
All skin types except sensitive skin.
Precaution
Not to be used on acne prone skin.
8. Rose Water and Alum
Apply the mixture on the hairy area with the help of a cotton ball. Let it dry and apply again. Keep on drying and applying the pack for 5-6 times in one sitting. Then wash it off and massage the face with olive oil.
Ingredients
Alum
Rosewater
Olive oil
How to Make
Add rose water to the alum powder to make a solution.
How often to Use
Repeat this every alternate day or at least once a week.
Why does It Work?
It helps in curbing hair growth and also cools down the skin.
Suitable Skin Type
All skin types
Precaution
Alum may cause a bit of skin irritation.
9. Papaya and Turmeric
Apply the mask on the unwanted hair area and massage it in a circular motion for 15-20 minutes. Wash it off.
Ingredients
Raw papaya
Turmeric powder
How to Make
Peel the papaya and make a paste of it.
Then mix it with a little turmeric powder.
How often to Use
It should be applied 2-3 times a week.
Why does It Work?
The papain enzyme in the papaya makes the hair follicles open up; as a result, the hair falls off.
Suitable Skin Type
All skin types
Precaution
Use very little turmeric powder.
10. Aloe Vera and Papaya
Apply the paste and let it dry. Then with a cotton cloth, rub the dried up mask in the opposite direction of the hair growth. Wash it off and massage the skin with a few drops of olive oil.
Ingredients
Aloe Vera pulp
Raw papaya paste
Gram flour
Mustard oil
Olive oil
How to Make
Mix aloe vera pulp, papaya paste, gram flour and mustard oil together to make a thick paste.
How often to Use
Use it 3-4 times a week for at least 3 months.
Why does It Work?
The papain enzyme helps in hair removal, and aloe vera helps in moisturising the skin.
Suitable Skin Type
All skin types
Precaution
Do not use soap after using the mask. Mustard oil may cause skin irritation in some people.
11. Turmeric and Nettle
Apply the paste over the hairy area and allow it to stay it for a few hours. Then wash it off.
Ingredients
Nettle leaves
Turmeric powder
How to Make
Wash and grind the nettle leaves to a paste.
Add turmeric to it.
How often to Use
Apply this pack every day for 5-6 weeks.
Why does It Work?
The juice of the nettle leaves penetrates the hair follicles and helps in hair removal. The turmeric acts as an antiseptic.
Suitable Skin Type
Do a patch test before applying this pack.
Precaution
Do not use bare hands while handling nettle leaves. It may also cause skin irritation.
12. Lavender and Tea Tree Oil
Apply the oil mix with a cotton ball over the hairy area.
Ingredients
Tea tree oil
Lavender oil
How to Make
Mix both the oils in a bowl.
How often to Use
For three months, apply this mix a couple of times every day.
Why does It Work?
Both the oils have anti-androgenic properties which reduce hair growth.
Suitable Skin Type
Suitable for dry, normal and combination skin type.
Precaution
Avoid if you have acne-prone skin.
13. Kusuma Oil and Thanaka Powder
Remove the excess hair through waxing or threading. Then after washing the area, apply the mix over it and massage against hair growth. Allow it to stay overnight.
Ingredients
Thanuka powder
Kusuma oil
How to Make
Make a smooth paste by mixing both the ingredients.
How often to Use
Apply it once a week.
Why does It Work?
The combination of Thanuka and Kusuma oil helps in thinning the hair and removing it.
Suitable Skin Type
All skin types
Precaution
Do a patch test before applying it.
14. Basil and Onion
Apply the paste over the hairy area. Let it dry and wash it off.
Ingredients
Basil leaves
Onion
How to Make
Make a paste of both the ingredients.
How often to Use
Repeat this 3-4 times a week for a few months.
Why does It Work?
Although onion helps in hair growth, when used with basil, it reduces hair growth.
Suitable Skin Type
All skin types
Precaution
Both ingredients may cause skin irritation.
15. Fenugreek and Green Gram
Apply the paste and when dry gently rub it. Then wash it off with chilled water.
Ingredients
Fenugreek seeds
Green gram
How to Make
Make a smooth paste of both the ingredients using water as required.
How often to Use
Thrice a week is good enough.
Why does It Work?
The paste sticks to the hair, and while rubbing the skin with it, the hair comes out.
Suitable Skin Type
All skin types except sensitive skin.
Precaution
Fenugreek may cause allergic reactions.
16. Barley and Milk
Apply the paste and rub it off when dry.
Ingredients
Barley
Milk
Lemon juice
How to Make
Blend all the ingredients together to make a fine paste.
How often to Use
Use it 3-4 times a week.
Why does It Work?
The paste sticks to the hair and when rubbed, the hair comes off.
Suitable Skin Type
All skin type except sensitive skin.
Precaution
Barley flour may cause asthma.
17. Wheat Bran and Milk
Massage the mix till it dries up and then wash it off.
Ingredients
Wheat Bran
Milk
How to Make
Mix all of the ingredients together to make a paste.
How often to Use
You may use this every day or once in 3-4 days.
Why does It Work?
The paste sticks to the hair and comes off when rubbed.
Suitable Skin Type
All skin types
Precaution
No side-effects.
18. Gelatin and Milk
Apply the mask on a clean face. Once dry, peel it off.
Ingredients
Gelatin powder
Milk
Lemon juice
How to Make
Mix all the ingredients together.
Put it in a microwave for 15-20 minutes to heat it.
How often to Use
Use whenever you feel the need to.
Why does It Work?
Since it is extremely sticky, it pulls off the hair along with blackheads and dead cells.
Suitable Skin Type
All skin types except sensitive skin.
Precaution
Make sure to cool the pack after taking it out from the microwave.
19. Papaya, Mustard Oil, Aloe Vera, Besan, and Haldi
Apply the pack and let it dry. Then rub the fuzzy area against hair growth with a dry cloth. Wash your face with cold water and pat dry.
Ingredients
Ripe papaya
Mustard oil
Aloe Vera pulp
Besan
Haldi
How to Make
Mash the ripe papaya and squeeze out the aloe vera pulp.
Mix all the ingredients together.
How often to Use
Use it thrice a week initially. After you start getting results, apply the pack once every 7-10 days.
Why does It Work?
The papain enzyme exfoliates dead skin and opens up hair follicles, making it easy for hair removal.
Suitable Skin Type
All skin types
Precaution
Apply some ice or cold water on the area from where hair has been removed. People with sensitive skin should avoid mustard oil since it can cause skin irritation.
20. Chickpea Flour and Haldi
Apply the pack and let it get semi-dry. Massage your face in a circular motion until it dries up. Wipe it off with a wet towel.
Ingredients
Chickpea flour
Fresh haldi root
How to Make
Grind the haldi to a paste.
Add chickpea flour, haldi and water to make a smooth paste.
How often to Use
Initially, apply this pack once every alternate day. Once there is a reduction in hair growth, you may use it once every 7-10 days.
Why does It Work?
Chickpea works wonders in removing hair, and haldi does not allow the hair to grow back.
Suitable Skin Type
Oily skin
Precaution
Not to be used on acne or sensitive skin.
21. Apricot and Honey
Massage the mixture after it has dried up, in circular motions. Wash it off with lukewarm water.
Ingredients
Apricot powder
Honey
How to Make
Mix the ingredients together to make a smooth paste.
How often to Use
Apply this thrice a week.
Why does It Work?
The paste sticks to the hair and gets removed when rubbed.
Suitable Skin Type
All except oily skin
Precaution
There may be skin breakout if applied by oily skin people.
22. Sugar and Molasses
Apply the warm mix to the hairy area and put a strip of cotton cloth on top. Then, yank it out in the opposite direction of hair growth.
Ingredients
Sugar
Molasses
Lemon juice
How to Make
Put molasses and sugar for 2-3 minutes in the microwave.
Add lemon juice to the mix.
How often to Use
Whenever required.
Why does It Work?
Being sticky, it works like wax to strip off the hair.
Suitable Skin Type
All skin types except sensitive skin.
Precaution
If the mixture is too hot, it may burn your skin.
23. Garlic
Crush garlic and rub it. Wash it after half an hour.
Ingredients
Garlic
How to Make
Crush some garlic to a semi-fine paste.
How often to Use
Use it once a day.
Why does it Work?
While there is no scientific backing to this, many women have found this to effectively remove hair.
Suitable Skin Types
Not suitable for sensitive skin.
Precaution
A patch test should be done to rule out allergic reactions.
24. Spearmint Tea
Try this tea and say bye-bye to facial hair.
Ingredients
Spearmint leaves
Water
How to Make
Add the spearmint leaves to water over low heat and place a lid.
Switch off the stove and strain the tea.
How often to Use
You make drink a cup twice a day.
Why does It Work?
It lowers the production of the male hormone androgen which causes excess facial hair in women.
Suitable Skin Types
It is suitable for all.
Precaution
Consult a doctor before trying this.
25. Yogurt, Gram, Flour and Turmeric
Apply the paste. Once it becomes semi-dry, massage the area in opposite direction to hair growth. Then rinse off with water.
Ingredient
Yoghurt
Gram Flour
Turmeric
How to Make
Mix it all together to form a smooth paste.
How often to Use
It can be used every day.
Why does It Work?
The pack being sticky sticks to the hair; when rubbed against hair growth, the hair comes out.
Suitable Skin Types
All skin types.
Precaution
No side-effects.
26. Orange Peel and Oatmeal
Apply the paste and once it is semi-dry, massage it in circular motions. Wash it off.
Ingredient
Orange peel powder
Oatmeal powder
How to Make
Mix it all together with a little water to make a paste.
How often to Use
Repeat the procedure 2-3 times a week.
Why does It Work?
Orange peel is a natural bleach; oats exfoliate the skin and remove excess hair.
Suitable Skin Types
It is great on all skin types.
Precaution
Orange peel may cause some skin irritation.
27. Black Cohosh
It is a flowering plant of the buttercup family.
Ingredient
The dried root of the black cohosh
Honey
How to Make
Let the root boil in water for half an hour over a low flame.
When the water becomes 1/3rd, switch off the stove, strain it and add honey to it.
How often to Use
Drink a cup three times a day.
Why does it Work?
It has anti-androgen properties which cure hirsutism.
Suitable Skin Types
This is taken as a tea.
Precaution
This should not be taken by people suffering from liver disease, blood clotting disorders or anyone on hormonal medication.
Essential Tips and Precautions to Consider While Using the Remedies
There are quite a number of natural Ayurvedic home remedies for removing facial hair. However, it is important that we follow some precautions while using them.
It is important to be patient when you try home remedies to remove facial hair permanently.
Be careful while using a home remedy for removing facial hair within one day like sugar and molasses pack, because the method requires heating which may burn your skin if applied too hot.
Home remedies for facial hair removal for sensitive skin should not comprise of allergic ingredients like turmeric, orange peel, lemon juice etc.
Taking a warm bath before applying the packs will help in opening up pores.
It is important to close the pores by rubbing ice or washing the area with cold water after the remedy.
Try out any of the above remedies and get freedom from excess facial hair.
Also Read:
Homemade Face Masks to Lighten & Bleach Your Skin Naturally
Easy Steps to Get Salon-Like Glow at Home
Simple Home Remedies to Remove Blackheads Permanently Read more
Check out this new Memory

Madhu
Mom of a 4 m old girl
3 mins ago

Like
Comment
Share
1 Likes
0 Comment
Suggested for you

Suggested for you
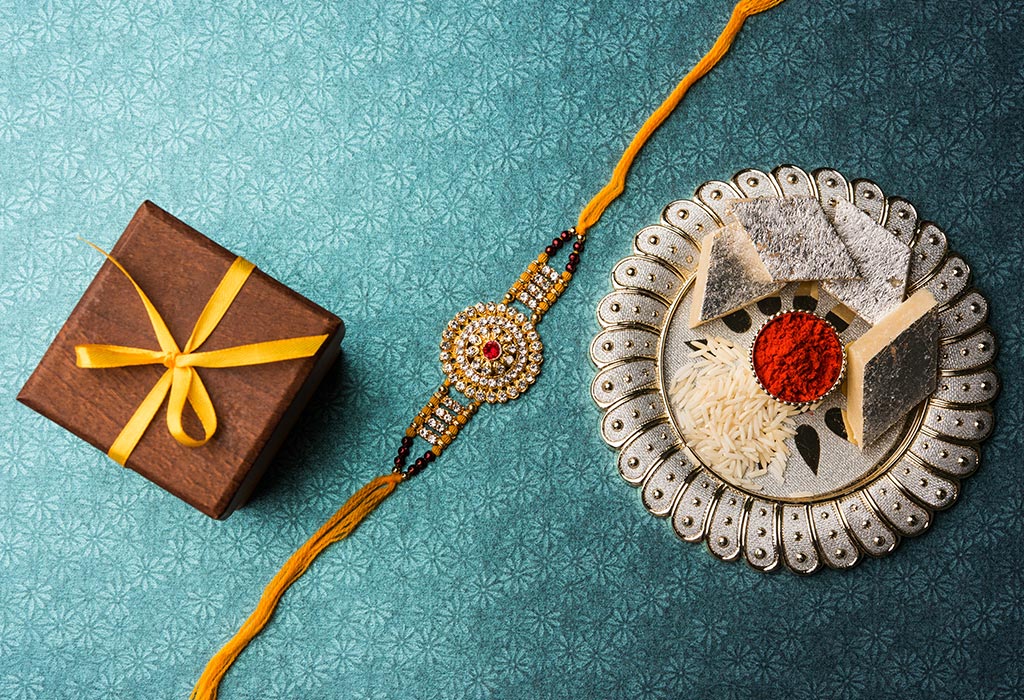
15 Creative Rakhi Making Ideas for Children
No member of your family is as crucial to your support system as your sibling. They are your confidants, your friends, your moral compass and the shield between you and the rest of your family which can be extremely important at times. A healthy relationship with your sibling ensures you have a truly special person in your life who offers unconditional support in every circumstance of your life. This is why the celebration of your sibling is so emotional and crucial as well. No festival celebrates the importance of your sibling other than rakhi.
Easy DIY Handmade Rakhi Ideas for Kids
As most parents know, building a bond between your children is crucial, a way to do that is to celebrate Rakhi in a fun and unique way so the kids see this time of their lives as a time they cherish with their loved ones. Every parent also knows that keeping a child engaged in activities requires a huge dose of fun. One way to incorporate that into your rakhi celebrations is to find fun rakhi designs for kids that can be made at home using arts and crafts to truly personalise the rakhi while keeping your kids engaged in a fun DIY activity. Here are a few designs to help you and your child make a unique rakhi.
1. Cartoon Character Rakhi
A cartoon rakhi is not only cute, but also fun to make and keeps your child engaged.
What You Will Need:
Thick, felt cartoon stickers
Kid-friendly scissors
Satin ribbon
Glue
How To Make:
Using the scissors, cut the ribbon to an appropriate length.
Lay the ribbon flat and use a dry cloth wipe off any dust that may be on the ribbon.
Cut the cartoon sticker of your choice into shape.
Spread the glue evenly across the back of the stickers.
Paste onto the ribbon and let it dry.
2. Race Car Rakhi
Most young boys adore race cars. Making a race car rakhi at home is fun and really easy.
What You Will Need:
Kid-friendly scissors
Satin ribbon
Peel- off race car stickers
How to Make:
Using the scissors, cut the ribbon to an appropriate length.
Lay the ribbon flat, and use a dry cloth to wipe off any dust that may be on the ribbon.
Peel off the back of the sticker of your choice, and paste the race car at the centre of the ribbon.
Press and hold for 5 seconds.
3. Bedazzled Rakhi
Few things are as cute as bedazzled rakhis. Here is how you make them.
What You Will Need:
A foam ribbon
Scissors
A small velvet or cotton cloth
Glitter
Children’s craft crystals
Kid-friendly adhesive
How to Make:
Use the scissors to cut the foam ribbon to regular size.
Spread the child-friendly adhesive on the velvet or cotton cloth.
Sprinkle glitter all over - Stick the craft crystals in a pattern or design.
Paste the cloth to the ribbon.
4. Animal Rakhi
Animal rakhis are extremely adorable and are a breeze to make. Here’s what you’ll need.
What You Will Need:
A foam ribbon
Scissors
Felt paper
A sheet with animals printed on it
Glue
How to Make:
Using the scissors, cut the ribbon to an even line that fits your child.
Cut the animal of your choice into shape.
Spread glue evenly along the felt paper.
Paste the animal-shaped cut-out, and press for 5 seconds.
Paste the felt paper onto the ribbon.
5. Superman Rakhi
Every kid adores Superman. Here is a fun way to make the man of steel on your child’s rakhi.
What You Will Need:
Glue
Satin Ribbon
Thin foam sheets (Thermocol)
Children’s Craft Cutter
Superman themed S sticker
How to Make:
Cut the ribbon to a decent length.
Cut the foam sheet into an even square.
Spread glue on both sides of the foam sheet.
Cut the Superman logo, and paste onto the foam sheet.
Paste the foam sheet onto the ribbon.
6. Name Rakhi
What can be more personal than your child’s name on the rakhi? This is sure to bring a huge smile out of both your little ones.
What You Will Need:
Scissors
Felt paper cut into alphabet shapes
Glue
Satin Ribbon
How to Make:
Cut the ribbon into the required length.
Spread glue evenly on the ribbon.
Paste the letters that make your child’s name in order on the ribbon.
7. Art Rakhi
Every child loves arts and crafts. Here is a fun way to incorporate the artistic stylings of your child onto a rakhi.
What You Will Need:
Satin ribbon
A piece of white felt paper
Crayons or finger paint
Scissors
Glue
How to Make:
Cut the felt paper into a small square.
Ask your child to draw or paint on it.
Spread an even layer of glue on the ribbon.
Paste your child’s masterpiece on the ribbon.
8. Heart Rakhi
What can be more endearing than a rakhi with a heart on it? Here is how you make it.
What You Will Need:
A satin ribbon
White felt paper.
Heart stickers
Glue
Scissors
Glitter
How to Make:
Cut the felt paper into an even square.
Spread an even layer of glue onto both sides of the paper.
Sprinkle glitter on one side.
Stick the other side onto the ribbon.
Peel off the back of the heart stickers and stick them onto the felt paper attached to the ribbon.
9. Lego Rakhi
Nothing exemplifies DIY like Legos. Here is how you can make a rakhi out of them.
What You Will Need:
Braided string
A piece of lego
Glitter
Glue
How to Make:
Simply punch a hole on either side of the lego
Attach with the braided string
Spread glue on the lego evenly
Sprinkle glitter on top
10. Butterfly Rakhi
Few things are cuter than a butterfly. Here is how it can make an unforgettable rakhi.
What You Will Need:
A ready-made foam butterfly embellishment (These can be found in most arts and crafts stores.)
Glue
A silver satin ribbon
Glue
How to Make:
To make this simple rakhi, simply paste the butterfly embellishment to the satin ribbon.
If the butterfly is plain, you can also add glitter or bedazzle it.
Rakhi Making Ideas for School Competitions
If your child has to participate in a rakhi making competition at school, here are a few creative ideas that can come to use.
1. Funky Button Rakhi
A fun and creative rakhi to enter in school competitions is the button rakhi. Here’s how you make it.
What You Will Need:
Different coloured buttons
Glitter
Craft jewelry
Glue
Silver satin ribbon
How to Make:
Spread an even layer of glue onto three different coloured buttons.
On one, sprinkle glitter, on another button, paste craft jewellery in a pattern of your choice.
Leave the third one plain.
Paste all three buttons in any order side by side on the ribbon.
2. Goto Rakhi
This is a truly unique rakhi. Here is how you make it.
What You Will Need:
Foam glitter sheets
Ready-made goto flowers
Superhero embellishments
Glue
Silver ribbon
How to Make:
Cut the ribbon to the required size.
Cut the foam glitter sheets into a circle that is smaller than the goto flower.
Paste the cut glitter sheet onto the goto flower.
Paste the superhero embellishment onto the glitter sheet attached to the goto flower on the centre.
Paste the centrepiece onto the ribbon.
3. Bird Rakhi
These rakhis are fun to look at and easy to make. Here’s how you make them.
What You Will Need:
Ready-made bird embellishments
Glue
Scissors
Silk ribbon
How to Make:
Cut the ribbon to the required size using the scissors.
Evenly spread the glue on the back of the bird embellishments.
Paste onto the ribbon.
Add glitter or craft jewellery if needed.
4. Emoji Rakhi
Emojis are a part of everyday life, they are adorable and fun and can now be made into rakhis.
What You Will Need:
Silk ribbon
Emoji Stickers
How to Make:
To make this rakhi, simply cut the ribbon to the required length.
Peel off the back of the emoji stickers.
Paste onto the ribbon in any order.
5. Family Rakhi
What can be more endearing than a rakhi that has your family on it? Here’s how you make it.
What You Will Need:
Scissors
Glue
Small pictures of your family
Silk ribbon
How to Make:
To make this rakhi, simply cut the pictures of your family members faces into circles.
Then paste in any random order onto the ribbon.
Rakhi or Raksha Bandhan is a festival that celebrates family and siblings. To make this rakhi season unique, make custom rakhis at home. Remember to supervise your child while making these rakhis and enjoy a safe and warm filled family holiday.
Also Read:
Greeting Card Making Ideas for Kids
Kite Making Ideas for Kids Read more
Suggested for you

Baby Activities - Fun Things To Do With Your Babies
The early days of babyhood is a good time to engage your baby in activities that are interesting, educational, and provide a bonding experience. These seemingly silly things that you do can lay the foundation for his overall development that will transform him into a brilliant individual in the future.
Things to Do with Babies from 0-6 Months
The activities that your baby engages in during this time of his life can help in his early development. It also helps you to build a stronger bond with him. His senses develop, he will gain some control over his body, and start responding to you by cooing, gurgling and laughing, and melt your heart in the process. Stimulating his brain during this period by providing him situations to explore can assist in his learning process and make him a good observer.
1. Have Some Face Time
This one is pretty simple; gaze into your baby's eyes while feeding. You can also caress his cheeks and back while doing this. This is a highly pleasurable activity for him and will strengthen the bond between the both of you.
2. Tummy Time
Make sure your baby gets some tummy time in his early days. Lying on his tummy makes him look up to see the things around, this helps in strengthening his neck muscles. Let him have tummy time on a firm surface; this will also help him accomplish other milestones such as crawling, sitting and walking. Sometimes he might not be interested in tummy time due to the effort involved; do it for a few minutes initially, and slowly increase the duration.
3. Stimulate Their Senses
Always allow newborns to engage their senses as much as possible. It is important for them to feel things around, such as their skin, water from their bath, their stuffy toys and such. Even cuddling with you can help them develop their sense of touch. Babies start hearing sounds while still in the womb, so talking, singing and reading to your little bundle of joy helps them to build a personality and encourages language development and promotes bonding.
4. Get Kicking
Once your baby reaches 3 months, hang up colourful toys above his play mat. This will encourage him to kick up his legs, bring his hands together and also tuck his chin in. The chin tuck requires neck strength and flexibility and helps him in turning over. Other 3 months baby activities include playing with rattles, seeing his reflection in a mirror and introduction to different sounds.
5. Peek-A-Boo
Well, this is a real game changer. Once your baby understands the concept of this simple activity, you will find yourself hiding behind anything and everything, shouting peek-a-boo, just to see him giggle in response. A newborn initially has blurry vision and can only see 8 to 12 inches away. By 4 months your baby will be able to see further and track moving objects. Therefore, this is an ideal activity, that helps to develop fine motor skills, object permanence and hand-eye coordination.
6. Fly High
Lay your baby on his back and place your hands around his midsection. Now gently lift him up, mocking a take-off and add some sound effects for extra fun. This activity will increase his body awareness and gives him a different perspective to view the surroundings.
Things to Do with Babies from 6 to 12 Months
Your baby might have started crawling and will soon be taking his first steps. It is an exciting time for you as well since he will start to babble incoherent words (including the much-awaited mama or dada) and become responsive to his environment. It is an ideal time to engage him in infant activities that will assist his development. Your presence, love and involvement are all important for an ideal growing environment.
1. Baby Sit Up
If your baby is around 6 months old and has developed good head control, try making him sit up. Lay your baby on his back, put your hands under his arms and guide them to a sitting position. Muscles strengthen due to multiple uses and he will gain strength and balance. Some other fun 6-month-old baby activities are, bouncing him on your lap while singing a silly song; stacking up things and then, of course, letting him knock them down; and getting them to say 'mama' (duh).
2. Throw Time
Your baby may enjoy throwing stuff around, either his playthings or his food (that's really not fun); ever wondered why? A part of the reason he does this is because he begins to understand that his actions make things happen and he is just studying the reactions! So, a good 7-month-old baby activity would be allowing him to throw stuff. Make a hole in the lid of a container and help him push small toys through it. Open the lid and dump out the toys. This simple activity will engage him for a long time. This improves his understanding of cause and effect and his object manipulation skills.
3. Make Some Noise
As the baby grows, he will learn to make different sounds by banging or rattling things. Let the budding sound engineer develop; allow him to play with different utensils and surfaces and let him experience the different sounds made. You can also fill a bottle with some beads or uncooked grains and let him play with it. These are good sensory activities for your baby, that teach him auditory discrimination, fine motor skills, cause and effect. You can also try rhyming words and repeat them to the baby.
4. Talk Time
Once your baby reaches 9 months of age, engage him in language development activities for infants. These are simple activities that most parents tend to do naturally, once they see their baby growing up. Encourage him to talk even if it makes no sense, point out colourful objects and name them, teach him different parts of his body. Even describing your actions can help in his language development. It is important to patiently engage in conversations with your baby since that encourages him to express himself.
5. Play with Puzzles
Try to engage your baby in simple wooden puzzles once he reaches 12 months, and make sure that the pieces are big enough for him to hold. This develops fine motor skills, hand-eye coordination, problem-solving skills and spatial awareness. Teach him how to do it and cheer him on when he does it right. Some other baby brain development activities are pointing out objects to your baby and naming them, playing a simple game of catch with scarves or towels. Playing catch will improve his hand-eye coordination and gives him the thrills (and giggles). You can also tune his decision-making skills by giving him an option of toys to choose from while playing.
Each stage of life must be experienced in the most fulfilling way possible. Make this time, that you spend with your newborn memorable and enjoyable. Each child has their own pace of learning; you can always encourage him, but let him reach each milestone at his own pace.
Also Read: 15 Creative Activities for Toddlers Read more
Suggested for you

Dos and Don'ts for New Moms and Moms of Cranky Babies Who Don't Sleep at Night
Is your baby too cranky? Does your baby not sleep enough at night? Are you a new mother? Well, I would like to share a few tips on what a new mother can do with her cranky child.
Many new moms do not get proper guidance. First-time moms would probably not know what is happening with the baby when he cries. Sometimes you might feel depressed or may go wild with desperation when your baby doesn't let you sleep and gives trouble!
I have some tips for every such mom that will help you make things smooth with your newborn.
When Your Baby Cries It Can Be Because of the Four Main Reasons
1. Hunger
2. Gas
3. Wet or soiled diapers
4. Discomfort
When the crying doesn’t stop for more than 3 hours, it is usually due to gas. Never give honey to your baby to soothe him/her. Instead, try massaging the baby's tummy slowly. If it doesn’t work, understand why your baby could get gas (so you can treat it better).
Some Reasons and Situations Why a Baby Might Be Gassy are as Follows:
1. When a baby doesn’t latch to the nipples properly.
2. When a baby drinks milk from a bottle.
3. If you don't let the baby burp well.
4. When you don't feed the baby often.
Amount of Breast Milk Produced Also Affects Baby's Development. Here are Some Tips to Produce More Milk
1. Eat all vegetables, especially green ones like broccoli, cabbage, and cauliflower.
2. With every meal have 6-7 boiled cloves of garlic.
3. Drink 3 glasses of milk every day.
4. Milk kheer is good for producing more milk.
5. Avoid junk food and fried food.
6. Drink one full glass of water before every feed.
7. Along with your milk, give your baby formula for one of his feeds; your baby will gain weight quickly!
8. Consult your doctor about tablets you can take to increase milk production.
In the beginning, it is difficult to pull out milk. The more you feed your baby the more milk you will start producing. If all these above doesn’t work with you consult a doctor.
Disclaimer: The views, opinions and positions (including content in any form) expressed within this post are those of the author alone. The accuracy, completeness and validity of any statements made within this article are not guaranteed. We accept no liability for any errors, omissions or representations. The responsibility for intellectual property rights of this content rests with the author and any liability with regards to infringement of intellectual property rights remains with him/her.
Read more
Suggested for you

#ItalianLove Baked Corn in Cheesy White Sauce
The very thought of this dish makes my mouth to water. Sweet corn with its crunchy texture and soft interiors is a much-loved food the world over. In this creation, boiled corn is baked in a perfect white sauce base with simple garnishes. Baked corn in white sauce with crisp fresh garlic bread is a match made in heaven
Serves
Preparation Time
Cooking Time
2 People
10 Minutes
05 Minutes
Ingredients
1/2 cup boiled sweet corn kernels (makai ke dane)
1/2 tbsp (tablespoon) butter
1/2 tbsp plain flour (maida)
1/2 cup milk
1/8 cup grated processed cheese
Salt and freshly ground black pepper (kalimirch) powder to taste
1/3 tsp (teaspoon) dry red chilli flakes (paprika)
Method
Step 1
Heat the butter in a broad non-stick pan and add the plain flour and cook on a medium flame for 1 minute, while stirring continuously.
Step 2
Add the milk, mix well and cook on a medium flame for 1 to 2 minutes or till the sauce is thick.
Step 3
Add half the cheese, salt and pepper, mix well and cook on a medium flame for 1 minute.
Step 4
Add the corn, mix well and cook on a medium flame for another minute.
Step 5
Pour into a baking bowl , sprinkle the remaining cheese and chilli flakes evenly over it and bake in pre-heated oven at 200°c (400°f ) for 5 minutes or till the cheese melts.
Step 6
Serve immediately with garlic bread.
Read more
Dr Vandan H Kumar has added a new answer
Guardian of 0 children
14 hours ago
Q. I am currently 32 week pregnant.I recently had growth scan.mu baby is in cephalic presentation. Does this change as I approach my due date. Also my EDD is July 25 and EDC is July 2. what is my expected due date. Also what is EDC?

Dr Vandan H Kumar
Paediatrician
14 hours ago
A. edc is expected date of delivery only.
that is 40 weeks
You will get more information for your query with your family doctor. You may meet your dr in person for proper guidance .
It is important to remain in contact with your doctor.
Swati Kar Samanta has added a new answer
Expecting Mom due in 7 months
14 hours ago
Q. why I am getting dizziness in my pregnancy
I am going with 3rd month of my pregnancy it's a very strong dizziness I feel at times means every day .....no other symptoms of pregnancy .Please help with elaboration .All okay means isn't part of this journey.
Read more
Swati Kar Samanta
Mom of a 2 m old girl
4 hours ago
A. Do consult your doctor as soon as you can. It's important to find the real reason because without that, proper medication is not possible.
Dr Priyanka Kalra has added a new answer
Guardian of 0 children
14 hours ago
Q. I am currently 32 week pregnant and had growth scan recently.My baby is in cephalic presentation.does this change after 36 week or does this remain the same?

Dr Priyanka Kalra
Obstetrician and Gynaecologist
6 hours ago
A. usually fixed. better to show to specialist always as they get the correct diagnosis. try to avoid self and extra medication that will only complicate this and create more damage to the child
Rashmi has added a new answer
Guardian of 0 children
4 hours ago
Q. it's my 5 month n I still didn't went for check up yet not even once is it okay if I go now or?

Rashmi
Mom of a 9 yr 7 m old girl
4 hours ago
A. You should have started going from the very beginning itself once you get to know you’re pregnant but since you haven’t reached that now if you’re pregnancy has been healthy last five months please get it checked with your doctor also if you need to start with any supplements or diet the doctor would advise you after a ultrasound so please visit your gynaecologist
Dr Ghouse has added a new answer
Guardian of 0 children
1 hour ago
Q. size chart is not correct for age of the baby

Dr Ghouse
Paediatrician
58 mins ago
A. generally it is available from Indian academy growth chart download from Google. if there is no relief it is better you see your doctor for proper examination particularly physical examination if there is need for doing investigations to find out the problem and treatment ok
Nikitha has added a new answer
Guardian of 0 children
33 mins ago
Q. Mera 8 month start hu white distance hora mere ko
Nikitha
Mom of a 9 yr 5 m old boy
32 mins ago
A. hello since u are a expecting mom this would require a proper medical attention and it is better to check with your doctor and your doctor will be able to guide you better on examination of the same and advise you accordingly
Check out this new Memory
Ravi mishra
Guardian of a 5 m old boy
1 min ago

Like
Comment
Share
0 Likes
0 Comment
Check out this new Memory

Sandhya
Mom of a 3 yr 11 m old boy
4 mins ago
#babyphotochallenge

Like
Comment
Share
0 Likes
0 Comment
Check out this new Memory
Shikha Pal
Expecting Mom due in 1 month
5 mins ago
#babyonboard

Like
Comment
Share
0 Likes
0 Comment
Check out this new Memory

Deepika Alkari
Guardian of a 7 m old boy
5 mins ago
#MamyPokoMilestoneMemories

Like
Comment
Share
0 Likes
0 Comment
Tell us more about yourself get More Personalised
 Infant0 to 6 Months
 Baby6 Months to 2 Yrs
 Toddler2 to 4 yrs
 Kids4-6 yrs
 Big Kids6+ yrs
 Expecting
 Trying to Conceive

