

.svg)
.svg)
.png)

Enter Child Details

Add Profile Photo


Videos you might be interested in


Videos you might be interested in
Videos you might be interested in
Suggested for you
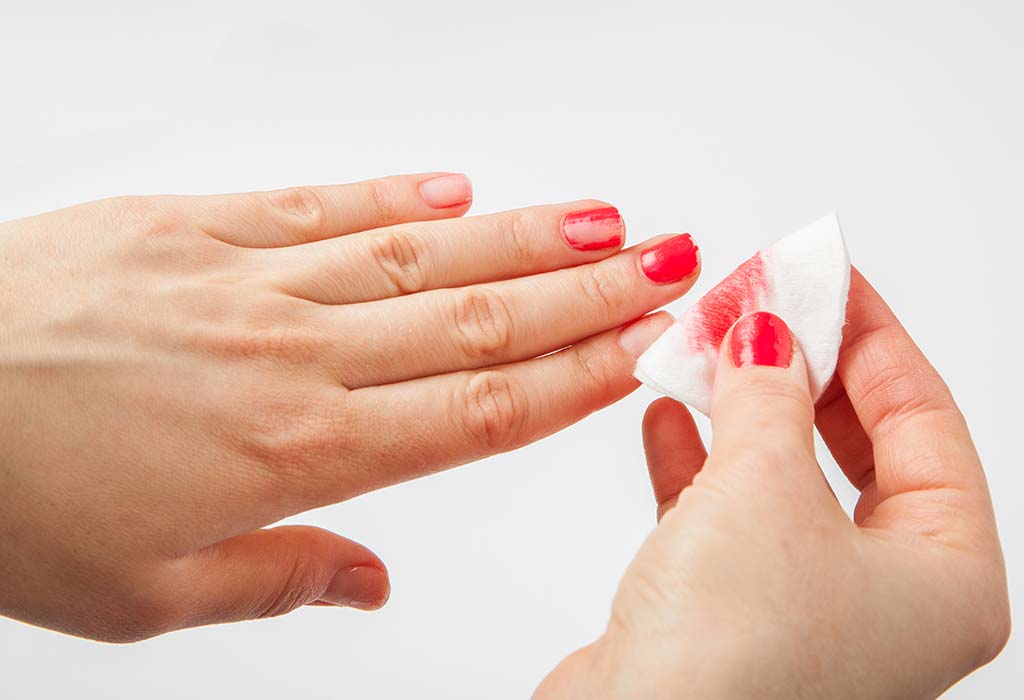
9 Ideas for Removing Nail-Paint Without Using Remover
Sometimes the best manicure and pedicure can go the wrong way and before you know it, you're dying to change your look. On one hand, you don't want to chip your nails and on the other - you don't have a nail polish remover around you.
So, is it possible to get the polish off without damaging your nails the natural way? The answer is - yes!
9 DIY Ways to Take off Nail Polish Without Remover
Here are 9 DIY ways to take nail polish off without using a remover. These are safe, easy to use, and don't take a lot of time either.
1. Toothpaste Remedy
Toothpaste has ethyl acetate, a chemical compound that's commonly used in commercial nail polish removers. This works like a charm and it is also a nail polish remover without acetone.
What You Will Need
Toothpaste
How To Use It
Get a toothbrush and apply a pea-sized dollop of toothpaste on it
Gently scrub it over your fingers, let it sit for a few seconds, and rinse while scrubbing the polish away
2. Lemon Water
Lemon has alkalizing properties and goes easy on your nails. All it takes is a few scrubs and you're done! It helps in removing nail polish naturally at home.
What You Will Need
Lukewarm soapy water
One slice of lemon
How To Use It
Soak your nails in soap water for five minutes
Take the lemon slice and scrub it over them gently
Apply nail oil afterwards to keep your nails in good shape once you remove the polish
3. Alcohol
If you're worried about nail infections and don't have other alternatives lying around the house, try using some regular alcohol. It works and is much more effective than commercial nail polish removers
What You Will Need
Rubbing alcohol
Lukewarm water
Cotton balls
How To Use It
Soak your nails in lukewarm water for a few minutes
Take the cotton balls and dip them in the rubbing alcohol. Work over your nails by rubbing them gently to remove the nail polish
Finish the wiping by applying some cuticle oil to your nails
4. Hand Sanitizer
This one is another natural home remedy that works extremely well. Here is how you use it.
What You Will Need
Hand sanitizer
Cotton balls
How To Use It
Spray a bit of hand sanitizer over your nail polish, making sure not to spray too much
Rub cotton balls on your nails after spraying and wipe away the nail polish
Spray a little bit at a time and keep rubbing. Repeat until the polish comes off
Rinse your nails thoroughly with water afterwards and dry
5. Hydrogen Peroxide
Almost every household has hydrogen peroxide lying somewhere in their kitchen cabinets. Here's how you use it.
What You Will Need
A small bowl
Hydrogen Peroxide
Hot water
Nail filer
How To Use It
Take two parts of hydrogen peroxide and mix with one part water
Soak your fingers in this and use a nail filer to remove the polish
6. Hair Spray
If Bustle says hair sprays work like a charm, then why shouldn't we be using it? It's not a crazy fad - just try it out and see for yourself.
What You Will Need
Hair Spray
Cotton balls
How To Use It
Spray cotton balls using the nozzle of a hair spray to make sure it gets saturated
Glide the cotton balls over your nail polish
Do this as many times as you want until the polish comes off
Rinse with water later and put some cuticle oil to keep your nails in good shape
7. Vinegar and Lemon Juice
If lemon water isn't enough to get the job done, then you need something much stronger. Try the vinegar and lemon juice combo - that pesky polish will definitely get wiped away.
What You Will Need
4 tablespoons of vinegar
One lemon (juiced)
Cotton balls
A small bowl
How To Use It
Mix the lemon juice and vinegar in a small bowl
Soak your nails in the solution and let your fingers stay soaked for about 3 to 5 minutes
Use the cotton balls to gently wipe away the nail polish and rinse afterwards
8. Deodorant
If you want to learn how to remove nail polish without remover and need something with acetone, try using deodorant. It works.
What You Will Need
Deodorant
Cotton balls
How To Use It
Bring your nails close to the nozzle of the deodorant
Quickly spray a little and wipe the polish away immediately using cotton balls
9. Nail Polish
This one might sound crazy but trust us, it works. Why? Because the solvents present in different nail polish will help evaporate and soften the nail polish you're currently wearing making it easy to remove. Make sense? Don't take our word for it. Just see it yourself.
What You Will Need
Any other nail polish besides the one you're currently wearing
A handful of paper towels
How To Use It
Pick an old or another type of nail polish you have lying around the house. Make sure it's not the quick drying variety
Apply that over your existing nail polish
Wipe away immediately using paper towels
You might have to give this remedy a go a few times for it to work, to make sure it comes off completely
Things to Remember while Using Homemade Nail Paint Removing Methods
Here are a few things to remember when you're using any home remedies to remove nail polish
Some of these methods may not work since most commercial nail polish removers contain acetone, a key ingredient which is used for removing nail polish. These are simply alternatives and acetone is harsh on your skin which is why we recommended these.
If you plan on using quick-drying nail polish to remove your existing one, make sure to wipe away quickly. Don't let it sit or dry up because that way, you'll have to put in double the effort to remove both kinds of nail polish next time.
Moisturizing your nails and applying cuticle oil afterwards is a must. This will help protect your nails, keep them healthy, and prevent them from drying up.
Remember to keep your nails in good shape and care for them the right away. We all make mistakes and it's totally normal to wear the wrong type of nail polish sometimes. Just make sure you use these remedies with care and don't depend on them. They're just healthier alternatives and if they don't seem to be working, just opt for a commercial nail polish remover. The investment would be worth it but we definitely recommend these for mild cases, for example, if you've just finished a manicure and changed your mind. Let us know how these home remedies work for you.
Also Read:
How to Shape Your Nails Perfectly?
How to Do a Pedicure at Home?
How to Give Yourself a Manicure at Home? Read more
Suggested for you
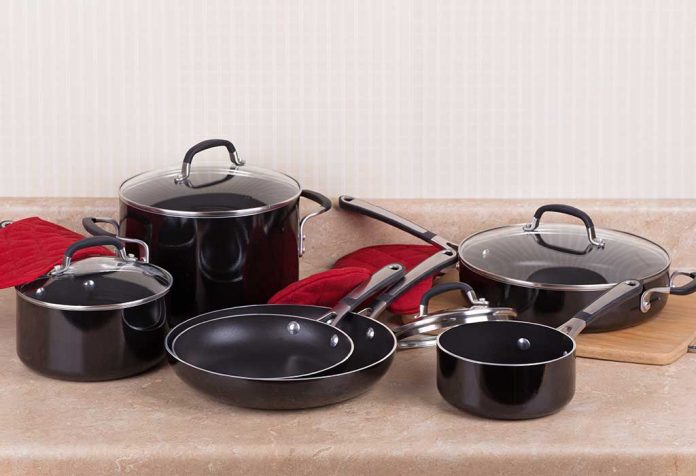
Best Utensils for Cooking - The Cookware That Will Keep You Healthy
Whenever you cook for your loved ones, you make sure that you choose the best possible ingredients, cooking medium, vegetables, spices and everything that would make food more nutritious and yummy. However, how often do we pay heed to the utensils that we cook in? Well, if until now you have not been paying heed to, it is important to know that the cookware that uses for cooking also has a great positive or negative impact on the food being cooked in it. In this article, we shall discuss some best utensils that you should use for cooking and also talk about the ones you should avoid!
What Kind of Utensils are Ideal for Cooking?
There can be many health threats lurking if you do not pay heed to the cookware that you use to cook meals for your family. Here are some of our healthy cooking cookware recommendations or some best utensils for Indian cooking:
1. Stainless Steel
One of the most readily available and best vessels for cooking that you should consider is stainless steel. You can not only cook wide varieties of dishes in it, but it also retains approximately 60 to 70 per cent nutrient content of the food. However, refrain from buying the stainless steel utensil that is polished with chromium or nickel as they may cause health threats.
2. Cast Iron
One of the long-lasting and sturdy metals that can be used for cooking food is cast iron. Small amounts of iron leach from the cookware when you cook food in a utensil made of cast iron, however, that is healthy for us. But if you are battling with an overload of iron in the body, avoid cooking food in such utensils. The modern-day cast iron utensils come with a safe coating to reduce leaching of iron; such utensils are more durable and easy to care too.
3. Glass
Undoubtedly one of the safest kitchen utensils that you can use for cooking is glassware. Glass is a non-reactive material, which means it neither release harmful elements into the food being cooked nor does it absorbs any nutrition from the food. The only limitation that is associated with it is that it is mostly used for microwave cooking.
4. Brass
Brass is a great material when it comes to cooking food because the food prepared in such utensils retain as much as 90 per cent of its nutritional content. Brass utensils are great for preserving the optimum way to keep most nutrients intact in the food that is being cooked. The only drawback or downside of using such utensils is cleaning them because extra care needs to be put in when you wash such utensils. Also, do not cook food in such utensils if the food is too acidic in nature.
5. Bronze
Bronze is another very healthy medium of cooking food but this material tends to keep approximately 97 percent of the nutritional quotient of the food intact. However, be aware of any tin or nickel that may be added to these utensils as it may lead to health hazards. Buying for a known or reliable source is a better way of buying some authentic bronze utensils.
6. Clay Pots
Clay heats up slowly and thus helps in retaining moisture and nutrients of the food intact. The biggest drawback associated with clay pots is that it takes longer to cook in comparison to other materials. Also, make sure that you buy unglazed pots rather than picking up the glazed ones because the latter may use harmful chemicals that may release during the process of cooking.
Cookware You Should Avoid for Cooking Purposes
Where cooking in some kinds of utensils helps in adding extra health benefits, on the other hand, there are some materials that may pose health threats if you cook food in them. Following are some cookware materials that you should avoid cooking food in:
1. Ceramic
There is no doubt that when it comes to stir-frying or sautéing food, ceramic cookware is a great option. However, the sad part is that most cookware with ceramic coating has a very thin coating and underneath there may be a coating of aluminium that may pose serious health hazards is used for cooking food. If you have to use ceramic cookware, make sure you buy one with heavy ceramic coating and from a renowned store or brand.
2. Aluminium
There was a time when almost Indian households were flooded mostly aluminium utensils in their kitchen cabinets. It was established that aluminium is a thyrotoxic metal. If it is used for cooking food, it can easily leach in the food and then cause liver disorders, constipation, paralysis and even cause brain disorders.
3. Granite
Granite utensils can pose some serious health conditions too because they are coated with a harmful substance called tetra fluoro ethylene. The reality is that such cookware is not exactly made up of granite but just look like it, in either case, it is not healthy for cooking.
4. Non-Stick Cookware
With more and more people getting conscious about their health and fitness, non-stick cookware is what has become the latest fad. However, these kinds of cookware are coated with Teflon or tetrafluoroethylene that contains material like cadmium and mercury that can pose health threats like various kinds of cancer, heart diseases etc. Slowly and gradually these elements store up in the body and cause mental and nerve disorders too.
FAQs
Here are some frequently asked questions for some added information on the topic:
1. Are Silicone Utensils Safer than The Plastic Ones?
Well, silicon utensils are not all natural, but they are made non-toxic silica. These can easily withstand freezing and heating without leaching off harmful chemicals. However, this might not be the case with most plastic utensils as they leach harmful chemicals when exposed to extreme temperatures.
2. What Utensils Can I Use with Non-Stick Cookware?
Non-stick utensils require extra care and handling as any sharp objects; metal spatulas can compromise the coating of these utensils. Using wooden or silicon cookware is an ideal option because such materials are less abrasive and do not cause damage to your cookware.
We hope that this article has helped you understand why certain cookware should be chosen while others should be avoided completely. Be smart and choose your cookware sensibly so that you and your family enjoy healthy food that comes from your kitchen.
Also Read:
Kitchen Essentials You Need to Have
Easy Ways to Clean a Burnt Vessel
Quick and Easy Ideas for Kitchen Organization Read more
Suggested for you
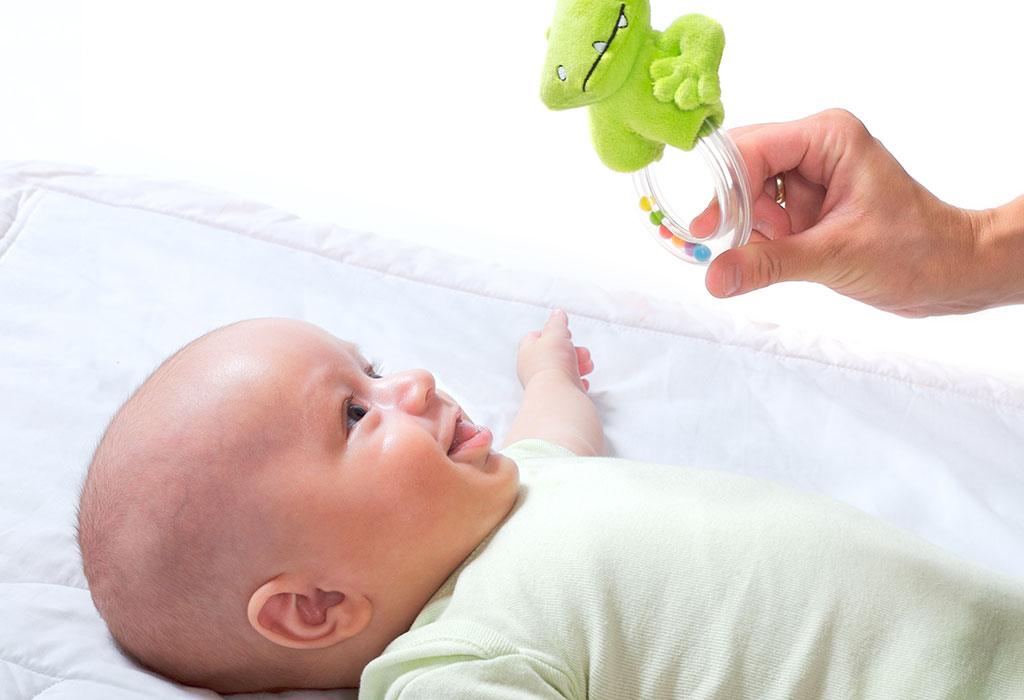
Best Toys for 2 Months Old Baby
Babies tend to learn better by doing. Toys can shape a baby’s all-round development in many key ways. Parents can provide their babies with the ideal opportunity to foster and practice new skills by offering age-appropriate toys which may meet their unique interests.
But selecting the apt toy for your baby can be a bit of a challenge with the kind of options available today. It is easy to get overwhelmed trying to decipher the age recommendation labels and sorting through the array of toys to choose the best toy for your cute bundle. Parents may like to go in for toys that can both challenge their baby's abilities and nurture healthy growth and development as well.
Cloth Toys
At this age, babies usually start to develop their senses and learn primarily via touch. Cloth toys come in adorable designs and a variety of materials and textures like smooth, squishy, rubbery, bumpy.
1. Skills Development
Cloth toys may aid your baby in the exploration of new visual shapes and colours.
They may assist in raising a baby’s tactile and sensory development.
2. Recommended Toys
Soft block toys
Textured rings
Coloured sponges
Baby paper crinkle
Soft taggies
Rattle Toys
Rattle toys are easily a baby’s favourite toy with the noise they make. Rattles with clips can be attached to a car seat which makes them a handy toy.
1. Skills Development
Rattles may help discover your baby the use of his eyes, hands, feet and auditory senses.
These toys can initiate the learning of cause and effect as babies slowly gain control over their actions and receive a response they like.
The sound of a familiar shaking rattle may make your baby turn in that direction thereby helping in the progression of vision tracking skills.
Rattle toys may promote grip management and object manipulation skills in babies.
2. Recommended Toys
Rattle and rock toys
Beads wood rattle
Oball shaker
Grab and spin rattle
Baby loop bee rattle
Music Toys
Your baby may enjoy music toys immensely as hearing is among the earlier senses to develop.
1. Skills Development
Musical toys may enhance a baby’s understanding of sounds and language.
These toys can provide an enjoyable exercise to arouse hearing and vision.
They may also help in the advancement of cognitive skills.
2. Recommended Toys
Baby play piano
Musical caterpillar with a ring-bell
Storybook rhymes musical toy
Musical dancing frog
Moon musical box
Baby Play Gym
Baby play gym may give your baby a wonderful space and time to stretch, wriggle and build up his body.
1. Skills Development
Baby play gym may help your baby exercise and increase his muscle tone.
It can prepare him for future tummy time by enabling him to turn his head to the side or look cheek-down even though raising his head to see ahead won't be possible at this stage.
Baby gym with dangling coloured toys may help awaken visual interest in babies.
It may help promote a baby’s motor skills and social-emotional skills.
2. Recommended Toys
Activity play mats
Overhead play gym
Infant stim mobile
Colour fun play gym
Multi-function baby activity spiral
Calming Toys
Calming toys with music and humming sounds may prove beneficial in soothing your baby and helping him fall asleep.
1. Skills Development
Calming toys may support the development of gross motor skills and introduction to the idea of cause and effect.
They may further sensory perception through touch and taste.
Musical calming soother and teethers may foster auditory stimulation and jaw strength.
2. Recommended Toys
Teething relief toys
Melodies soother lamb
Soothe and glow seahorse
Snugapuppy calming soother
O ball loops teething toy
Colourful Toys
Your baby cannot see colour till he turns 3. However, he may be fascinated with high contrast colours and patterns like black and white objects, chessboard-like patterns.
1. Skills Development
Colourful toys may promote auditory and visual perception.
These toys act as a great basic colour stimulus.
They may help incite pattern recognition in babies.
2. Recommended Toys
Musical dreams mobile
Soft coloured balls
Multicolour striped cat
Soft picture book
Horse shaped roly-poly
Portable Toys
Portable toys can help create an exciting play area for your baby just about anywhere. They can be attached to car seats or baby strollers when on the move.
1. Skills Development
Portable toys may promote constant tactile feel and visual attention.
They may serve as a wonderful auditory
Plastic mirrors can help introduce your baby to the notion of self-awareness.
2. Recommended Toys
Multi-activity toy pack with plastic loops
Unbreakable plastic mirrors
Stroller bar activity toy
My nature stroll along toy
Merry go round cot mobile
What Does Age Recommendation Labels on Toys Mean
It is essential to carefully read the age recommendation labels on toys before buying them. They usually indicate:
If the toy is safe for babies in the intended age group and does not pose any choking or ingestion hazard during normal use and abuse
If the different characteristics of the toy match the mental and physical abilities of the proposed age group of kids
If the toy caters to the needs and interests of children in the envisioned age group
If the toy contain harmful chemicals that are used to make plastics softer like phthalates
Safety Tips for Babies
Some useful safety tips that you may like to keep in mind can be:
Choose toys that are soft, light and can be easily managed by your baby lest he ends up hurting himself.
Settle for toys that can be cleaned easily from drool and spit-up to prevent any likely infections.
Always keep an eye on your baby while he is playing. It is not advisable to leave him unattended.
Regularly inspect your baby’s toys for any broken components, chipped paint or tiny parts that may come loose to avert possible choking risks.
How to Choose Best Toys for Your Two-month-old Baby
Some helpful tips to enable you to choose the best 2-month baby toys can be:
You may like to look for toys that grow with your baby and last for a while like musical instruments, learning blocks.
Toys which boost a baby’s physical, cognitive, social-emotional and language skills may be the right choice like toys for 2 months baby girl can be a music box, soft books and toys for 2 months baby boy can include toy mobile, soft blocks.
Toys that stimulate the maximum senses and demands the total involvement of a baby may prove beneficial like unbreakable mirrors, sensory toys which squeak.
Brightly coloured or high contrast coloured toys which can move slowly may easily capture your baby’s attention like wind chimes, crib mobile.
Toys like softballs, stacking toys, push and pull toys that provide a chance for interactive activity, promote tummy time may make the best choice.
The onus for selecting suitable toys for babies falls on their parents who may provide such experiences, materials and opportunities which can set the stage for early learning and development. Read more
Suggested for you
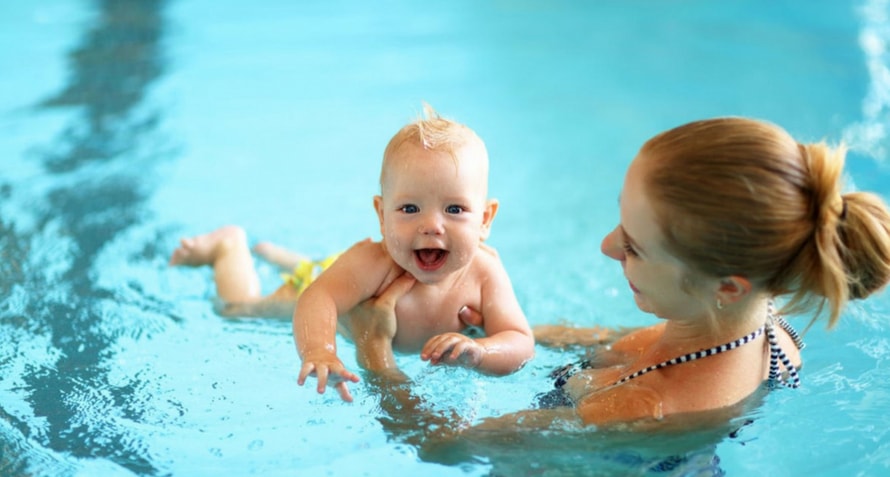
The Right Age to Take Your Baby Swimming
The Internet is rife with videos of babies that can barely hold their heads up, doing back stroke in the swimming pool, and going underwater and swimming right up to the surface like they are pros! Encouraged by these and other such videos, you might want to take your baby swimming too. But is it really recommended?
What Should be the Right Age to Take your Baby Swimming?
The American Association of Pediatrics (AAP) recommends that: you should wait until your child is 4 years old before you enroll them in swimming classes. This recommendation is based on the physical readiness required to be able to take swimming lessons. However, AAP does not strongly advocate against toddler swimming programs and lessons. This does not mean they recommend it, but they are tolerant to the idea.
7 Reasons to Start Baby Swimming Lessons Early
According to some studies, the earlier you start baby swimming lessons, the better it is. Here are the points in favour of early baby swimming lessons.
Survival swimming lessons can save your baby’s life. Drowning has been estimated to be one of the leading causes of unintentional injury and/or death, especially of 1 to 2 years old children. Wouldn’t it be great if your baby was equipped to be able to save himself?
According to several studies, enrolling your baby in swimming lessons early on can reduce their risk of drowning, between the age of 1 and 4 years.
The earlier you begin, the easier it is to weed out aquaphobia (fear of water). Most phobias begin during early childhood, and exposing your baby to the causative factor before such phobias have a chance to emerge could be one way to protect him from it.
This might be a good idea for competitive swimming. Some babies, it is very clearly evident, are water babies – they love being in the water! If you have such a baby at hand and plan to get them into competitive swimming, you might be considering starting early.
Swimming can accelerate and improve lung and heart development, increases the strength of these organs, and aids in brain development too. It can also greatly enhance the coordination between various body parts.
Swimming provides your baby with necessary physical activity for better eating and sleeping patterns and can weed out problems like low appetite, insufficient weight gain, and so on.
Baby swimming lessons can be a unique bonding experience for baby and parent. They can also serve as an educative means for parents to learn about water safety and life-saving skills like cardiopulmonary resuscitation, or CPR.
However, some studies have also successfully established that your baby’s swimming age does not expedite gaining proficiency over swimming. Irrespective of when your baby starts taking swimming lessons, he will attain a certain degree of expertise in swimming around the same age as his counterparts (who started swimming later) – estimated to be around 5.5 years. So technically... it really doesn’t matter!
How to Introduce Baby to Swimming
So, if after all considerations you have decided to start swimming lessons for your baby, remember: you cannot, and should not, do it alone (i.e. without a trained expert/supervisor).
It is best to look for a baby swimming program, offered by a credible institute. Look for qualifications of the experts who will actually be working with your baby. Ensure they are following regulatory guidelines with respect to making the swimming pool and the entire experience safe for your baby.
Having said all that, it would be best to not ‘hand your baby over’, but to instead join your baby in the pool. You do not want to regret and feel sorry if you are unable to rush to your baby’s side in time, should such a situation arise.
Also remember, any kind of swimming lesson should not be attempted until the time the baby has learnt to hold their head up. Your focus should be on 3 things when trying to teach your baby to swim:
Teach them to float – this can be tried for younger babies.
Teach them to roll over and put their face out of the water – this too can be tried with younger babies.
Teach them to move to the sides of the pool – this might be suitable for slightly older babies (1 years and above).
As your child gains control over the above three movements, you may try teaching them advanced movements; maybe even a stroke.
https://www.youtube.com/watch?v=16J5WHqgqkI
KEY TAKEAWAY: In this video, Victoria explains some of the basic types of swimming lessons you can try to give to your baby, along with sharing some safety measures and tips:
Never carry your baby down the steps and into the water. Always put the baby on a mat (by the edge of the pool), enter the pool yourself, and then pick up your baby, as shown in the video.
Never allow anyone to hand your baby over to you while you are in the water; the risk of the baby being accidentally dropped into the water is too high.
The first activity you can try is ‘swings and dips’; you hold the baby with his back facing the water, and swing him from side to side. If your baby seems keen, you may try to dip his ears in the water (so he can get used to the difference in pressure).
Next, you can try ‘breathing activities; this is a demonstration only activity where you hold the baby in front of you, and show them how to take a deep breath (out in the air), and release it under water to make bubbles. With time your baby may show the willingness to try it himself.
Next activity you can try is ‘kicking legs in the water’; hold your baby to yourself, supporting their head and neck, and hold and splash their legs in water up and down (as shown in the video). Similarly, you can even try ‘splashing hands in the water’.
The next activity is ‘walk floating’; hold your baby with their tummy touching the water, head supported and held above water level. Slowly walk backwards, dragging the baby forward with you. You may notice your baby kicking his legs and hands (if the previous activity was learnt by your baby)! The same activity can be tried by holding the baby on their back too. After sufficient practice, you can try and give your baby more freedom by supporting ONLY their head, letting their waist, bottom, and limbs free to be moved and wiggled around as they please!
Finally, while coming out of the pool, follow the same practice as getting into the pool: place the baby on the mat, step out of the pool, then pick your baby up.
8 Swimming Safety Tips
Here are important safety concerns, so far as taking baby swimming is considered.
Learn about CPR. Cardiopulmonary resuscitation – or CPR – is a way of reviving an unconscious person, commonly one who has been a victim of drowning. It is a complex procedure that involves reviving a heart that has temporarily gone into cardiac arrest, and ventilating a person artificially (i.e. helping their body get ‘air’, so as to get oxygen, in order to remain alive). Knowing CPR can prevent a dangerous situation from escalating, and if you are taking your baby anywhere near a swimming pool, you should know CPR.
Swim in proper gear. Swimming gear – including swimming costumes, swimming caps, swimming goggles, and ear-plugs – is essential for a safe and comfortable swimming experience.
Floats are a must. Once in the pool, it should be imp[erative for children to use floats until they master swimming. The best kinds are inflated tubes that go around the waist. If not, life-jackets are another option.
Beware of pool-borne infections. Swimming pools are perfect breeding grounds for all kinds of germs. So beware of pool-borne infections and take due precautions. The swimming gear mentioned above will also help keep infections far away from your child. If required, ask your paediatrician for preventive measures, and also seek him/her out at the earliest sign of things going wrong – rashes, redness, any kind of discharge (from eyes, ears, etc.) should be taken seriously.
Also, beware of hypothermia. The temperature of the water in the pool has to suit your baby. Remember, babies cannot effectively self-regulate their body temperature, and extreme temperature differences can cause them to go into shock, a condition known as hypothermia.
Instill discipline. This pertains to toddlers and older kids. Instill a strict code of discipline for being in and around a swimming-pool: no playing pranks, no pushing anyone into the water, no splashing or diving, and certainly no dares! While swimming pools can be enjoyable, they need to be treated with caution!
Supervision is a must. No matter how old your kids get, never let them be around a pool without adult supervision. Also make sure the adult supervising your child knows how to swim, and will be able to intervene constructively and in a timely fashion, should an accident occur.
Don’t push too hard. While you may want your baby to start early, pay heed to any signs of discomfort, hesitance, or unwillingness your baby may be displaying.
6 Ideas to Help Your Baby Enjoy Swimming
Here are some tips on making swimming time fun and enjoyable for your little munchkin!
Involve them in the shopping process. Even babies have preferences for colours, patterns, etc. If you can involve them in the shopping of their sippy cup, first spoon and plate, clothes and toys, why not their swim gear too?
Jump in with them. One of the easiest ways to comfort your babies in the pool is to jump right in with them. If you are yourself afraid of entering a pool, remember that you will be taking your baby to a ‘baby pool’, in which water won't be above waist-line. It will indeed be reassuring for your baby to be only at an arm’s length from you, and might actually excite them to try it!
Maintain eye contact and keep smiling. This will make your baby feel safe. You may sing to them, or praise them, to encourage them to move about independently in the water.
Carry their favourite toy along. Toys always soothe babies, so make sure you carry their favourite toy to the pool. For older children, you can use toys to motivate them to swim.
Click pictures. The younger generation is definitely more camera friendly than the older one used to be when they were kids. So one way to try and make the experience of taking your baby swimming a more enjoyable and memorable one is to also take your camera or simply your phone along, and have someone click pictures. (Beware of dropping the camera/phone in the pool though!)
Reward them. Who doesn’t love gratification? For a successful time in the pool, you can reward your baby with a new toy, their favourite food or snack, or maybe just a nice and warm cuddle-session!
What to Carry in Your Baby’s Swim Bag
When you take your baby swimming, you’ve got to be prepared for any situation that may arise! Consider adding the following things to your baby’s swimming bag.
First aid
Swim gear
Extra diapers
All diaper-bag essentials
Toiletries and bathing essentials (including soap, wipes, shampoo, towel, disinfectant, etc.)
Fresh set of clothes
Accessories (like toys, floats, etc. mentioned earlier)
Swimming is a skill that your baby will never forget once he learns it. It is like driving a car, or writing – no matter how little you do it on a daily basis, you never really forget. Swimming is a great way to unwind, and can be used for recreation too! All the best!
Source:
https://www.ncbi.nlm.nih.gov/pubmed/19255386
https://www.ncbi.nlm.nih.gov/pmc/articles/PMC2598364/
https://www.ncbi.nlm.nih.gov/pubmed/?term=Children%27s+readiness+for+learning+front+crawl+swimming Read more
Suggested for you
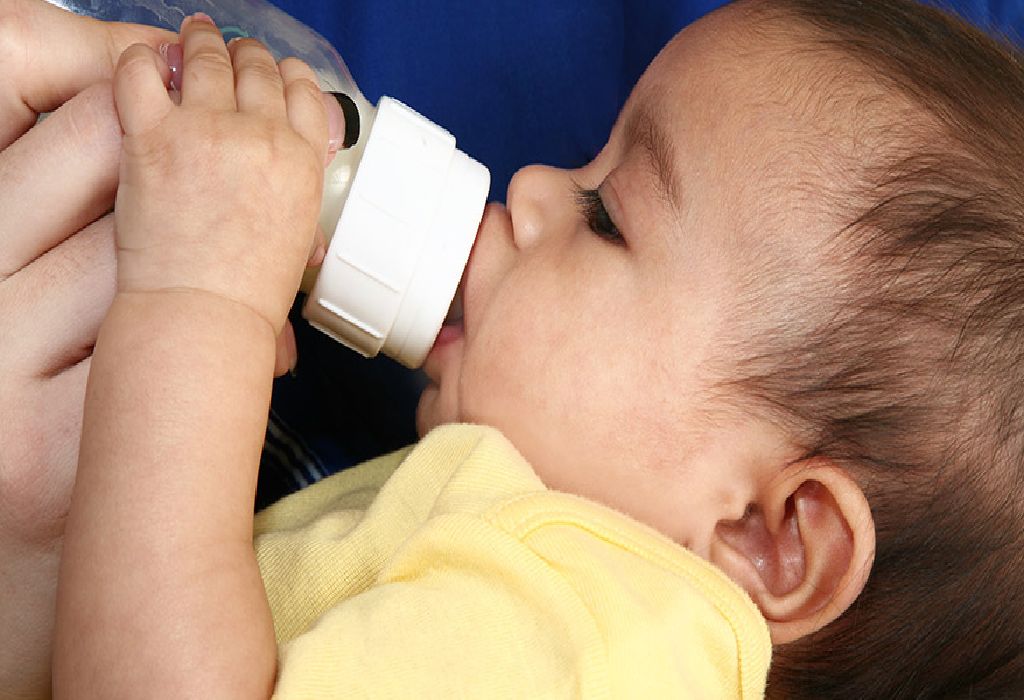
Is Your Baby Getting Enough Milk Along With Solid Food? Check These 5 Signs Carefully!
Babies need the right kind and the right amount of food to grow up fast and healthy. In their initial years, milk does everything for them. Yes, as a mother, you are still worried if he has drunk enough milk to be satisfied and well-fed. But once you have introduced solid foods to your child, the challenge gets even tougher! How much is really sufficient? Now that the infant is eating solid foods too, how much milk does he still need and how can you check if he's getting enough? Well, your baby makes it easy for his mom by displaying some clear signs...
Paediatricians recommend exclusive breastfeeding, as far as possible, for the first six months of a baby's life. After six months, many mothers introduce some solid foods to the baby. It is a challenging experience, and while some babies love the novelty, others make a big fuss. But one common problem that many of us face as mother is this: HOW MUCH milk does the baby still need? Since he is eating solid food also, does he really need all that milk still?
The Secret of Balanced Diet - Solids are NOT Substitutes
First, it is very important to remember that although your baby has started on solid foods, the solids cannot be a substitute for breast milk/formula milk just yet. A major part of your baby's nutritional requirements have to still be covered with milk. In the initial stages, solids are used just to get the baby used to the idea of chewing food. Your baby will most likely have small quantities of solids at frequent intervals, since, she is more interested in checking out new textures and flavours rather than simply filling her tummy! There will also be days when she wants to have more of milk feeds. It is better to allow her to do so.
5 Signs To Watch Out For If Your Baby is Refusing Milk After Starting Solids
Here are the five signs you must keep track of in your baby to guarantee that's getting a good balance of milk and solid food. If you notice any abnormalities, you can then adjust your feeding patterns accordingly.
1. Your Baby's Needs
The amount of food your baby needs will depend on a lot of factors like her weight, feeding patterns, and level of activity. Thus, the amount of milk will vary for different babies and will also depend on how much solid food your baby actually consumes (as opposed to how much he throws or spits up!). According to some well-accepted studies on this subject, here are some guidelines to remember:
At 6-7 Months: Your baby needs a lot of milk now - safe to say that it is milk that will actually give him his nutrition while solid foods are more 'experimental' in nature to just give him a feel. Many doctors also recommend that solids should be fed after nursing session, not before. This helps your baby get breast milk first, which is still your baby's primary source of nutrition till he is a year old
At 8-10 Months: The amount of milk will now start going down as your baby slowly accepts and enjoys solid food. Feed on demand by reading your baby's cues that denote he is still hungry
At 11-18 Months: Milk still accounts for a good percentage of your child's diet, almost 50%, as suggested by child nutrition experts
At 24 Months: By now, your child is getting a lot of his nutrition from solid foods. Milk will now account for about 20% of his nutritional needs
Tip: It is always better not to have a strict feeding schedule for your baby at first, but rather to go with the flow. You will notice that as your baby grows, she will show more inclination towards a variety of solid foods and the milk feeds will reduce accordingly.
Watch: 12 Infant Nutrition Do's & Don'ts to Keep in Mind
https://www.youtube.com/watch?v=MBPhMYHQpKk
2. Your Baby's Height and Weight
Two of the most significant signs you must track are your baby's height and weight. Make sure that you take your baby for regular checkups so that the doctor is able to assess her weight, height and growth parameters.
At 6 Months: Your little boy should weight about 7.8 Kg now, with a height of about 67.8 cm. For little girls, the number stands at 7.2 Kg and 66.6 cm
At 9 Months: By this time, baby boys usually reach the weight of about 9.2 Kg now, and a height of about 72.3 cm. For baby girls, the number stands at 8.6 Kg and 71.1 cm
At 1 Year: At the one year milestone, 10.2 Kg is a healthy weight for boys, with a height of 76.1 cm. Baby girls, on an average, weigh about 9.5 Kg on their first birthday, with a height of 75 cm
If your baby's height and weight are all well within limits, you can be assured that she is being fed right both in terms of milk and solid foods. Note that these are only indicative and there will be minor variations depending on your baby's activity level as well as family background. You can refer to more details in the chart below.
3. Your Baby's Reaction
When you start off with solid food, your baby has to be your guide in checking whether he's full or needs his favourite milk! But babies can be very unpredictable. So, one day you may find your baby happily finishing up her bowl of puree, while the next day she may refuse to have more than a few spoonfuls. The best thing to do when you are introducing a new food is to dab a pea sized amount on your baby's tongue. Watch her reaction to see if she likes it, and you can gradually increase the quantity. If not, don't push it and let her find comfort in milk for the time being.
Also observe your baby when it comes to your feeding style. For instance, your baby may prefer to have small mouthfuls. She may be comfortable with chewing slowly and may not open her mouth for the next mouthful until she's through.
Tip: Offer your baby only as much as she accepts willingly. It is not a good idea to force feed her at this stage, as she may develop an aversion to the whole feeding routine.
4. Your Baby's Diapers
This is critical and a great way to check if your child is getting the right nutrition. Your baby, if she is eating sufficient quantities of food, will wet the diapers at regular intervals - typically 4-5 times a day at least. She will also have one or two bowel movements over the course of the day. If your baby is peeing and pooping far less than this, chances are she is not getting enough nutrition. She could also be facing dehydration. It is best to consult a paediatrician.
Also note the colour of your baby's poop as a good indicator of whether his feed is going down well. If the poop is continuously green for a few days, it can indicate a stomach infection. Yellow-brown poop is also a cause for alarm as it can indicate irritable bowels. Many babies experience tummy problems when their feeding routine first changes from exclusive milk to solid foods + milk. If you notice any abnormality in the poop, discuss it with the doctor to get proper treatment without delay.
5. Your Baby's Health
Lastly, remember that your baby's requirement for food (solid/milk) will be different when he is unwell. For example, if your baby is running a fever or has a stomach infection, his needs will naturally be different. It is widely believed by many moms that babies should not be fed solid food if they are sick. But the truth is that most doctors advise it is best to continue feeding the baby normally, unless she is throwing up at regular intervals. If your baby is throwing up food, it is best to cut back on her solid food and keep giving your baby milk (formula or breast) at regular intervals. You can also try an oral re-hydration solution after getting a go ahead from her doctor.
Finally moms, let's never forget that every baby is different and the amount of food a baby should eat isn't set in stone. The main thing is to follow your baby's cues to decide how much of what she should eat, keep some room for flexibility, and let your baby chalk out her own meal plan! Read more
Suggested for you
Vandana Sharma has added a new answer
Guardian of 0 children
12 hours ago
Q. I'm currently 37 weeks 4 days my baby weight is 2.4kg whether it is normal?

Vandana Sharma
Nutritionist
12 hours ago
A. Hello mam that is fine , and this varies as it depends o various factors as well too , so avoid stress, take rest and and also healthy diet as well
Dr Ghouse has added a new answer
Guardian of 0 children
12 hours ago
Q. what could be the baby weight when we are in 37 week 4 days? what could be average weight before labour?

Dr Ghouse
Paediatrician
12 hours ago
A. there is lot of individual variation it can be around 3 kgs ok. if there is no relief it is better you see your doctor for proper examination particularly physical examination if there is need for doing investigations to find out the problem and treatment ok
Dr Disha Patel has added a new answer
Guardian of 0 children
12 hours ago
Q. hlo plzz tell me gripe water de sakte hai baby ko Mera baby 15 months ka hogya hai ???

Dr Disha Patel
Ayurvedic Physician
11 hours ago
A. nahi.
its not nessesary to feed it.
ur baby is 15 month okd, give all family food in roughly mashed form, include seasonal fruits n veggies.
t..c
Sarika gupta has added a new answer
Guardian of 0 children
12 hours ago
Q. #asktheexpert
Am 25 weeks pregnant with Twins, and cervix of 25mm. got cerclage done at 21 weeks. please suggest precautions so that I can smoothly continue ue my pregnancy and avoid premises.

Sarika gupta
Mom of 2 children
12 hours ago
A. Hello there ma’am please do not worry about it too much and please have coconut water on daily basis and also have more green leaves vegetables fruits and dairy products in diet and also home made food. Also go on regular check ups. Also be happy and stress free .
Thanks and take care
Dr Ghouse has added a new answer
Guardian of 0 children
11 hours ago
Q. what does this mean
"There is a funneling of internal os with effective cervical length (measures ~2.8 cm on TVS) "
in 29 weeks 5 days pregnancy?
Dr Ghouse
Paediatrician
10 hours ago
A. small cervical length ok. if there is no relief it is better you see your doctor for proper examination particularly physical examination if there is need for doing investigations to find out the problem and treatment ok
Dr Ghouse has added a new answer
Guardian of 0 children
1 hour ago
Q. my baby approximately weighs only 2.4 kgs in my womb what are all the foods that can increase baby weight?
Dr Ghouse
Paediatrician
43 mins ago
A. normal traditional foods if you are having deficiency of hemoglobin can take iron supplements calcium etc. if there is no relief it is better you see your doctor for proper examination particularly physical examination if there is need for doing investigations to find out the problem and treatment ok
Check out this new Memory

Shabbu Shabbu
Mom of a 3 yr 1 m old girl
3 mins ago
#coolkid

Like
Comment
Share
0 Likes
0 Comment
Check out this new Memory
Mangesh Gaidhane
Father of a 1 m old girl
6 mins ago
#megaphoto

Like
Comment
Share
0 Likes
0 Comment
Check out this new Memory

Aidoh Damin
Expecting Mom due in 2 months
9 mins ago
#mamatobe

Like
Comment
Share
0 Likes
0 Comment
Check out this new Memory

Manasa Gangotri
Mom of a 2 m old boy
14 mins ago

Like
Comment
Share
0 Likes
0 Comment
Check out this new Memory

kajal gajjar
Mom of a 6 m old boy
23 mins ago

Like
Comment
Share
0 Likes
0 Comment
Tell us more about yourself get More Personalised
 Infant0 to 6 Months
 Baby6 Months to 2 Yrs
 Toddler2 to 4 yrs
 Kids4-6 yrs
 Big Kids6+ yrs
 Expecting
 Trying to Conceive

