

.svg)
.svg)
.png)

Enter Child Details

Add Profile Photo


Videos you might be interested in


Videos you might be interested in
Videos you might be interested in
Suggested for you
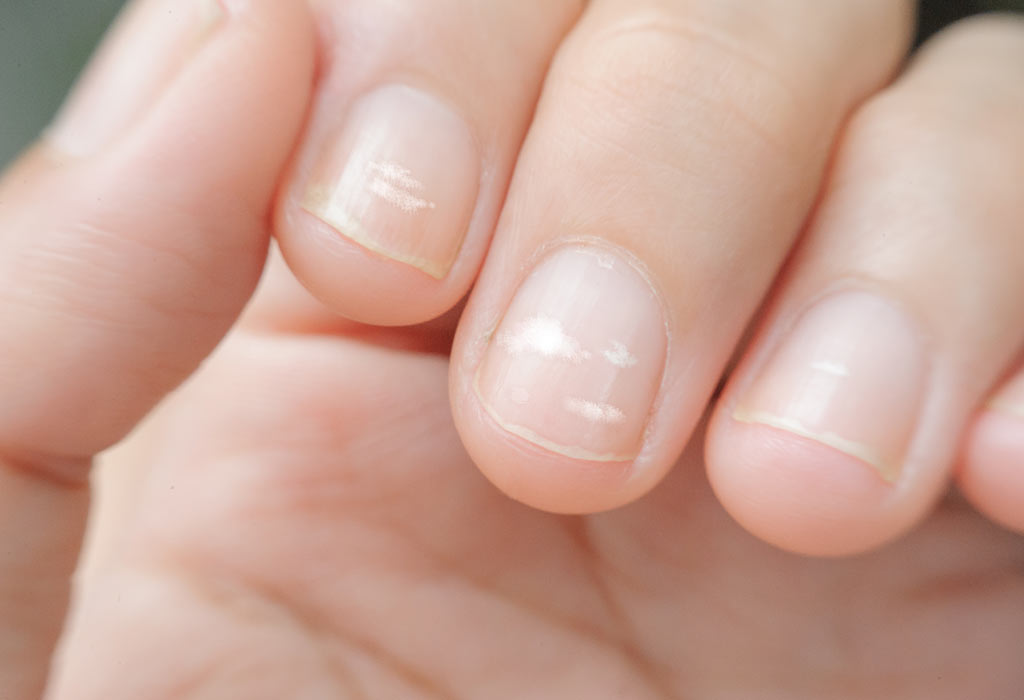
White Spots On Your Child's Nail - Should You Be Worried?
A child’s fingernails can reveal a lot about his overall health. Pink and lustrous nails are usually indicative of good health. Discolouration, lines and ridges, brittle nails, or white spots on the nails can be a sign of an underlying medical issue. The emergence of white lines or spots on a child’s nail is also called leukonychia. In most cases, it is a harmless condition that is fairly prevalent in children. The spots vanish in due course of time as the nail grows out.
What White Spots on Your Child’s Nails Mean
White spots on a child’s nail can imply a zinc deficiency, which is easily curable. Sometimes it corresponds with low magnesium and calcium levels. At times it can be a mark of a past injury rendered at the base of the nail, which starts showing as a white spot when the nails grow a bit. Irrespective of the cause, the white spots are usually temporary and likely to disappear when the nail grows out completely, which roughly takes eight to nine months. However, instances where recurrent white spots may appear on most nails can be indicative of some viral or fungal infection or chronic problems linked to the liver, kidney, or heart.
Types of Leukonychia
Leukonychia can be of the following types:
1. Total Leukonychia
Such a condition is usually genetic. The whole nail may change to fully white.
2. Partial Leukonychia
In this condition, whitening of some parts of the nail occurs. Partial leukonychia can have three variations:
Leukonychia Striata: Horizontal white streaks appear parallel to the base of the nail (lunula). This condition is also called Mees’ Lines or Transverse Leukonychia.
Leukonychia Punctata: Tiny white spots become visible on the nail. It is the most common form of leukonychia. It is also referred to as “true” leukonychia.
Longitudinal Leukonychia: Longitudinal white lines emerge beneath the nail plate. Longitudinal leukonychia is quite rare.
3. Apparent Leukonychia
This condition involves white discolouration of nails due to alterations to the nail bed instead of the nail plate. Terry’s nails, Muehrcke’s nails, half and half nails are variations of apparent leukonychia.
What Causes White Spots (Leukonychia)
Some of the likely causes of white spots on nails can be:
1. Nail Injury
White spots can be a result of some minor injury or trauma inflicted on the nail matrix. For example, banging of nails against a desk, fingers shutting in a door, bending of a nail, or incorrectly clipping a nail may cause leukonychia. The damage may have happened weeks before, but nails tend to grow very slowly. Therefore, the injury may become visible when the nails grow in the form of a white spot.
2. Allergic Reaction
Another cause of white spots can be a mild allergy due to exposure of nails to certain chemicals as found in nail polish, removers, and hardeners.
3. Infection
The emergence of white spots on nails can be a fungal infection. If left untreated, it can grow and slowly spread to the bed of the nail. The nail may turn flaky and brittle.
4. Mineral Deficiency
White spots on nails may become noticeable in case of a mild deficiency of certain minerals like zinc, caused by some illness or variations in hormone levels.
5. Possible Side Effect
Leukonychia can also surface as a plausible side effect of certain medications or treatments like systemic chemotherapy.
6. Other Causes
Some possible additional causes can be:
Kidney failure
Heart problems
Eczema or psoriasis
Arsenic or lead poisoning
Pneumonia
Symptoms of White Spots on Nails
White spots can manifest in various ways. The cause may dictate the form and extent. For example, a nail injury may show as a big white dot, while an allergic reaction can produce several dots across the nail. Some of the common symptoms can be:
Small measured spots
Larger distinct individual spots
Lines (longitudinal or horizontal) across the nail
Do These White Spots Occur Only Due to a Calcium Deficiency?
Most people think calcium deficiency causes the white spots on nails. But many medical researchers like to challenge this notion. They say that both the occurrences are not connected. White spots are most commonly a result of an old injury to the nail matrix, which starts becoming prominent as the nail grows out. Alternatively, a fungal infection, an allergy to nail products or a food item can also be probable triggers. Sometimes the condition can be genetic. In very rare instances it can point to some deficiency which more often than not is related to low levels of zinc or biotin.
Treatments for White Spots
The treatment for white lines on nails toddler may differ depending on their cause. A doctor, to make a diagnosis, may recommend a nail biopsy or mycology wherein nail tissues or clippings are studied. He may also propose a blood test to establish the likely presence of an underlying disease. There are certain treatments that may be suggested, depending on the cause.
In case the cause is a fungal infection, your doctor may prescribe oral antifungal medicines and topical antifungal creams.
In case it is the result of an allergy your doctor may suggest discontinuation of all nail products and give some anti-allergic medication.
Most injuries to a nail heals with time. With the growth of the nail, the wound will move upwards, and you can clip off the damaged part.
Cosmetic treatments are available if discolouration of nails is an issue.
Home Remedies to Get Rid of White Spots/Line on Children Nails
Some useful home remedies that may help to get rid of white marks on nails in children can be:
1. Tea Tree Oil
First, add olive oil to tea tree oil to make a mixture. Once this is done, apply the same to the affected nail. Continuous use of this mixture may produce positive results.
2. Baking Soda
You can prepare a mixture combining half a cup of baking soda, some spsom salt, one-fourth of a cup of peroxide, and four cups of warm water. Dip your child’s nails in this solution for some time regularly for reduction of white spots.
3. Orange Oil
Applying orange oil to the discoloured nails using a dropper or some cotton may prove beneficial in doing away with the white spots.
4. White Vinegar
You can soak your child’s nail in a concoction of white vinegar and lukewarm water for about ten minutes every day to eliminate the white spots.
5. Lemon Slices
Rubbing lemon slices on your child’s fingernails may help in eradicating the white spots.
How to Prevent White Spots on the Nails
In case of inevitable conditions such as genetics, it may not be possible to prevent white spots on the nails. However, there are certain measures you can take to reduce the risk of white spots appearing on the nails, or preventing them in case of conditions such as injury or a deficiency.
1. Avoiding Contact With Chemicals or Irritants
Avoid exposing your child to irritants or chemicals such as nail polish removers, etc., as they can cause white spots or leukonychia to occur.
2. Keeping the Nails Hydrated
Keeping your nails hydrated ensures that white spots do not occur due to dryness. Moisturise your child’s nails as soon as he steps out of the shower and make it a habit, so he can continue the same as he grows up.
3. Eat Foods Rich in Zinc
Regularly eat foods that have a high zinc content, such as nuts, dairy, eggs, meat, etc. This will reduce the risk of a zinc deficiency, and subsequently, leukonychia.
When to Consult Paediatrician
You may like to consult a paediatrician in the following cases:
If all the nails turn completely white
If several white spots become evident on all the nails
If parallel discoloured lines appear on all the nails
If your child’s nail become part brown and part white
The occasional white spots or leukonychia on your child’s nails may not be a worrisome situation. Usually, it doesn’t require any special treatment. In case a child frequently gets white spots on all his nails, the issue may need further investigation to rule out any serious complications.
References and Resources: MedicalNewsToday, Healthline
Also Read: Dark Circles Under Eyes in Kids Read more
Check out this new Memory
Janagani Mythily
Guardian of a 1 yr 1 m old boy
5 mins ago

Like
Comment
Share
1 Likes
0 Comment
Suggested for you
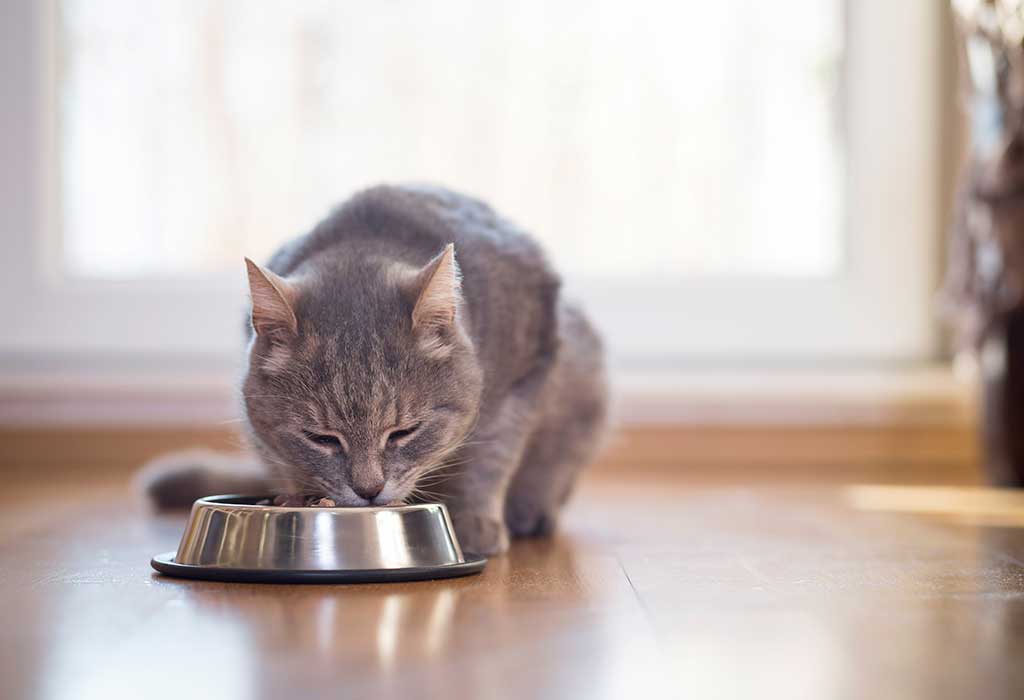
Feed Your Cat These 8 Healthy Homemade Foods
If you are a cat owner and want to feed your furry little friend healthy and nutritious food, then you should give him home-cooked meals. These homemade recipes are perfect to keep your cat happy and satisfied.
Benefits of Giving Homemade Food to Your Cat
When your furry friend is in the growing stages of his life, one of the most important things he needs, besides your love and care, of course, is proper and balanced nutrition, which is what most store-bought pet food fails to give.
Homemade cat food is made of natural food items and is great for the digestive system of cats. By giving homemade food to your cat, you can keep his calorie intake in check and make sure that he stays healthy. Your cat’s dental and urinary health will also improve. He’ll have a better coat and shed much less. You’ll also see a visible improvement in your little friend’s energy.
Essential Nutrients That Should Be a Part of Your Cat's Diet
The important nutrients that your cat needs to stay healthy and fit are mentioned below.
1. Animal Protein
Protein is an important nutrient. It supplies essential amino acids and is needed for producing antibodies, enzymes, and tissues. Animal protein provides energy to cats and helps in their growth and development.
2. Fats
Just like humans, fats are an important part of a cat’s food as well. Fats help the body breakdown vitamins and provide ready energy for other activities as well.
3. Vitamins
Vitamins too are essential for cats. Vitamins help in regulating their metabolic rate and promote normal growth and functioning of their body parts. Vitamins help improve and protect your cat’s vision and improve their bone strength.
4. Minerals
Minerals serve a lot of important functions across the body of a cat - be it nerve impulse transmission or maintaining acid-base balance. Minerals also help in the formation of enzymes.
5. Water
We all need water to survive and so does your cat. Water will provide your body with the energy he needs to break down and digest all the food he has consumed. It will also provide him with the energy to continue with other important functions.
Healthy Cat Food Recipes That You Can Try at Home
If you want to make the switch already, here’s how to make homemade cat food.
1. Eggs for Breakfast
Eggs with cottage cheese should be your cat's first meal of the day. Here is how you can make a nutritious breakfast for your cat rich with eggs and cottage cheese.
Ingredients
3 medium eggs
2 tablespoons of veggies of your cat's choice (grated)
1 tablespoon non-fat dry milk
3 tablespoons cottage cheese
Directions
In a medium to large size bowl, take the milk powder, add water to it, and mix it well. Make sure that there are no lumps in it.
Break and add the 3 medium eggs into the mixture and beat well.
Take a frying pan and preheat it on a medium to high flame. Pour the entire mixture and cook it, as you would do with while making pancakes.
Flip it, add the cut veggies and grated cottage cheese on the half-cooked side and allow it to cook well.
Once it is cooked, fold it in half like an omelette and cut into bite-size pieces. Serve it warm in your cat’s favourite bowl.
2. Chicken Stew
This meal is super easy to cook and can be used both for lunch as well as dinner.
Ingredients
2 cups of brown rice
8 carrots (scrubbed but not peeled)
Boneless chicken
¼ cup of green peas
A handful of green beans
Directions
Wash the chicken in and out and keep it in a large stew pot and cover it with water till the brim.
Take the veggies and cut them into small pieces and add them to the pot.
Add the 2 cups of brown rice.
Cook till the chicken becomes soft and the veggies are soft enough to consume.
Take the entire stew and pour it into a large blender. Blend it.
Let the mixture cool down a bit and serve in your pet’s favourite bowl whenever he feels a bit hungry.
3. The Classic Chicken
The classic chicken diet is a pet-parent favourite across the world.
Ingredients
1/2 pound chicken breast (boneless and cooked)
1/8 teaspoon salt substitute
1/2 large egg (hard-boiled, split it lengthwise)
2 tablespoons of olive oil
Directions
Take all the ingredients in a microwave-safe bowl and mix them well.
Heat it up in the microwave oven before serving it to your cat.
4. Chicken and Rice
Chicken and rice is a great combination for all pets.
Ingredients
1/3 pound chicken breast (boneless and cooked)
1/3 cup long-grain rice (cooked)
1 egg (hard boiled and mashed)
2 teaspoons of olive oil
1/8 teaspoon salt substitute
1 multiple vitamin-mineral tablet (crushed)
Directions
Take all the ingredients in a large bowl.
Mix the entire list of ingredients using both your hands and serve meal size portions in your pet’s favourite bowl.
5. Fish
Cats love to eat fish, so make it a part of your cat's diet - he will thank you for that.
Ingredients
Depending on your cat’s age choose a small, medium or large fish with preferably fewer bones.
1 egg (hard-boiled and chopped)
1 multiple vitamin-mineral tablet
2 bone meal tablets (crushed, 10-grain or equivalent)
Directions
Take a large bowl and add all the ingredients in it except the fish.
Boil the fish for 10 to 20 minutes so that its flesh becomes soft and remove the bones.
Add the fish meat to the bowl and mix all the ingredients properly.
Heat it in a microwave and serve medium hot.
6. Mackerel Starter
This mackerel recipe is a favourite among cats and it is the perfect food you can make for your cat at home.
Ingredients
1 cup cooked or canned mackerel
1 tablespoon sunflower oil
1 tablespoon of cooked brown rice
2 tablespoons of chicken broth
Directions
Mix all the ingredients in a blender and blend well.
Serve immediately. You can store this in the fridge for three days.
7. Sardine Treat
Here’s another fish meal that your cat will love.
Ingredients
Sardines (1 canned or 3 to 4 fresh ones)
2 tbsp of grated carrots
1/3 cup cooked oatmeal
Directions
Mix all the ingredients in a bowl and serve.
You can refrigerate the leftovers and use it for 3 days.
8. Diabetes Special
Some pets have diabetes. They might develop it in the late stages of their lives or may even show symptoms from the very beginning. If your pet cat has diabetes, here’s a cat food recipe for senior cats with diabetes.
Ingredients
1/2 cup grains (brown rice or oatmeal, cooked)
1/2 cup organic chicken (raw, ground)
1/4 cup raw carrots or cooked green beans
1/2 cup chicken liver (raw)
vegetable broth to moisten
Directions
Take a large bowl and pour all the ingredients into it. Mix all the ingredients to the desired consistency.
Warm up the meal before serving and serve in small bite-sized pieces for easy digestion.
This meal is specially designed for cats with diabetes and its main aim is to strengthen the pancreas, reduce insulin needs and reduce scarring.
FAQs
1. Raw Food or Cooked Food - Which is Better for My Cat?
Since your pet is domesticated, cooked food is by far the best option for him.
2. Which Ingredients Should Never Be Added to a Cat's Food?
Avoid adding gluten-based products and corn substitutes in your cat’s food.
3. How to Store Homemade Cat Food?
The best way to store homemade cat food for short periods of time is to keep in a container and place it in the corner of your kitchen. For extended periods of time, you can consider storing them in your refrigerator.
4. Can Kittens Be Fed the Same Homemade Food as the Older Cats?
Yes, they can, but the food needs to be softer and broken into smaller bite-sized pieces for easy digestion.
5. How Much Food Should I Give to My Cat?
A standard bowl serving of 250 gms of food, twice a day would be enough to keep your pet healthy.
Homemade food is good for cats. By eating homemade food, your cat with stay healthy and happy. Try these recipes and keep your furry little friend happy and healthy.
Also Read:
Tips To Maintain Your Home Clean and Pet-Friendly
Basic Tips to Consider While Planning a Trip with Your Pet
Consider These Pets That Require Low Maintenance Read more
Suggested for you

Hyperlactation - Causes, Signs and Remedies
Milk production is the primary aspect of motherhood once the baby has been delivered and is ready to feed on the mother’s breast. As the due date approaches and the delivery commences, the body already goes into gear to start milk production and keep it ready for the baby. While some women face problems with it, there are certain women whose body produces a lot of milk than required. This condition is termed as hyperlactation.
What is Hyperlactation Syndrome?
Hyperlactation syndrome is the condition where breast milk overflow occurs in excessive quantities because of increased milk production. This results in the milk spurting out of the breast with a lot of force and in large amounts. At times, milk begins to leak out of the breast more frequently than it should be. All of these conditions can make it difficult for the baby to feed off the breast properly.
An optimal level of breastmilk production and feeding is a good sign for both the mother and the child to know that he is getting enough milk and the body is producing the right amount, too. Excessive production could lead you to believe that your baby isn’t having enough or the forceful spurting of milk could cause your baby to refuse to breastfeed as well.
What Causes Oversupply Syndrome?
Since all women do not face the condition of hyperlactation syndrome, the oversupply of milk is a reason for multiple factors that are unique to certain women. These are:
1. An Imbalance of Hormones
Milk production is a result of hormones that stimulate the necessary glands to carry out the generation of milk in your breasts. Any change in the levels of these hormones could result in the improper quantity of milk being produced. In certain cases, this could be a side-effect of medicines too, which affect the hormone levels. Internally, the pituitary gland could end up secreting more hormones than necessary, leading to hyperlactation.
2. The Signs of The Body
The process of breastfeeding depends a lot on the feedback it gets from external conditions. As breastfeeding begins and the newborn starts sucking on milk, the body begins to understand the demand on a daily basis and produces the right quantity of milk that’s needed.
However, if you prefer squeezing out breastmilk to be given to your child at night via the bottle or when you’re at work, this could lead your body to be confused in the amount of milk your child requires. Sensing an increased demand for milk, the body will switch to high gears and produce a lot of milk than needed, leading to hyperlactation.
3. The Number of Alveoli Glands
Heard quite rarely, the glands that produce milk in the breast and stored it before passing it down the tracts, to the nipple and consequently to the baby, are called as alveoli glands. An average number of alveoli glands in a breastfeeding woman tend to hover around 1lac or so. For women suffering from hyperlactation syndrome, these glands could reach up to 3 lacs, leading to a lot of milk being produced than required.
Signs of Hyperlactation
To understand if you are suffering from a hyperlactation syndrome, it is necessary to look for an oversupply of breast milk symptoms that can help you reach a conclusion. These are observed both in the mother as well as the child.
1. Mom Signs
For the mother, the very first and most obvious sign is the sensation of feeling extremely full and heavy breasts. There might even be the possibility of having developed mastitis or having your ducts blocked.
These engorged breasts can start hurting after a while, leading to milk being leaked out and wetting your feeding bras. While feeding on one breast, the other breast might start leaking milk, too.
Usually, this mismatch of milk production and demand is seen in most mothers in the first couple of weeks, or maybe one more. Post that, most women find their milk supply to be regulated at the right level.
2. Baby Signs
Most babies rarely react to a larger flow of milk since it could be as much as they require, too. But if the milk begins to spurt out way too fast, he may pull away from his mouth and turn away from the breast. Some babies use their gums to chew down on the nipple to stop the flow, which ends up damaging the nipples altogether.
With hyperlactation, babies usually get confused. This results in repetitive nursing cycles where the baby will take the breast but then refuse it after a while, and then get fussy about the hunger he feels. Your child might even spit out milk while feeding when the flow is too fast. This prevents your child from getting the nice creamy milk that comes later on.
Such babies either have low weight or end up gaining a lot more weight than is healthy.
How Will Oversupply of Breast Milk Affect Your Baby?
The forceful emergence of milk in large quantities results in the baby swallowing a lot of milk in one go, which also ends up in him swallowing air along with it. This leads to the formation of gas in his tummy, making him fussy and irritated. A lot of burping might be required leading to spit up milk, and he might pass gas more often than usual.
How to Treat Hyperlactation?
Reducing oversupply of breast milk can be achieved by taking care of a few things right away.
Avoid pumping right after you are done feeding.
Adopt the technique to dangle feed your child, which helps regulate supply properly and reduce the chances of mastitis.
Go for block feedings as you use only one breast to nurse your baby for a couple of hours.
Apply cold cloths under your breast to relieve the engorgement.
Placing leaves of cabbage inside your bra is well-known to take care of milk leaks, too.
Can You Continue Nursing with Hyperlactation Syndrome?
Absolutely. Nursing the right way is what will finally regulate your milk production and reduce hyperlactation. Make sure you try to stick to a fixed schedule and quantity as much as possible.
Hyperlactation might seem like a boon for women having low breastmilk problems but this, too, is not beneficial for the mother or the child. With a few quick home remedies and the right techniques of feeding and storing milk, your body can start learning the baby’s demands and bring itself back on track in no time.
Also Read: How to Deal with Leaky Breasts Read more
Suggested for you

Suggested for you

Common Troubles During Breastfeeding That No One Talks About
Being a mom to a 2-month-old angel, I was on cloud 9 on the day of my delivery. All my pain and crying stopped when I saw my little one. Mine was a vaginal term delivery, and she weighed 3.34 kg at birth. Things were pretty good and smooth till then.
Then came the session of breastfeeding. Being a doctor, I knew very well the importance of breastfeeding my baby soon after delivery. Like any other mom, my mind was prepared for feeding until the horrors struck.
Horror 1:
Being a first-time mom, my breasts had not yet started producing milk. It was a hassle from then, as she started feeling hungry soon after delivery and I couldn’t feed her.
Solution:
It took 4-5 days for my breasts to start producing colostrum and until then, she would keep sucking and turning more irritable. As advised by my obstetrician and her paediatrician, we resorted to formula feeding in the beginning.
Horror 2:
One of my nipples was retracted, but that would pull off slowly with the help of a massage. But the real horror didn't end there - even though I was vigilant of massaging and oiling my nipples during the antenatal period, nothing actually seemed to be effective as I developed severe nipple cracks and fissures. To accompany that, I had unimaginable pain when the baby latched and sucked, along with soreness and bleeding. I literally cried through each feeding session, and within a day, breastfeeding became a nightmare.
Solution:
As advised by my obstetrician, I used silicone nipple shields bilaterally and applied nipple cream after each feeding session. It took almost 30 days for the pain to reduce, and to be frank, it hasn't completely healed yet.
Horror 3:
As I started finally started producing milk 3-4 days after my delivery, my baby stopped sucking! I believe that it was because she either felt that it was useless to suck on something empty, or because she had sucked blood a few times accidentally. This lead to engorgement of both my breasts, causing another pain sequence.
Solution:
Self-expressing milk worked for a bit, but the real cure was pumping milk. I used a manual vacuum pump to express the milk and I fed her that.
Horror 4:
Due to extreme pain while breastfeeding, I was reluctant to feed her on demand and I would resort to formula feeding more frequently, which led to a decrease in milk production.
Solution:
Home remedies such as garlic, ghee, sprouts, milk, lots of water, eggs, and many other foods rich in protein and fat were added in my diet which, to some extent, did help me out. Above all that, I decided to breastfeed her on demand regardless of the pain I suffered.
Horror 5:
The nipple shield - the saviour I needed - was now my biggest headache. As she got used to latching and feeding while on nipple shields, when I gradually decided to feed her without it, she would turn incredibly fussy. She would never latch on or suck.
Solution:
As there were many sterility issues with using nipple shields, I had to train her to feed without them. It took several days for her and me to successfully start our journey of proper breastfeeding.
Some pieces of advice to all the new moms out there:
It is okay if you don't produce milk soon after delivery; a majority of moms don’t. So calm down and keep feeding your baby. Let her learn to latch properly while you find the best position to feed her.
It is okay to put your baby on formula feeding, provided you follow the procedure to the T and only give the amount advised by the paediatrician. But remember that breast milk is always best for the baby. Never be reluctant to feed.
Nipple soreness is a common issue in almost all first-time moms, and it will heal by itself. Apply breast milk to your nipples after each feed. Unsalted butter also helps. Train your baby to latch properly because a wrong latch can cause sore nipples.
Nipple cracks take time to heal as there is no rest to the damaged skin. The more you feed, the more time it takes to heal. Talk to your obstetrician about such issues during the antenatal period so as to prevent these problems at the early stage itself.
There is nothing wrong in pumping breast milk and feeding your baby in case of nipple cracks and engorgement, provided you follow the complete sterility procedure.
Use of nipple shields should be done very carefully. Boil them after each feed for about 5 minutes and store them in clean, sterile containers. Do not over depend on nipple shields as they can cause nipple confusion and potential latching issues.
It is important that your baby gets the initial colostrum from you as it takes care of all her health, growth, and immunity. The amount of breast milk you produce will gradually increase with time. It is important for moms to eat healthy, frequent meals and drink lots of water to ensure proper milk production. You can also take medication for the same under the supervision of your obstetrician.
Every mom is different, so never stand for any comparisons or taunts. Also never resort to any wrong practices and medicines that a non-professional would advise to increase breast milk because what you eat ultimately reaches your baby. She may fall ill.
Lastly, not all moms produce enough milk to satisfy their baby's hunger. Keep a check on weight gain, the number of stools passed, and frequency of urination. Ideally, a newborn uses 10% of their birth weight in the initial days post birth, and they gain back the weight within 10 days. From there on, they gain about 30 g per day. Passing stools 5-6 times and urinating about 12 times is expected in newborns. A total of 1 to 1.2 kg weight gain is ideal for a baby by the time they turn 1 month old.
It is okay to feed formula if you do not have enough breast milk. There is nothing to be embarrassed about it. Not everyone is perfect. Do not give ears to myths and old moms who scrutinise and judge you for the same.
Last but not least - keep calm, be happy, take care of yourself and rest when your baby sleeps because you need to take care of your body. Things don't end with childbirth; they go into a whole new phase. Talk to your better half or your mom about your worries. It is okay to feel sad sometimes because it is part of the job. Believe me, the pain is worth it in the end!
Disclaimer: The views, opinions and positions (including content in any form) expressed within this post are those of the author alone. The accuracy, completeness and validity of any statements made within this article are not guaranteed. We accept no liability for any errors, omissions or representations. The responsibility for intellectual property rights of this content rests with the author and any liability with regards to infringement of intellectual property rights remains with him/her. Read more
Suggested for you

Rashmi has added a new answer
Expecting Mom due in 5 months
3 hours ago
Q. Is there any issue with this test

Rashmi
Mom of a 9 yr 7 m old girl
3 hours ago
A. You have not given any details about us to what test are you talking about or anything associated with that for that matter can you please repost your question with all the necessary details required to understand your question as accordingly I can assist you on that
Dr Vandan H Kumar has added a new answer
Guardian of 0 children
1 hour ago
Q. my baby is 8years old and she wets bed can anyone suggest me what to do??

Dr Vandan H Kumar
Paediatrician
1 hour ago
A. normally bedwetting is very common during the night time and the child is able to tell you regarding urination during the daytime.
usually this problems improves with increasing age of the child and usually no medicines are given until and unless recommended by the doctor( you can easily wait for ten years of age of the child)
usually treatment of medicines (if started) gives only symptomatic relief and the problem goes away only with increasing age with the strengthening of the muscles of the bladder which control the urination.
steps
decrease the amount of water intake just before going to bed and make the child pass urinex before going to sleep.
also you can wake up the child at around 2 o'clock 3 o'clock and make the child pass urine.
never criticizex the child for this act because this will again aggravate the problem due to stress.
meet your doctor who will tell you more regarding this .
Sunita Mahato has added a new answer
Trying To Conceive
1 hour ago
Q. sir job vacancy are avalable

Sunita Mahato
Mom of 3 children
58 mins ago
A. not the platform fr this question
take care...
Sunita Mahato has added a new answer
Mom of a 1 m old child
53 mins ago
Q. #asktheexperts why my 1 month old baby latch every every 10 15 mins in the afternoon
Sunita Mahato
Mom of 3 children
44 mins ago
A. every 10 to 15 mins baby wants attention and all the time to be in lap so
dnt develop that habit...
maintain a feeding gap of 2 hrs...
always burp after feed..
take care
Rashmi has added a new answer
Trying To Conceive
40 mins ago
Q. Hello doctors.. I am 32 weeks pregnant... I am getting vibration feeling near right upper abdomen... mostly when I lying on left side it's getting vibration feeling... it's normal?
Rashmi
Mom of a 9 yr 7 m old girl
13 mins ago
A. Different women have different feeling during the time of pregnancy so it would be normal but if it is happening constantly with you then it would be good for you to get it checked with your doctor whatever is required doctor advise you after examining
Sai Prasanthi R L has added a new answer
Expecting Mom due in 4 months
37 mins ago
Q. I want something very good products to my coming baby

Sai Prasanthi R L
Mom of a 10 yr 2 m old boy
19 mins ago
A. Hello dear! Try Babyhug skin care and clothing products for the baby. There are safe and effective for almost every skin type. Consult your doctor for further assistance in this regard. Good luck and take care
Check out this new Memory

Riya
Mom of a 1 m old boy
1 min ago
#MamyPokoMilestoneMemories
First time holding him feels like I have got second life

Like
Comment
Share
0 Likes
0 Comment
Check out this new Memory

Pradosh Pathy
Father of a 11 m old boy
2 mins ago
#stylishbaby

Like
Comment
Share
0 Likes
0 Comment
Check out this new Memory

VERTIKA SINGH
Mom of a 5 m old girl
5 mins ago

Like
Comment
Share
0 Likes
0 Comment
Check out this new Memory

Swaroop Janga
Guardian of a 2 m old girl
6 mins ago

Like
Comment
Share
0 Likes
0 Comment
Tell us more about yourself get More Personalised
 Infant0 to 6 Months
 Baby6 Months to 2 Yrs
 Toddler2 to 4 yrs
 Kids4-6 yrs
 Big Kids6+ yrs
 Expecting
 Trying to Conceive

