

.svg)
.svg)
.png)

Enter Child Details

Add Profile Photo


Videos you might be interested in


Videos you might be interested in
Videos you might be interested in
Suggested for you

Teaching Your Kids to Write - 10 Tips that Work Wonders
Kids start their learning journey the moment they are born. First, they learn to adapt to their new surroundings, followed by making their body accustomed to intake of solid and liquid food items and then slowly progressing to learn the nuances of life such as crawling, walking, identifying things and people around them. While kids learn many things on their own, there are certain things which need to be taught to them.
When Can Your Toddler Start Learning to Write?
Your kid will take her first step towards writing by scribbling random things. Learning to write is not easy and your child will need a good amount of time to start understanding what she is writing or drawing. A child usually starts to understand the difference between drawing and writing by the age of three.
Teaching how to write requires a lot of patience on the part of the parents. Writing gets a boost once the kid starts talking and understanding the sounds and meaning of all the letters. There is no standard way on how to teach writing to preschoolers & toddlers, but the playschool will help the kid to fine-tune their writing skills and teach them how it is different from drawing.
How to Teach a Child to Write?
A school is equipped with trained teachers, who will teach the child how to draw and write once your kid begins schooling. However, even before your toddler starts formal schooling, you can give them a head start by teaching certain elementary basics about writing. Here are the different methods of how to teach a child to write letters:
Do not teach how to write just because it’s necessary, make it fun:
No kid will start writing letters properly with a pencil or a crayon at once. They will start writing only when the colours and patterns amuse them. Start off by showing them how to make random signs by using slate and chalk or magnetic doodle pads. Another exciting way to get a toddler interested in writing is by using sand, salt or wheat flour to draw random signs and letters and encouraging them to follow.
2. Strengthen their palms:
Developing hand muscles is an important step in getting your child to write more and more. Playing with things such as clay or play-doh and holding different things with their hands will strengthen the hand muscles.
3. Ensure a good grip:
Give your child a pencil or a crayon which fits their palms comfortably, providing a good grip. This will make writing easy and also ensure that their handwriting is good. Using golf pencils will help.
4. Allow them to scribble:
Do not stop your kids from scribbling. Allow them to start scribbling as soon as they start holding items. Seeing things appear on a paper out of their hands will excite and encourage the child to scribble more. You can guide them on how to write their name, one letter at a time.
5. Show enthusiasm and excitement while they write:
Children tend to do things with greater enthusiasm when people around them are amused by what they do. Show excitement by laughing and clapping every time your child scribbles something. This will make them happy and encourage them to write more.
6. Make the margin lines more visible and evident:
If your child has a problem writing letters in between the margin lines, ensure that the lines are visible by highlighting and darkening them. Draw different multicoloured lines as start points for capital and small letters so that the child knows where to begin and end a capital letter and small letter.
7. Limit their interaction with devices such as mobile phones and tablets:
Digital tools are something that you should make your kid stay off from during the initial years. Getting hooked on mobile phones will make them lose interest in writing. Also, avoid teaching them how to write on a tablet. This will not allow them to develop proper grip and control with a pencil or a pen. Although our lifestyle today is dominated by technology and it is impossible to keep a child away from them completely, it is worthwhile to restrict their exposure to the digital enhancements.
8. Make your child write on top of letters written by you:
Tracing a letter will make it much easier for a child to learn the contours and curves of an alphabet. Write down a few alphabets and make your child write on top of them. Once they familiarize and get a hang of the letters, make them write without the pre-written letters.
9. Give them the freedom to write what they like and do not get worried if they write backwards:
Many children start writing backwards in the beginning. The best way to correct them is by getting a black slate with borders and marking the top left corner as the start point. This will ensure that they write in the correct direction. Also, do not restrict them from writing what they want as this will discourage and disinterest them from writing. Teach how to write the correct things slowly and step by step.
10. Teach them how to recognise letters:
The child will be able to write letters much more easily if they are able to identify, memorise and relate to them. Surround your kid with alphabet shapes in the form of magnets, puzzles and drawings. Spell out letters to them while pointing out to the respective letter. This will help them associate the letter with its sound, thereby fulfilling an important pre-requisite to learning how to write.
Kids are enthusiastic about learning new things and cling on to what they see, hear or do. Being patient is a pre-requisite when you are trying to teach your kid anything. They will have a short attention span and get distracted very easily. Understand that teaching them will take effort and time. Also, applying the correct methods of teaching how to write along with continuous monitoring of their progress is essential as any unchecked mistake will become a habit in the long run.
There are many different ideas and tools which will help you understand how to teach a child to write alphabets in easy and organized ways. You need not wait for formal schooling to start in order to teach your child how to write. These tips will help you get started even before the school does.
Also Read: 10 Basic Life Skills for Children Read more
Suggested for you
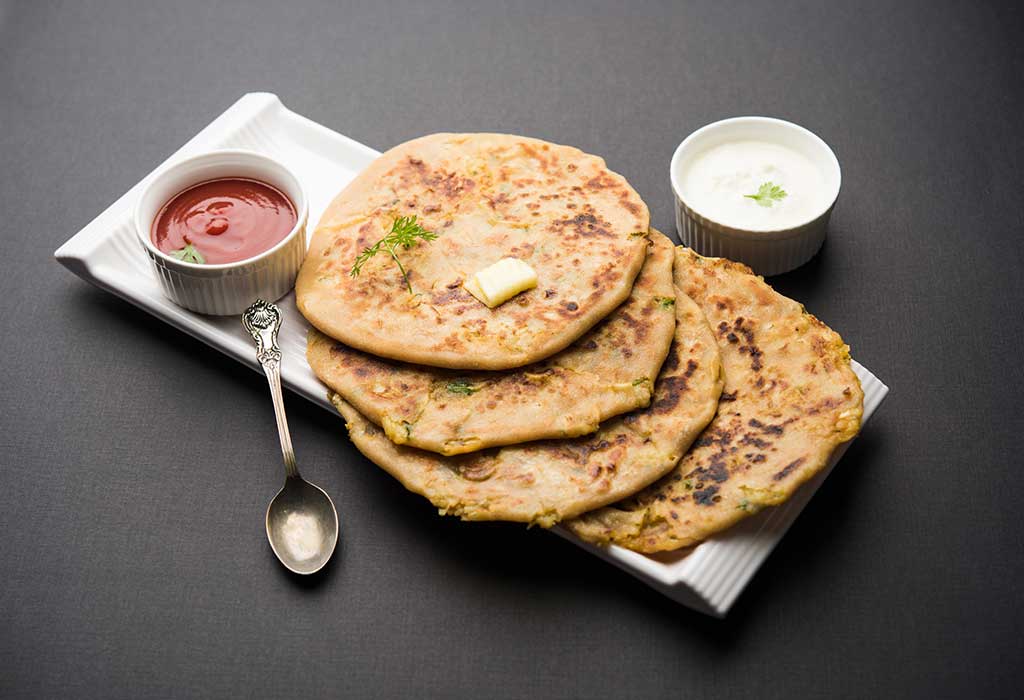
Start Your Mornings with These Simple North Indian Breakfast Recipes
A healthy breakfast kick-starts our day and gives us the energy to perform different activities. Having breakfast daily also improves our focus. Breakfast is the most important meal of the day, and you must never skip your breakfast. If you are bored of eating the same old eggs or cereals in your breakfast, explore different options. We bring you the recipes of breakfast items that are popular in north India. Start your day with these.
North Indian Breakfast Recipes
Listed below are ten north Indian breakfast dishes for you to try from.
1. Ajwain Puri
This simple, delectable breakfast item can be eaten with a vegetable curry, curd, or tea.
Ingredients
Wheat flour – 2 cups
Ajwain (Carom seeds) – 1 tbsp
Chilli powder – 1 tsp
Vegetable oil – 250 ml
Salt to taste
How to Make
Take the wheat flour in a large plate and add the carom seeds, chilli powder, a few drops of vegetable oil and salt to it.
Use water to knead the dough.
Divide the dough into small balls.
Take one ball on the rolling board and roll it to form a small circle.
Heat the oil in a kadhai and fry the puri until it turns slightly golden.
Repeat the process to make more puris.
2. Aloo Paratha
It is the quintessential breakfast item in most north Indian households. You can have it with curd and pickle.
Ingredients
Potatoes - 2
Roasted cumin-coriander (ground) – 2 tsp
Chilli powder – ½ tsp
Coriander (finely chopped) – 2-3 tbsp
Ghee or vegetable oil – 4-5 tbsp
Wheat flour – 2 cups
Salt to taste
How to Make
Pressure cook the potatoes for 3 whistles.
Once the potatoes are cooked, allow them to cool for some time. Once they are cool, peel them and grate them.
Add all the spices, chopped coriander, and salt to the grated potatoes and mix well.
Take the wheat flour in a plate and add some water and start kneading the dough.
Once the dough is kneaded properly, take small balls from it.
Take one ball, and roll it into a 3-4-inch circle using a rolling pin.
Place the potato filling in the centre of the circle and press it gently.
Bring together the edge of the circle and seal it.
Now roll it again to form a bigger circle.
Heat a pan and cook the paratha from both the sides using little ghee or oil.
Repeat the process with the remaining dough.
3. Cheela
This simple and nutritious dish is perfect for breakfast. Cheela tastes best with garlic chutney or a tomato-chilli dip.
Ingredients
Moong dal – ½ cup
Onion (finely chopped) - 1
Green chilli (chopped) – 1
Tomato (chopped) – 1
Coriander (chopped) – 2 tbsp
Oil – 50 ml
Salt to taste
How to Make
Soak the moong dal overnight and grind it the next day to form a fine paste.
Add the chopped onions, tomatoes, green chilli, coriander, and salt.
Heat a non-stick pan, add very little oil to it, and pour one ladle of the batter on it. Spread the batter quickly to form a small circle.
Cook the cheela from both the sides.
Once done, serve with green chutney.
4. Poha
Poha is a light and healthy breakfast and it tastes delicious too. It is a popular breakfast in north India as well as central India.
Ingredients
Beaten rice (poha) – 250 gms
Mustard seeds – 1 tsp
Green peas – 100 gms
Potato(diced) – ½ cup
Onion (finely chopped) – ½ cup
Green chilli (chopped) – 1
Turmeric powder - ½ tsp
Red chilli powder – ½ tsp
Coriander leaves (finely chopped) – 1 tbsp
Vegetable oil – 4-5 tbsp
Sugar – A pinch
Salt to taste
How to Make
Wash the poha 3-4 times and strain out the water. Keep aside.
Heat the oil in a kadhai. Add the mustard seeds to it and let them splutter.
Add the onions and green chilli and sauté till the onions turn translucent.
Add the peas and diced potato and sauté well. Cover the kadhai with its lid for a 3-4 minutes to cook the potatoes.
Once the potatoes are cooked, add the turmeric powder, chilli powder, and salt.
Now add the poha and mix well.
Let the poha cook for some time, then turn off the flame. Garnish it with coriander leaves.
5. Egg Bhurji
Eggs make a perfect breakfast and we all love to eat it. Egg bhurji is a popular breakfast in North India. It can be eaten with roti, paratha, and bread.
Ingredients
Eggs – 4
Onion (chopped) – 3-4 tbsp
Green chilli (chopped) – 2-3 tbsp
Coriander leaves (chopped) – 2-3 tbsp
Tomato (chopped) – 3-4 tbsp
Oil – 4-5 tbsp.
Salt – to taste
How to Make
Beat the eggs in a big bowl and whisk them well.
Heat some oil in a non-stick pan. Add the onions, chilli to it and sauté till the onions turn golden brown.
Then add the tomatoes and all stir again.
Lastly, pour the mixture of whisked eggs into the pan and let it cook. Once it is cooked, scramble it.
Add the salt as per your taste and mix well.
Serve with roti or paratha.
6. Bread Upma
This breakfast can be made with leftover bread. You may also serve it with tea in the evening.
Ingredients
Bread – 4-5 slices
Mustard seeds – ½ tsp.
Curry leaves – 3-4
Onion (chopped) – 1
Small tomato (chopped) – 1
Green Peas – 1/4 cup
Peanuts – 1-2 tbsp
Turmeric – 1 tbsp.
Chilli powder – ½ tsp.
Green chilli (chopped) – 1 tbsp.
Coriander leaves (chopped) – 1/4th cup
Salt – to taste
Vegetable oil – 2-3 tbsp.
Water – as required
How to Make
In a pan, fry the peanuts well.
Chop the bread slices into cubes.
Heat oil in a kadhai and add mustard seeds to it and let it splutter.
Add the hing, curry leaves and onions and fry till the onions turn golden brown.
Add the tomatoes, green peas, turmeric, and salt.
Once the tomatoes become soft, add chilli powder.
Sprinkle some water and cook for some time.
Then add the bread cubes and peanuts and stir the mixture.
Cook it for a few minutes to make the bread cubes crisp.
Garnish with the chopped coriander and serve warm.
7. Paneer Paratha
Paneer paratha is a very popular breakfast dish in north India. Paneer paratha can be eaten with pickle, curd, or with a cup of tea.
Ingredients
Paneer (grated) – 100 gms.
Wheat flour – 1 cup
Onion (diced) – 1
Green chilli (chopped) – 1
Ginger (minced) – 1-2 tsp
Red chilli powder – 2 tsp
Coriander leaves (chopped) – 3-4 tbsp
Salt to taste
Vegetable oil - 4-5 tbsp
How to Make
Knead smooth and fine dough.
In a bowl mix the grated paneer, onion, coriander leaves, green chilli, salt, red chilli powder, and ginger.
Take the wheat flour in a large bowl, add some water to it to and knead the dough.
Keep the dough aside for 20 minutes.
Take a ball from the dough, and roll it to form a 4-inch circle.
Place the paneer filling in the centre of the rolled out mixture.
Take the edges of the rolled dough together and seal it.
Roll it again and make a bigger circle.
Heat a tawa, pour some oil on it, and place the rolled mixture on it. Cook the paratha from one side. Apply oil on it.
Then flip it, apply some oil and cook from the other side.
Cook over low flame till both sides are golden brown.
8. Koraishuti (Green peas) Kachori
Koraishuti kachauri a Bengali breakfast dish. Serve it with aloo dam (cooked in the Bengali way) and pickle.
Ingredients
Peas – 250 grams grams
All purpose flour (maida) – 2 cups
Asafoetida – 1/4th tsp
Cumin seeds – 1 tsp
Ginger (grated) – 1 tbsp
Fennel seeds – 1 tbsp
Coriander seeds – ½ tbsp
Red chilli powder - 1 tbsp
Garam masala powder – ½ tbsp
Green chilli (finely chopped) – 1 tbsp
Sugar – ½ tsp
Besan – 2 tbsp
Salt to taste
Vegetable oil
How to Make
In a bowl take the all-purpose flour, some salt, 2 tbsp oil and give it a good mix.
Add water to knead the dough.
Cover the dough with a damp muslin cloth and let it sit for half an hour.
Meanwhile, roast the fennel seeds and coriander seeds together and grind it with a mortar and pestle.
Grind the matar in a blender to make a coarse paste.
Heat 2-3 tbsp of oil in a kadhai and add cumin seeds and hing.
Then add the grated ginger and sauté for 10 seconds.
Then add the matar paste, roasted fennel and coriander powder, red chilli powder, green chilli, salt, sugar, and garam masala powder, and mix well.
Then add the besan and fry it for another 2-3 minutes.
Turn off the flame and let the filling cool down.
Now take the dough and divide it into small balls.
Take a ball, roll it out a little, place the filling in the centre, and seal the ball.
Then roll it out again.
Heat the oil in a deep kadhai.
When the oil becomes very hot, lower the flame and place a kachori into the oil and fry till golden brown.
9. Paneer Sandwich
It is a delicious dish which can be eaten as breakfast or during tea time or can be packed in the lunch box.
Ingredients
Bread – 8 slices
Paneer (grated) – 1 cup
Onion (chopped) – ¼ cup
Cumin seeds – 1 tsp
Tomato (chopped) – ¼ cup
Green chillies (finely chopped) – 2 tbsp
Green peas – 1/4 cup
Capsicum – 1/4 cup
Turmeric powder – ½ tsp
Red Chilli powder – 1 tsp
Butter – 2-3 tbsp
Salt to taste
How to Make
In a non-stick pan, add 1 tbsp butter.
Add cumin seeds and once their colour changes, add the onions and chillies.
When the onion turns golden brown, add the tomato, capsicum, green peas, red chilli powder and turmeric powder and sauté it for a minute.
Then add the grated paneer and add salt. Cook it well for 2-3 minutes on medium-low flame.
Once done, leave it to cool.
Then spread the butter on a slice of bread and put a thick layer of the paneer filling on top of it.
Cover the bread slice with another one and grill it in a sandwich maker.
Serve it hot with tomato ketchup.
Follow the same procedure to make more sandwiches.
10. Rawa Dhokla
Rawa dhoklas are healthy and taste delicious too. Rawa dhoklas can be eaten for breakfast or even as a snack during tea time.
Ingredients
Semolina – 3-4 cups
Curd – 1 ½ cups
Green chilli (paste) - 3-4 tbsp
Vegetable oil – 5-6 tbsp
Baking soda – 1/4 tsp
Mustard seeds – 2 tsp
Sesame seeds – 2-3 tsp
Hing (Asafoetida) – 2-3 tsp
Coriander leaves (chopped) – 2-3 tbsp
Green chillies (slit) – 3-4
Curry leaves - a handful
Salt to taste
How to Make
Mix semolina, curd, green chilli paste, 1 tbsp. oil, salt and water (enough to make a thick paste) well in a bowl.
Let it sit for half an hour.
Meanwhile, heat 3-4 cups of water in a steamer.
Add the baking soda to the batter and give it a good whisk.
Grease a plate with oil and pour the batter and spread it evenly by shaking the plate few times.
Put the plate in the steamer and cover it with a lid. Cook for about 12-15 minutes (to check if it is cooked, take a toothpick and prick the dhokla; if it comes out clean, it is cooked).
Keep the cooked dhokla aside.
In another pan, heat oil and add the mustard seeds, sesame seeds, curry leaves, hing and whole green chillies, and sauté them for 10-20 seconds.
Pour the tempering mixture over the dhokla and garnish them with coriander leaves.
These are some yummy north Indian breakfast dishes that you can make for your family and enjoy with them. Try out the above breakfast recipes and have a wholesome breakfast.
Also Read:
Snacks You Can Eat in Your Office
What Happens When You Skip Breakfast?
Healthy Jowar Recipes You May Want to Try Read more
Suggested for you

Suggested for you

5 Easy Tips to Forget About Double Chin
Tired of photoshopping your double chin in every picture? Quit worrying; help is at hand. All you'll need to do is diligently follow some home remedies to lose double chin. Your actions will set in motion a sea of changes in your face - ones you'll be too happy about!
Is your double chin bothering you every day? In today’s age, when appearance matters, you just cannot 'not' care about that extra fat around your chin. While many would scramble to hide them with their scarves and turtleneck shirts/tops, you must go the more permanent way. It is not all that difficult too!
How to Get Rid of a Double Chin Fast?
1. Tongue Pressing Activity
Carefully, tilt your head back as much as you can, so that your eyes are now looking at the ceiling. Keep your back straight and your shoulders downwards. Then press your tongue flat against the roof of your mouth. At the same time, lower your chin to your chest, as far as you possibly can, so that you can feel your chin and neck contract. See to it that you don’t curl up your upper back. Continue this exercise for double chin reduction for 10 minutes at a stretch.
2. Rotate Your Chin
The most important thing to keep in mind while doing this exercise is that your spine should be absolutely straight. Rotate your head gently in a complete circular motion--from the shoulder to the chest and then back to the shoulder. In case your neck becomes stiff and you're unable to rotate your head completely, follow a semi-circular motion. Repeat this exercise 10 times for each side.
3. Chin Up, Baby!
This is one of the most common facial exercises to reduce double chin in which you need to lift your chin up and keep holding it in that position for a while. This will stretch and flex the muscles of your jaw. Do keep your spine erect. Now, face the ceiling and pucker your lips for a kiss and hold it for at least five counts. Repeat the same 10 times.
4. Exercise Your Jaw
Sit up straight, inhale deeply and exhale slowly. Keep moving your jaw as if you are chewing. While exhaling, keep your mouth wide open so that a clear, audible “ahh” sound is heard. The tip of the tongue should rest on the back of the lower teeth. Repeat this exercise daily 5 times for toning your jaw muscles to perfection.
5. Form The Perfect ‘O’
With your back straight and head tilted back, close your lips. With your lips closed, form an O shape with your mouth and hold it in this position for 20 seconds. Then, relax your mouth and lower your chin to return to the initial position. The contraction on both sides of your neck should be felt clearly.
Say ‘goodbye’ to the annoying selfie-spoiling double chin dilemma by knowing about ways to reduce double chin and face fat. Try these time-tested tips to remove double chin and get a chiseled jawline to ensure you smile at your mirror with renewed confidence. All the best! Read more
Suggested for you
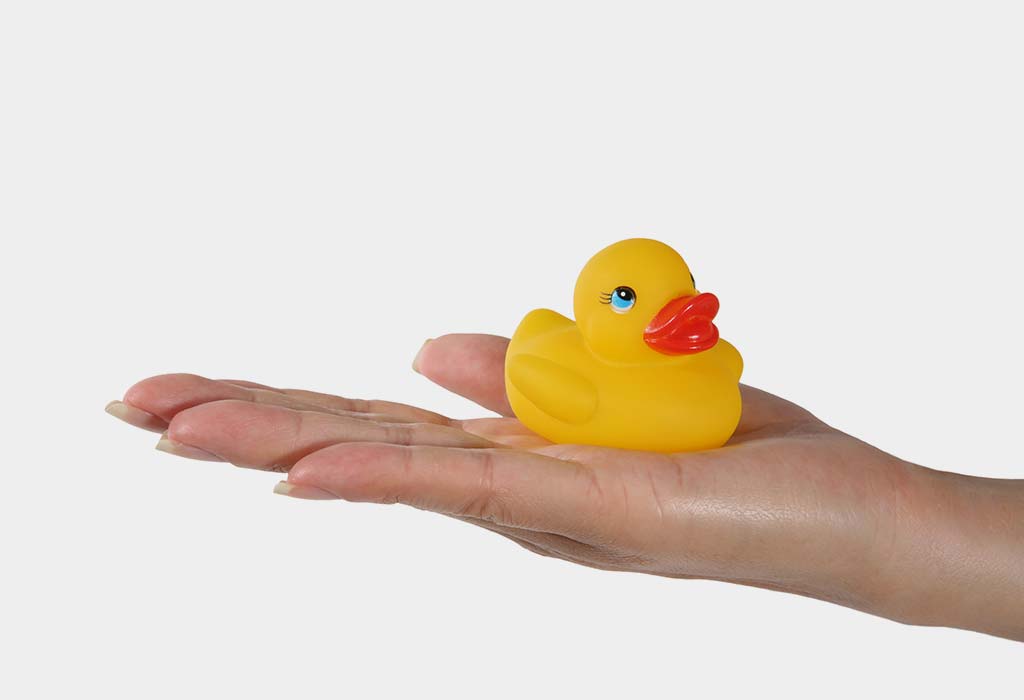
Risk of Squeezy Toys - Why Not to Use Them in Water
Temperatures have started rising now, at least in the city I live in and this is causing me to have tiny episodes of stress.
No! Nothing to get panicked but the stuff you would read next, might put you into that zone.
Squeezy toys. Most of us parents must have heard about these and some might have put them to use too. These are toys that emanate a certain sound when a force is exerted upon them or in simple terms, as per their nomenclature, if you squeeze the toys there will be a sound.
Babies mostly like these toys especially during bath times. Toys like these help in developing pincer grasp and are good for the cognitive development of the child too. But there is a risk.
The toys when used in water during bath times, have some amount of water left in them. Even when you keep them out to dry, still there will be droplets of water in them as these are mostly available in various shapes and sizes, like an aeroplane or a car. There are nooks and corners wherein the water droplets get stuck and then they form into algae.
Algae when comes in contact with a child’s body, when the toy is put to use again, may cause irritation of skin or the child might ingest it too.
It is better to not put the squeezy toys into use during bath times for babies and use them otherwise. Instead, we can use a spoon, a glass or some other laminated books too to make their bath times fun and interesting.
These toys are easy to be handled by our kids but the risk attached to it looms larger than the fun it brings along. It is always better to be cautious and take preventive measures than to be sorry for our careless ways.
This post is just to create awareness about the risk associated with these toys.
Disclaimer: The views, opinions and positions (including content in any form) expressed within this post are those of the author alone. The accuracy, completeness and validity of any statements made within this article are not guaranteed. We accept no liability for any errors, omissions or representations. The responsibility for intellectual property rights of this content rests with the author and any liability with regards to infringement of intellectual property rights remains with him/her. Read more
Suggested for you

Dr Disha Patel has added a new answer
Expecting Mom due in 6 months
15 hours ago
Q. can I take medicine pcm n citrazene in pregnancy fir sore throats n fever

Dr Disha Patel
Ayurvedic Physician
10 hours ago
A. dear mom.
better to take tab pcm for time being n do take steam inhakation couple of tines a day, follpw good home renedies for cold, taje more rest .
Swati Kar Samanta has added a new answer
Mom of a 9 m old child
9 hours ago
Q. hi everyone good morning,
sorghum can I give to my 10 month baby is it safe or not please revert I waiting for your reply

Swati Kar Samanta
Mom of a 2 m old girl
7 hours ago
A. Yes but first give in very small quantity to judge the reaction of your baby.
Rashmi has added a new answer
Expecting Mom due this month
6 hours ago
Q. #asktheexperts is it okay that the baby is kicking less than usual?

Rashmi
Mom of a 9 yr 7 m old girl
6 hours ago
A. Yes it is the what part is that your child is kicking if you feel that there is a movement of your child whether it is a cake or slight movement also you know that your child is doing fine so there is no problem in that if the movement is less it’s completely alright
Dr Sameer awadhiya has added a new answer
Guardian of 0 children
6 hours ago
Q. #asktheexperts what to do if the baby’s nose is blovked

Dr Sameer awadhiya
Paediatrician
6 hours ago
A. Nasal blockage is very common, specially in small children because of the narrow nasal cavity. Any kind of saline drops like nasal clear will be helpful in dissolving the stuffy secretions, which can be taken out by vnasal aspirator gently also steam inhalation will be helpful also, try to avoid keeping the child directly under the fan.
Ankita Mehta has added a new answer
Expecting Mom due in 4 months
3 hours ago
Q. 22 week pregnant,baby konse month me or din me kitni baar move kartaa he ,pls bataye abhi sirf 2, 3 baar hi hota he

Ankita Mehta
Mom of a 8 yr 7 m old girl
1 hour ago
A. hi
yes it's enough
and the frequency and timing may vary as we all are different
but yes, the frequency of feeling baby movements will increase now
please go for regular check-up to your gynecologist
and follow his or her suggestions
Rashmi has added a new answer
Trying To Conceive
3 hours ago
Q. hi
need help and advice
my RT 18x16mm and LT 10x16mm ET 6.59
and did ovulation rest also showing fertility test C as if now , pls advice if we intercourse tomorrow then when will be my ovulation start.
Rashmi
Mom of a 9 yr 7 m old girl
2 hours ago
A. You can check with an ovulation kit if it is positive then you can certainly go ahead with the conception because ovulation kit is going to give you 100% clarity whether you are ovulating or not with that you can try practising if you can conceive the same time
Check out this new Memory

Mohammad Feroz
Father of a 11 m old boy
New Memory

Like
Comment
Share
0 Likes
0 Comment
Check out this new Memory

Dimple Patel
Mom of a 4 yr 1 m old girl
New Memory
#kidno1

Like
Comment
Share
0 Likes
0 Comment
Check out this new Memory

Vivek Sinha
Father of a 11 m old girl
1 min ago
Gng to park

Like
Comment
Share
0 Likes
0 Comment
Check out this new Memory
amardeep
Guardian of a 1 yr 3 m old boy
1 min ago
#stylishbaby

Like
Comment
Share
0 Likes
0 Comment
Check out this new Memory
Mohammad Feroz
Father of a 11 m old boy
1 min ago

Like
Comment
Share
0 Likes
0 Comment
Tell us more about yourself get More Personalised
 Infant0 to 6 Months
 Baby6 Months to 2 Yrs
 Toddler2 to 4 yrs
 Kids4-6 yrs
 Big Kids6+ yrs
 Expecting
 Trying to Conceive

