

.svg)
.svg)
.png)

Enter Child Details

Add Profile Photo


Videos you might be interested in


Videos you might be interested in
Videos you might be interested in
Suggested for you
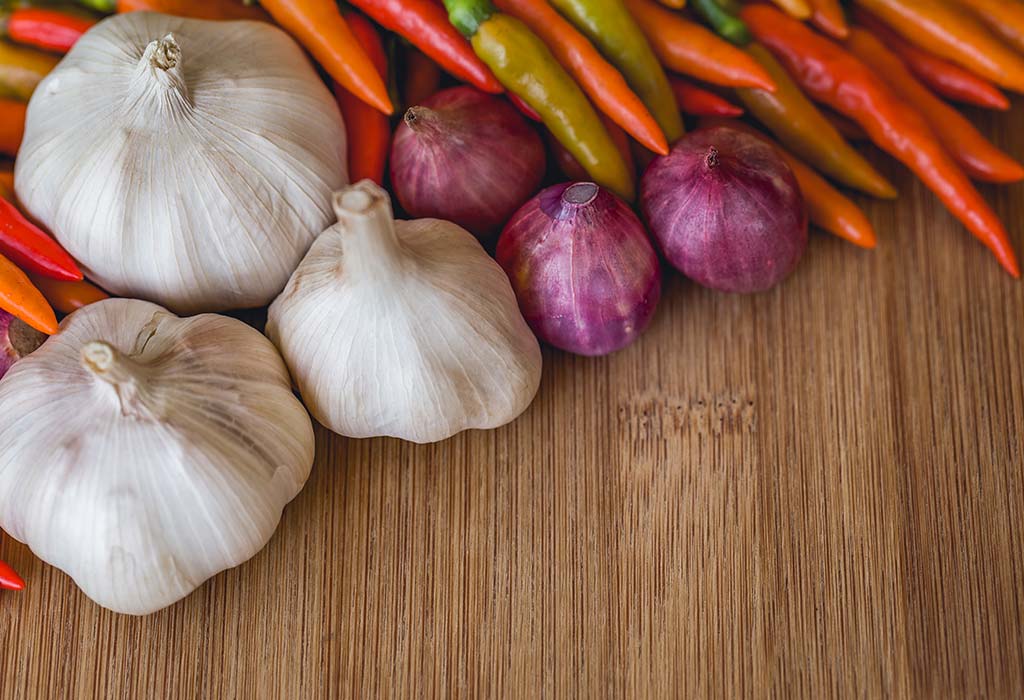
10 Delicious Recipes Made Without Onion and Garlic
Do you wish to learn a few satvik “no-garlic-no-onion” recipes which you can eat during sawaan or Navratri? Here are some tried and tested recipes that will suit your palate while you are fasting and even on normal days. Try them out and get your taste buds tickling.
10 Popular No-Onion No-Garlic Recipes
Listed below are some pure vegetarian “no-garlic-no-onion” recipes from all over India.
1. Dhokar Dalna
Dhokar dalna is basically gram lentil cake that is prepared by frying it and then cooked in gravy.
Ingredients:
Chana dal (gram lentil): 2 cups
Bay leaf: 1-2 nos
Cardamom: 5-6 nos
Cinnamon stick: 2-3 cm, long
Cumin seeds: 1 tsp
Cumin paste/powder: 2-3 tbsp
Asafoetida: 1 tsp
Potato (peeled and diced): 1-2 nos
Ginger (paste): 2 tsp
Chilli powder: 1 tsp
Kashmiri Chilli powder: 1 tsp
Turmeric powder: 1 tsp
Sugar: 1 tsp
Salt: to taste
Ghee: 2-3 tsp
Mustard oil: 7-8 tbsp
Method:
Wash the dal and soak it overnight.
In the morning, grind it into a thick paste.
In a non-stick tawa, heat some oil and add a little ginger paste, chilli paste, sugar and salt to the dal paste.
Set the flame on low and fry this for 10-15 minutes.
Then grease a flat plate and spread the paste while it is hot and even it out.
Once, it gets cool, cut it into diamond shapes using a knife.
Then fry the potato slightly and deep fry the dhokar (lentil cakes) after marinating it with a little turmeric.
In another pan, in some oil, add bay leaves, cumin seeds and asafoetida.
Then add the cumin paste, turmeric powder, chilli powder, Kashmiri chilli powder, the rest of the ginger paste and some water.
After the masala gets cooked, add the fried potato and 2-3 cups of water.
Once the potatoes are cooked, add the dhokar.
Cook it in gravy for 2-3 minutes. Then add salt, garam masala paste and ghee and switch off the stove.
2. Corn and Palak Pakoda
It is one of the best palak recipes without onion and garlic and can be served to guests and also eaten during Navratri or fasts.
Ingredients:
Palak (washed and chopped): 1 bowl
Sweet corn: 1 cup
Besan: 2 cups
Red chilli powder: 2-3 tsp
Ginger (minced): 2 tsp
Cumin seeds (dry roasted and ground): 3-4 tbsp
Salt: to taste
Water
Vegetable oil
Method:
Except for the oil, mix all the ingredients in a bowl to make a smooth thick paste.
Heat oil in a kadhai.
As the oil heats, take a spoonful of the mix and deep fry the pakodas.
3. Moong Dal Khichdi
This tasty mix of rice, dal and vegetables be eaten during puja and can also be offered to God as prasad.
Ingredients:
Gobindo bhog or jeera rice: 2 cups
Moong Dal: 2 cups
Potato (quarter cut): 2 nos
Cauliflower (florets): 5-6 florets
Peas: ½ cup
Ginger (paste): 1 tsp
Cumin (paste): 2 tsp
Garam masala: 1 tbsp
Bay leaf: 1-2 nos
Cumin seeds: 1 tsp
Green cardamom: 4-5 nos
Dry red chilli: 1-2 nos
Cinnamon stick
Ghee: 2 tbsp
Mustard oil: 3-4 tbsp
Salt: to taste
Method:
Dry roast the moong dal and wash the rice.
In a vessel, fry the cauliflower and potato.
In the same oil, put bay leaf, cumin seeds, cardamom, dry red chilli and cinnamon stick.
Then add the ginger paste, cumin paste, chilli powder and water.
Let it cook for 4-5 minutes in low flame and then add the roasted moong dal.
Mix it well and then add the rice.
Then add 12-15 cups of warm water to it. Then add salt and put a lid.
Once it starts boiling, add the vegetables and add more water as required.
Lower the heat and let it cook. In between, stir the khichdi from time to time and see if it is cooked or requires more water to cook.
After it is cooked, add the garam masala paste, ghee and give it a final stir.
4. Beetroot Chop
It is a very popular savoury in Bengal. People usually eat it with puffed rice as an evening snack.
[caption id="attachment_223870" align="aligncenter" width="558"] Source: Source: Pinterest[/caption]
Ingredients:
Beetroot (half boiled and grated): 2-3 nos
Potato (Boil and mashed): 2-3 nos
Peanuts: 25 grams
Cumin seeds (dry roasted): 2-3 tsp
Coriander seeds (dry roasted): 1 ½ tsp
Red Chilli (dry roasted): 2-3 nos
Ginger (grated): 3-4 tsp
Bread crumbs
Vegetable oil
Salt: to taste
Method:
Grind the dry roasted cumin seeds, coriander seeds and red chilli together.
Then in a bowl, mix the grated beetroot, mashed potato, salt and the masala together.
In a kadhai, add little vegetable oil and fry the peanuts.
Add the mix and fry it for 5 minutes on low flame.
Then take little of the mix in your hands and make medium size balls.
Roll them on bread crumbs and deep fry.
5. Phulkopir Roast
Unlike what the name suggests, this recipe has nothing to do with roasting. It is one of the best cauliflower recipes without onion and garlic.
Ingredients
Cauliflower (cut in florets): 1 whole
Peas (optional): 1 cup
Ginger (paste): 2-3 tbsp
Tomato (puree): ½ cup
Cashew nuts (paste): 3-4 tbsp
Magaj or watermelon seeds (paste): 2-3 tbsp
Kishmish (paste): 4-5 tbsp
Posto or poppy seeds (paste): 2 tbsp
Curd (beaten): 100 grams
Mustard oil: 5-6 tbsp
Ghee: 2 tsp.
Bay leaf: 2 nos
Cinnamon stick:
Green cardamom: 4-5 nos
Black cardamom: 2 nos
Cumin (paste): 2 tbsp
Turmeric powder: 2 tsp
Kashmiri red chilli powder: 2 tsp
Asafoetida: ½ tsp
Garam masala (paste): 1 tsp
Sugar: 1-2 tsp
Salt: to taste
Method:
Soak the cauliflower florets in hot water and salt for some time.
Marinate the florets with turmeric and salt and fry them.
Temper the bay leaf, cumin seeds, cardamom and cinnamon in oil.
Add ginger paste and tomato puree and let it cook on low flame.
Then add the beaten curd followed by the cashew paste, magaj paste and kishmish paste.
Then add cumin paste, turmeric, a bit of garam masala paste, Kashmiri Mirchi powder, sugar and salt and allow it to cook well.
Add the fried cauliflower along with the peas and mix it with the masala.
Put a lid and let it cook.
Switch off the stove and add the remaining garam masala paste and ghee. Mix it well.
6. Sweet and Spicy Tomato Chutney
This one is a popular sweet dish in Bengal and is served after finishing a meal.
Ingredients:
Tomato (diced in big chunks): 4-5 nos
Panch phoron (mix of cumin seed, methi, Kalo jeera, saunf and radhuni): ½ tsp
Dry red chilli: 2 nos
Grated ginger: 1 tbsp
Cashew nuts (cut into pieces): 5-6 nos
Dates (cut in halves): 5-6 nos
Aam papad or aam satto(cut in small pieces): 1 small packet
Jaggery: according to taste
Salt: 1/4th tsp
Mustard Oil: 1 tbsp
Method:
In a kadhai, heat oil and add dry red chilli and panch phoron.
Add the ginger and the tomatoes.
Stir it a bit and add the grated jaggery, salt and a little water.
Cook it on low flame with a lid.
Once it gets pulpy, add the dry fruits and aam papad.
Mix it thoroughly and take off the heat.
7. Sindhi Kadhi
It is one of the most popular Sindhi recipes and can be called a delicacy in Sindhi cuisine.
Ingredients:
Gram flour (Besan): 4 tbsp
Lady's finger: 5-6
Drumstick (cut in 1 ½ inch pieces): 1
Potatoes (cut into quarter pieces): 2, medium size
Cluster beans (cut into two halves): 10-12 Nos
Tomatoes (grated): 2 medium size
Ginger (grated): 2 Tsp
Asafoetida: ½ tsp
Raai: 1 tsp
Fenugreek seeds: ½ tsp
Cumin seeds: ½ tsp
Curry leaves: a spring
Turmeric powder: ½ tsp
Red chilli powder: 1 tsp
Tamarind pulp: 1 tsp
Salt: to taste
Vegetable oil: 1 tbsp
Method:
In a kadhai, put oil and add raai seeds, fenugreek seeds, cumin seeds, asafoetida and curry leaves and saute.
To this add gram flour and sauté until you get a nice aroma of the gram flour.
Then add 2-3 cups of water to it and mix it well so that there are no lumps.
Add tomatoes, turmeric powder, red chilli powder salt and salt to the mixture.
Then put potatoes and drumstick and allow them to cook for some time.
In another pan, heat oil and saute cluster beans and lady's finger.
Then put these sautéed items along with grated ginger to the gram flour mix.
Once everything is cooked, add the tamarind pulp and let it cook for 2-3 minutes; switch off the stove after that.
8. Masala Baigaan
This simple Kashmiri recipe is tangy which gives it a unique taste.
Ingredients:
Brinjal (long, round ones): 5-6 nos
Turmeric powder: 1 tsp
Coriander powder: 1 tsp
Asafoetida: ½ tsp
Red Kashmiri Chilli powder: 1 tsp
Red Chilli powder: 1 tsp
Fennel powder: ½ tsp
Dry Ginger powder: ½ tsp
Amchoor powder: 2 tsp
Curd: 2 tbsp
Coriander leaves (chopped)
Vegetable oil
Salt: to taste
Method:
Wash the brinjals and wipe them dry.
Then slit them up lengthwise in four sections till below the stalk.
In a deep kadhai, deep fry the brinjals one by one.
Soak the extra oil from the brinjals using paper towels.
In a pan, heat 1-2 tbsp. of oil.
On a medium flame, sauté asafoetida, ginger powder, turmeric powder, fennel powder, coriander powder, both the chilli powders and salt.
Then add beaten curd and a little water and leave it to cook for 3-5 minutes on low flame.
Once the masala is cooked, add the brinjals and put a lid.
Let the eggplants get cooked for 8-10 minutes over medium flame.
Then add the amchoor powder, mix well and change the sides of the brinjals; cook them for another 4-5 minutes or till they are done.
9. Paneer Butter Masala
It is one of the best paneer recipes without onion and garlic. Although it is prepared without the usual mix of onion and garlic, there is no compromise in its taste and flavours.
Ingredients:
Malai Paneer: 200 grams
Tomato (puree): 4 Nos. (medium size)
Ginger (paste): 2 Tsp
Green chilli (slit): 1-2 nos
Coriander powder: 2 tsp
Bay leaf: 1-2 Nos
Red chilli powder: 2 tsp
Kashmiri red chilli powder: 2 tsp
Cashew nuts (paste): 2 Tsp
Magaj (watermelon seeds-paste): 2 Tsp
Kishmish (Raisin-paste): 2 Tsp
Garam masala powder: 1 tsp
Milk: ½ cup
Kasuri methi: 1 tbsp
Butter: 2-3 tbsp
Oil: 2 tbsp
Sugar: 1 tsp
Salt: to taste
Method:
Heat oil and butter in a kadhai and sauté green chilli and ginger paste for few seconds.
Add the tomato puree, sugar, and very little salt and stir well.
Cook the puree very well over low heat until all the water dries up and the puree becomes thick.
Then add coriander powder, red chilli powder, Kashmiri chilli powder for few more minutes.
Then add the cashew paste, magaj paste and kishmish paste and cook it for a few more minutes.
After this, put the paneer cubes and the milk and mix it well with the masala; cook it for a few more minutes.
Switch off the stove, add garam masala, kasuri methi and mix them well with the paneer; then put a lid and let it stand for a few minutes more before serving it.
10. Vegetable Vermicelli Pulao
This recipe is quite popular in the southern states of India. It is taken in the morning breakfast or even as an evening snack.
Ingredients:
Vermicelli: 2 cups
Curry leaves: few leaves
Carrots (diced into small pieces): 1/4th cup
Bell peppers (cut in small cubes): 1/4th cup
French beans (chopped): 1/4th cup
Green peas: 1/4th cup
Cauliflower (small florets): 1/4th cup
Ginger (julienne): 2 tbsp.
Tomato (cut into small pieces): 1 cup
Coriander leaves (finely chopped): ½ cup
Urad dal: 2 tbsp
Raai seeds: 1 tsp
Green chilli (chopped): 2 Nos
Rasam powder: 1 tsp
Water: 4 cups
Salt: to taste
Oil: 8-10 tbsp
Ingredients:
In a non-stick pan, sauté the vermicelli for few minutes over medium heat until they turn light brown.
In a kadhai, pour oil and splutter some raai seeds and urad dal.
Add curry leaves, green chilli, ginger and sauté for some time.
Then add the vegetables one by one and lastly salt; stir, add water and put a lid.
Once the water starts boiling, add the rasam powder, vermicelli and some more salt.
Put a lid and cook the vermicelli on low heat and give it a light stir from time to time until the entire water evaporates.
Lastly, put off the stove and garnish it with chopped coriander.
Try out the “no-onion-no-garlic” recipes and surprise your friends with the same the next time they come visiting you.
Also Read:
Easy Evening Snack Recipes to Enjoy with Family on Tea Time
Health Benefits of Turmeric (Haldi) You Must Know
White Rice Alternatives You Must Consider Read more
Suggested for you

Eating Duck During Pregnancy - Is It Safe or Unsafe?
You would have heard different things about eating duck during pregnancy. The stigma around it suggests that pregnant women can feel tired when they eat duck. However, duck is highly nutritious for pregnant women. It offers multiple nutritional benefits. We will know about eating ducks, their benefits, easy to cook recipes in this article.
What Is Duck Meat?
Duck is white meat, which is part of the poultry family. The presence of myoglobin classifies duck meat as white meat. Though people from across the world relish different delicacies of duck meat, the method of cooking duck varies from one region to region. Pekin duck meat is the most common duck meat eaten in the United States of America. Pekin ducks are also known as the 'Long Island' ducks.
Can You Eat Duck Meat When Pregnant?
You can eat duck mean when you are pregnant. Anything consumed in moderation does not have bad effects on the body. It is, however, advised to eat cooked duck when pregnant. Do not eat undercooked or raw meat as they can contain harmful bacteria for the expecting mother. It can result in unnecessary complications for the mother and have a possibility of harming the fetus.
Health Benefits of Having Duck While Pregnant
Many expectant mothers have this question in mind, "Is duck good for pregnancy?" Yes, eating duck during pregnancy is good. Below listed are the benefits that mothers can reap by eating duck during pregnancy.
1. Excellent Source of Protein
Duck is rich in high-quality protein. It includes a wide variety of amino acids a pregnant lady requires and meets the daily protein intake. Protein helps boost the growth and development of the fetus and build the placenta, red blood cells, and tissues of the baby's body. Protein generally improves the body's immunity, skin, nails, and hair.
2. Immunity Booster
Duck meat is a good source of antioxidants with the presence of a mineral called Selenium. It works on preventing inflammation and getting the body cells from being damaged. Prevent cell damage and prevent inflammation, thereby boosting your immune system. Hence, duct meat helps a pregnant to fight different infections or diseases that may occur during pregnancy.
3. Promotes Healthy Heart
Duck meat has Omega-3 fatty acids, which help develop the baby's nervous system, brains, and eyes. These fatty acids also help lower high blood pressure levels and thus reduce the potential risk of evolving heart ailments.
4. Source of Antioxidants
Duck meat has antioxidants that effectively fight free radicals in the body. The presence of extra free radicals in the body can cause different diseases like diabetes, cancer, and heart issues. Antioxidants protect the body cells against free radicals.
5. Excellent Source of Vitamin B
Vitamin B, also known as Vitamin B complex, is found abundantly in duck meat. Vitamin B complex comprises eight vitamins; all these are put together with help in multiple ways to the mother and the growth of the fetus and then the baby. Some examples are increased energy levels, brain development, neural tube formation, vision, nervous system spine, etc.
6. Rich Calcium and Phosphorus
The presence of calcium and phosphorus plays an essential role in developing and strengthening the bones and teeth of the baby. Calcium also helps in building the baby's muscles, heart and nerves. It helps to prevent preeclampsia and osteoporosis that are common pregnancy complications faced by many pregnant women.
7. Improves Hemoglobin Count and Avoids Anemia
Hemoglobin is found in Red Blood Cells within the body. These help in transmitting oxygen to the tissues in the body. Duck meat is a high source of iron content, thereby helping in preventing iron deficiency and avoiding Anemia. An expectant mother needs a sufficient quantity of iron for the unborn baby and herself.
Risks of Eating Duck When Pregnant
Below are the two commonly related risks of eating duck when pregnant. Read them to understand and take a conscious decision before eating duck.
1. Listeria or Listeriosis
Listeria monocytogenes is a type of pathogenic bacteria that are found in animal meat, cheese, soil water, etc. They can survive in refrigerated foods like refrigerated pates, meat spreads, ready-to-eat meat, dairy products, etc. When a pregnant mother consumes this bacterium through food, it can easily transmit the bacteria to the baby. Symptoms of listeria include fever, muscle pain, chills, headache, etc. At times the risks include meningitis, spontaneous abortion, and other bacterial infection.
2. Toxoplasmosis
This is a parasite that is present in meat and soil. This can be easily detected through blood tests during early signs and stages of pregnancy. If you are immune and have antibodies, don't worry about toxoplasmosis; however, the bacteria don't get killed during cooking.
Pregnancy Safe Duck Recipes to Try
1. Duck a l'Orange
Total Cook Time: 50 Minutes
Serves: 4
Ingredients
Duck Legs: 4
Butter: 50 grams
Oranges: 2 (for the sauce and garnishing)
Orange Juice: 200 ml
Red Wine: 200 ml
Chicken Stock: 100 ml
Honey: 1 tablespoon
Black Pepper: 1 teaspoon
Salt to taste
Instructions
First, use a zester to zest the orange
Now remove the peel and pith and break the orange into different parts – keep aside the zest and the parts
Remove the duck skin with a sharp knife. Then season it with pepper
Take a pan and heat butter in it. Now add the duck once the butter is hot
Now let the duck cook for 10 minutes. Now turn the heat off - flip the duck over and allow it to sit in the pan for 10 minutes. Ensure the flame is off
Make sure the duck is cooked properly without any part being left raw or uncooked. Now remove it from the pan. Set it aside and cover it to keep it warm
The next step is to make the sauce using the same pan
Remove the duck fat, put the red wine, chicken stock, orange juice, honey, orange parts, and the orange peel
Bring all of it to a boil and then put on simmer for 2-3 minutes. Continue to stir.
Once cooked, it is ready to serve
Carve the duck and serve it with orange sauce. Add some boiled vegetables like potatoes and carrots along.
2. Crispy Duck Pancake
Total Cook Time: 2 Hours 15 Minutes
Serves: 5
Ingredients
Chinese Pancakes: 2 Packs (100gms each)
Whole Duck: 2 Kgs dressed
Spring Onions: 1 bunch finely shredded
Cucumber: 1 finely shredded
Orange (large): 1 peeled
Hoisin Sauce: 120 Gms
Cinnamon Powder: 1 tsp
Ginger: 50 gms finely sliced
Sichuan peppercorns: 2 teaspoon
Five Spice: 2 teaspoon
Sea Salt Flakes: 2 teaspoon
Oil: to grease
For the Glaze:
Hoisin Sauce: 1 tablespoon
Soy Sauce: 1 tablespoon
Shaoxing Rice Wine: 1 tablespoon
Honey: ½ tablespoon
Five Spice: 1/4th teaspoon
Instructions
Preheat microwave oven to 170°C.
Take a large roasting tin and line it with foil, and place an oiled metal rack over the top.
Now take the dressed duck and, with the help of a fork, prick all over. Put it in the fridge uncovered for 2 hours.
Mix five-spice Sichuan peppercorns, cinnamon, and salt and make powder out of it.
Now rub this powder mix all over the duck, inside and out.
Put the orange peel and ginger into the bird's cavity, place it on the prepared rack and roast it in the oven for two hours.
Now mix the glaze ingredients in the meantime.
Once the duck is roasted, remove it from the oven. Increase the temperature to 200°C.
From the tin, pour away the collected fat. Now place the duck back on the rack over the tin.
Generously brush the duck with the glaze and place it in the oven for 15 minutes,
Keep brushing glaze every 5 minutes until the duck's skin becomes crispy and the duck meat is carefully cooked.
Now remove from the oven, leave it covered and allow it to rest for 15 mins. Then shred the meat and keep it aside.
Warm the pancakes and follow the pack instructions to serve rolled up with the shredded meat, with hoisin, cucumber, and spring onion inside.
Safety Tips to Ensure Before Having Duck Meat in Pregnancy
It is very important to take precautions before eating duck when pregnant. Duck meat needs to be cooked thoroughly before eating, at least in 165°F. Organize the refrigerator properly, keep the raw meat, cooked food, and ready-to-eat food separately. Leftover food needs to be warmed properly before being eaten. Ensure you do not eat raw, dried, or smoked duck meat.
Do not touch foods that are risky to consume. Ensure you wash the hands properly, rinse the kitchen utensils cautiously. Remember not to rub your eyes.
FAQs
Below are the answers to some of the most commonly and frequently asked questions related to duck and pregnancy. Read them carefully to know what options a pregnant woman can consider and whatnot.
1. Is It Safe to Eat Duck Eggs in Pregnancy?
Yes, it's safe to eat both the duck and the duck eggs during pregnancy. However, the duck meat and the egg need to be cooked properly. Do not consume raw meat as it can lead to constipation during pregnancy.
2. Is It Okay to Eat Duck Breasts or Duck Steaks During Pregnancy?
Duck meat contains two types of bacteria like campylobacter and salmonella. These bacteria get killed only when they are cooked properly at a high temperature of 165°F. Hence it is not advisable to eat pink duck. Duck breasts and duck steaks are usually cooked in rare to medium heat.
3. Can I Have Crispy Duck (Peking Duck) and Duck Spring Rolls During Pregnancy?
Yes, you can have Crispy Duck (Peking Duck) and Duck Spring Rolls During Pregnancy. Crispy duck is thoroughly cooked, and duck spring rolls are deep-fried in hot oil before serving.
4. Can I Eat Duck Terrine and Duck Pate (Duck Liver Pate) When Pregnant?
The answer is simply a no. Duck pate and duck terrine have a high chance of causing listeriosis or listeria. This is an infection that enters the body through contaminated food. Listeria causes very severe infections in pregnant women.
Duck is generally safe to eat when you are pregnant, provided it is cooked properly. Consult your doctor before you begin eating duck meat when you are pregnant. Duck meat has immense minerals, omega-3 fatty acids, antioxidants, and other essential vitamins beneficial for an expectant mother. Thus, it is considered a highly nutritious food. Follow the recipes, tips, and ways suggested to eat duck meat and enjoy your pregnancy period.
Also Read:
Eating Fish when Pregnant
Eating Chicken during Pregnancy
Eating Meat while Pregnant – Is It Safe? Read more
Suggested for you

Introducing Bottle or Cup to Breastfed Baby
One of the key problems that hinder a baby’s transition from breastfeeding to bottle feeding is the fact that the mechanism powering them both is rather different. Breastfeeding involves creating a grip around the areola to press the nipple, which allows the milk to flow in smoothly and the baby swallows it up. Bottle feeding ends up with the baby taking more effort in suckling as he needs to reduce the milk flow to suit his own pace. Therefore, introducing the bottle needs to be a tricky endeavour.
How to Introduce Bottle Feeding to Your Breastfed Baby
To figure out how to bottle feed a breastfeeding baby here are certain steps and procedures you can adhere to:
Choose to introduce the bottle to your baby when he is hungry and not when it is the time to feed him. If you bring the bottle as per schedule, he will immediately notice the difference and choose to push it away. For a hungry baby, the presence of milk will take higher importance rather than the source, increasing the chances of him accepting the bottle.
Do your best to feed your baby via a bottle after making him sit upright. Many mothers continue to feed their little ones while they are lying down. Though that isn’t a problem, the chances of such babies developing ear infections and dental caries due to pools of milk staying collected in the mouth are higher. Give him support and hold him while he uses the bottle.
Try to keep the bottle feeding duration to last somewhere around 15 minutes or so, which should be closer to the usual time he takes when feeding on your breast. This could also make it necessary to choose an appropriate nipple size, which allows the milk flow rate to be as close as possible to your own. Any difference in it could either irritate the child or cause him to drink excessive milk before he realizes he has had enough.
Don’t push the bottle’s nipple in the mouth of your baby. It is necessary that the baby accepts the nipple by himself, just the way he accepts your breast. Start by stroking the nipple of the bottle against his lips to kick in his reflex of sucking on the bottle. The initial times might take a while before he gets used to the different texture of the artificial nipple, and realises that it also contains milk.
When a baby breastfeeds, he tends to take numerous breaks in between, just to catch some breath or to look around. Make sure the bottle feeding mimics that same behaviour as well. At times, babies can drink down a lot of milk in a single go, which can cause them to throw up when burping. Stay close to an actual breastfeeding session as much as you can.
Don’t force your little one to finish all the milk that’s present in the bottle. Most babies have a good idea of their satisfaction and will push away the bottle once they are done. Some may even fall asleep midway once their stomach is full and their nap kicks in. Don’t wake him up to finish the milk.
In the initial stages, start by switching your baby from one breast to another so that he doesn’t end up depending on one breast. Slowly, you can switch him from one breast to the bottle and then back, helping him get used to the sensation and trusting it fully.
Don’t mix breastmilk and formula milk in the bottle. The baby is getting used to the sensation of the new nipple, and a confusing taste of the milk can catch him off-guard. You can start off with breastmilk first and then replace it with formula as he accepts the bottle.
What to Do If Your Baby is Refusing to Feed on the Bottle
It is quite natural for a baby to be sceptical about a new entity being thrust into his mouth, especially when it feels nowhere close to the real breast. If your baby tends to refuse the bottle, here are a few ways you can make it easier for him.
Some babies might not accept the bottle when they are fully awake and aware of it. Choose a different time and see if it works for him. He might readily accept the bottle at night when is partially asleep or so.
At times, the temperature of the milk could also be a deal breaker for your child. While the milk from your breast is at the body temperature, the milk might taste better from the bottle if it is a tad warmer or even cold. Experiment with that as well and see if it works.
The position of feeding can be a little uncomfortable for the baby, causing him to reject the bottle. If sitting upright is getting difficult for you and the baby, you can start by using your lap and feeding him on his back. Else, if he likes a particular spot or a seat quite a lot, try starting him off from there. Gradually, you can return to the default feeding position.
Even if your baby does not drink from the bottle, let him play around with it and get used to the feeling. He might chew on the nipple or simply play with it. That would make him comfortable and more open to drinking milk from it.
The tastelessness of the artificial nipple might be weird for the little one. This can be countered easily by squeezing your breast and applying some breastmilk onto the bottle’s nipple. The familiar flavour will get him to start using the bottle immediately.
For a child that is already comfortable with a specific pacifier, opt for getting a bottle nipple made from the same material. Try warming the nipple up a bit to be closer to your body temperature as well.
What If Your Baby First Takes The Bottle and Now only Wants to Breastfeed?
Babies change their minds on the fly, which makes transitioning from breast to bottle more than a one-time thing. While you are rejoicing at the fact that your baby accepted the bottle right away, he might push it away after a few days and then choose only to breastfeed. The reason behind this could be a sudden realization that bottle feeding is absent from their mother’s breast and the touch of her skin and the body warmth. If this is the scenario for your child, try to sit with him for a few more days and using the bottle while he is next to you. At times, other situations such as an illness or other problems could cause him to reject the bottle. This would require a doctor to check him up and figure out the reason.
How to Teach Your Baby to Drink from A Cup?
Few families choose not to introduce the bottle at all. They rather prefer breastfeeding their child for a longer duration and then transitioning him directly to a cup. This has its advantages for sure. The chances of the baby getting confused with nipples are highly reduced. While most families continue to bottle feed their babies while they are lying down, opting for a cup can reduce chances of dental problems emerging early in life. Weaning the baby also gets a tad easier.
The transition to a cup requires more time than the bottle. Starting off with a sipper cup can be a stepping stone, allowing your baby to start sucking differently. Once that happens, you can make sure that at least one feed of the day is being rendered via a cup. As your little one grows up, he will get used to drinking from the cup right away.
What If Your Baby Completely Refuses to Take Bottle?
Some parents do complain about their baby not taking bottle feed at all. While they might blame time or habit for it, some babies would simply refuse to accept a bottle at all. Keeping him hungry for long durations is also not a good way to make him take the bottle. Such babies are well-used to the sensation of a nipple and might be more accepting of a sippy cup instead.
What If You Decide to Wean Your Infant from The Breast?
Whether you are deciding to wean your baby early just by habit, or to make it easier for you to return to work, it is necessary to continue giving him breastmilk in other ways. Make sure you get your baby adapted to a bottle or a cup early on, to make the transition easier for you as well as for him.
Moving from breastfeeding to bottle feeding can make mothers feel like they are breaking the bond with their child. However, the bond is made by the mother’s love and her presence, which can continue in various ways that go beyond the act of breastfeeding.
Also Read: Signs That Baby is Getting Enough Breast Milk Read more
Suggested for you

Birth Control Sponge - Use, Effectiveness, Benefits and More
Sometimes the common methods of birth control may not work for some women because of certain unpredicted side-effects. In such a case, one can opt for the Vaginal sponge or the Contraceptive sponge. The vaginal sponge is a means of birth control which is reversible. Some women may prefer using a vaginal sponge to avoid pregnancy as it is easily available at most pharmacies without a prescription and is fairly easy to use as well. However, a vaginal sponge when compared to a male condom may not be able to provide any protection against Sexually Transmitted Diseases (STD) like HIV.
What is a Contraceptive Sponge?
Contraceptive sponge or the birth control sponge is a doughnut-shaped sponge, about two inches in size. This soft, round vaginal sponge is made from polyurethane foam. The female sponge helps in preventing pregnancy through the blockade and spermicidal methods.
The contraceptive sponge may be inserted deep into the vagina before sex. The sponge forms a protective cover over the cervix and stops the sperm from passing into the uterus. Every cervical sponge has an attached cloth loop which makes it convenient to pull it out. The sponge is not reusable and should be discarded after use.
How Does it Work
The working of the sponge may be similar to that of a diaphragm. The sponge birth control method works in two ways. The sponge has an indentation which allows it to fit tightly against the cervix, creating a protective barrier and obstructing the entry of the sperms into the uterus. The sponge absorbs the semen before it can enter the cervix, the connecting passage between the vagina and uterus.
The vaginal sponge also has spermicide, a sperm-killing substance which prevents sperm from gaining access to an egg. It is essential for women to follow the correct method of using the sponge before sex. The sponge has to moisten with water before being inserted deeply into the vagina. You can keep the sponge inserted into the vagina for about 24 hrs before intercourse.
After use, you can pull it out with the help of the loop fastened to the sponge. The sponge can be used either in addition to a condom or all by itself. However, using it along with a condom may offer better protection against pregnancy.
Contraceptive Sponge's Effectiveness
Here is how using a sponge helps avert pregnancy
1.The Effectiveness of Sponge for Preventing Pregnancy
When we talk about birth control, the contraceptive sponge may not be the best method available in the market especially if a woman has given birth once. However, it is vital to use the sponge properly before sex for it to be most effective. Following the product instructions correctly and using it each time before sex may increase its efficiency. But realistically speaking, it may not be entirely possible to use it correctly every time.
If a woman who has not borne a child and accurately uses the sponge, the efficiency rate can be as high as 91%. But realistically it may not be more than 88% effective. But in the case of a woman who has given birth before, the success rate may be less than 80% even if we talk realistically. Therefore, rendering it an unlikely choice of contraception for women with kids.
So, it can safely be assumed that 9 to 11 women out of 100 on an average who use the contraceptive sponge may still get pregnant in a year.
2. Ways to Increase the Effectiveness of a Sponge
One of the ways to increase the effectiveness of sponge can be to use it properly each time before you have sex. Using the sponge consistently every single time before sex may also enhance its efficiency. But a definite way to boost its effectiveness is by using it in combination with another method of contraception like oral contraceptives or the male condom.
Another way can be if your partner does not ejaculate semen inside and pulls out before secreting the semen inside the vagina. Nevertheless, using both the sponge and the male condom together may be the most effective way as condoms can prevent STD’s as well.
3. Do the Sponges Protect Against STD's
The sponge cannot offer any protection against STD’s. On the contrary, the use of sponge may put you at a greater risk of STD’s like HIV. The spermicide sponge effectiveness is considerably reduced because the spermicide which coats the sponge has Nonoxynol-9, a chemical compound that can irritate the vaginal walls and make it more vulnerable to STD germs for them to easily enter the body through the vagina. Therefore it is better to get yourself tested on a regular basis to prevent STDs.
How to Use the Sponge
The correct usage of sponge for effective birth control cannot be stressed enough. The sponge can be fairly easy to use once you get enough practice with it. Inserting a sponge is quite like pushing in a tampon.
1. Contraceptive Sponge Insertion
The following things may be kept in mind while using the sponge:
It is important to wash the hands properly with water and soap before putting in the sponge
After removing the wrapper of the sponge, moisten it with a little water
Squeeze the sponge lightly a few times or until it is foamy. The sponge should be entirely wet for the spermicides to get activated
Take care not to squeeze the sponge dry
Keeping the indented side of the sponge facing upwards, turn the sides up (like you fold something in half) so that the sponge is long and narrow. The indented side of the sponge should be facing the body’s front side whereas the loop of the sponge should be facing the body’s backside
Try sitting in a comfortable position like you can balance yourself on a chair’s edge or squat. You can also insert the sponge while lying down or standing with one of your foot placed on a chair
Push the sponge deep into the vagina with the help of your fingers. Try and slide it as far up as possible. Upon letting go, the sponge will on its own unfold and tightly fit covering the cervix
Make sure that the sponge is covering the cervix properly by moving your fingers all over and along the edges of the sponge. Also, ensure that the loop is at the sponge’s bottom
You need not stress over remembering every single detail. All products come with a detailed set of instructions. Following the given directions will help you use the sponge correctly.
2. When Can One Insert the Sponge?
You can put in the sponge for about 24 hours before intercourse. The sponge is ready to use as soon as the spermicide is activated with water and inserted into the vagina. Therefore, the birth control can be in place much before you have sex. After the sponge is inside the vagina you can indulge in intercourse any number of times as you may want without any interruptions for the next 24 hours. You need not replace the sponge for that period.
3. How Long Can You Leave a Sponge inside
You need to leave the sponge in for a minimum of 6 hours after intercourse. But be careful not to leave it inside for beyond 30 hours in total. There is no compulsion, however, to leave the sponge inside for total 30 hours but 6 hours after sex must be abided by to be on the safer side.
4. Removal of Sponge
After washing your hands carefully, glide a finger into your vagina and fasten it around the loop of the sponge. Then very gently and steadily with the help of the loop pull the sponge out of the vagina. In case you are not able to find the loop of the sponge, you can grasp the sponge itself and slowly slide it out. If you experience difficulty reaching the sponge, push or thrust down with the help of your vaginal muscles while trying to reach for it. Carefully dispose of the used sponge by throwing it in the trash bin and not by flushing it down a toilet.
How Safe is the Contraceptive Sponge
The use of the birth control sponge is normally considered safe, but some women can experience certain side-effects
Some women may not be comfortable with the idea of putting fingers in their vagina.
In some cases, women may find it difficult to insert the sponge inside the vagina properly.
Avoid using the sponge during menstruation.
In case of any doubt regarding its safe usage, it is always advisable to consult your doctor first before using the contraceptive sponge
What are the Risks of the Sponge
If you have the following medical conditions, then the use of the sponge may be avoided:
If you are sensitive or allergic to polyurethane, spermicide, sulfites.
If you have a medical history of TSS (Toxic Shock Syndrome)
In case of a recent miscarriage, abortion or birth of a child.
If you are suffering from a vaginal infection.
If there is any sort of vaginal bleeding.
In case you experience any of the below-listed symptoms while using the sponge, discontinue its use and contact a doctor immediately. The signs can be:
An unexpected high fever
Diarrhoea
Vomiting
A red and itchy rash which feels and looks like a sunburn
Pain or irritation in the throat
Sore joints and muscles
Dizziness and weakness
Advantages of the Birth Control Sponge
Many women may like to opt for the birth control sponge because of the following advantages:
Birth control sponge is inexpensive and convenient to carry along because of its small size. It can simply fit into any purse or pocket.
When correctly inserted, you or your partner may hardly feel it.
It may not have any effect on the woman’s natural hormones.
You can use it during breastfeeding.
It can easily be purchased without a prescription from most drugstores.
You can buy it online as well with no difficulty.
The use of the birth control sponge may not require a doctor’s intervention as no invasive surgery or fitting is needed. The user can insert it on her own.
It can offer you pregnancy protection for up to 24 hours.
Birth control sponge provides you with the control because you can place it inside your vagina hours before sex and may leave it until 30 hours after
The sponge is easy to use and may not cause any inconvenience to either you or your partner
It is just as easy to discontinue its use. If you wish to get pregnant, then you may not insert the sponge in before intercourse
After placing the sponge inside your vagina, you can have sex many times for the ensuing 24 hours without replacing the sponge or any other disruptions
Disadvantages
Like all other methods of birth control, the sponge may also have some disadvantages. Though commonly considered safe to use by most women, a few women have reported contraceptive sponge side effects as well. Some of the disadvantages may be:
Some women may experience inconvenience or difficulty while inserting the sponge into the vagina. It may take considerable practice to learn the skill of correctly using the sponge.
It may happen at times that the loop of the sponge can break midway during the process of pulling it out of the vagina. In such a case, medical intervention becomes necessary to remove the remnants
The spermicide in the sponge can result in vaginal irritation in some cases
Sometimes if you are using the sponge, the sex can turn messy or wet because the sponge has to be foamy before you can insert it into your vagina
The effectiveness of the sponge largely depends on its correct and proper usage every time you have intercourse. In reality, to use the sponge correctly every single time may not be easy. Therefore, one cannot be sure of the effectiveness of the sponge as an efficient method of birth control
Occasionally the repeated and constant use of the sponge may cause some women to experience certain dryness in the vagina while having sex as the sponge may absorb the vaginal lubricants
The sponge cannot be used again after having used it once
You need to use the sponge each time you plan to have Not done so may adversely affect its effectiveness
The sponge can be removed only after 6 hours after you have had sex. It cannot be inside your vagina for longer than total 30 hours.
The sponge does not offer you any protection against sexually transmitted diseases.
The consistent use of the sponge can expose you to a heightened risk for HIV and other such infections as the spermicide in the sponge may irritate the walls of the vagina making it more susceptible to STD germs to invade the body.
Some women may be allergic to Nonoxynol-9, the chemical in the spermicide of the sponge which can result in discomfort and irritation.
Women who use the sponge as a method of birth control are somewhat at risk of getting a rare but dangerous disease called TSS (Toxic Shock Syndrome).
The sponge’s spermicide may feel unpleasant if you happen to taste it.
Where Can You Buy It
The spermicide sponge can be purchased over-the-counter without any prescription from most pharmacies or chemists. The birth control sponge is also available online.
The cost of the contraceptive sponge can differ depending on your place of residence and from where you are purchasing it. For example, the prevalent brand of birth control sponge in the US is The Today Sponge which costs about $15 for a pack of three. But free sponges or low-priced sponges may be available at community health centres or clinics.
It is imperative to use contraceptive sponges correctly and consistently. It is the only way to ascertain its effectiveness as a reliable birth control method. Adhering to the product instructions will help in using the sponge correctly. With practice, one can attain the ease to use it properly. If unsure about using the sponge consistently, you can always choose other methods of birth control which are comparatively easier to use and more dependable like implants or IUDs. In any case, using a male condom along with the sponge will provide you with the best protection against pregnancy and also STDs.
Also Read: Natural Birth Control Method Read more
Suggested for you

Why Financial Independence is a Must for All Women
There’s a famous song that goes, ‘Money, Money, Money…must be funny, in the rich man’s world!’ There’s nothing and everything that’s funny as far as money goes. It’s the elixir that makes your existence worthwhile. For a woman, more so. So, why and how can financial independence for women be attained?
They say money attracts money. So yes, moolah for a woman is a prerequisite, and not just to strengthen her identity or be a forceful case to propagate women's rights in this drab world. Financial independence helps you prove that you are made of stern mettle, can withstand a storm and give it your best shot.
How Financial Independence Helps You
Being financially sound for a woman delves deep into her psyche and actually makes her stand up for herself without being a puppet on strings.
It gives you the confidence to be a force to reckon with, be it handling any designation, prominent position or even being a new age woman.
As a woman of today, you expect more, live more, feel more and strive more across all fields. You could be a wife who has just begun to understand the vagaries of a marital life, a new mom who is clueless as yet about her new baby, or someone who’s hit a mid-life crisis, someone who detests an age old home or is just a grandma waiting to smother her grand kids with eternal love and affection. At all of these stages, a woman being financially independent is something that you need to imbibe in yourself.
How You Can Be Financially Independent
Deposit savings in your bank account. If you are a stay-at-home mum, your savings may be small at first. But opening and maintaining a savings bank account ensures you have a rainy-day fund for yourself. You can consider getting a part-time or work-from-home job based on your interest areas. Also deposit any gift cheques, allowances, etc. in this account.
Get credit cards exclusively for you. They can be a great help in times of need and emergency.
Keep tabs on the family's expenditure. This is the best way to track where the money is going, and save any that's being spent frivolously.
Understand your potential or hidden talent and see if this could easily blossom that into a full-fledged business. Even small sources of income such as a tuition class, a music lesson, or home-made art has the potential to become a big money puller.
When you are sound financially, confidence, a certain warmth that envelops you, inner beauty, and the craziness to get things done are all second nature. In these times, the male gender has just begun to understand what goes on in our minds and to quote from a movie title, ‘What a woman wants!” has finally begun to sunk in. What we want is, "To be able to live our life– the way we want it!" The possibilities are endless, so go ahead and strive to become financially independent. You can do it. Read more
Suggested for you

Yogic Love: Unique Yoga Styles you'll Have a Blast Trying
Yoga is an ancient form of exercise but that doesn't mean you need to keep to ancient ways of practising it. If you're bored of the repetitive yoga poses, you are in for a pleasant surprise. There are many different types of yoga poses you can adopt to guarantee a happening yoga session!
Wouldn't it be grand if yoga let you fly like a bird, fluttering your wings like there's no tomorrow? Or maybe drown your worries in the water? These unique yoga poses are every bit as powerful and yet so much cooler that we bet you'll be longing for your yoga session every day.
Totally Fun Yoga Asanas
Flying Bird Yoga
This yoga pose makes it possible to achieve what we have often longed for: to be as light as a bird! Flying bird yoga is said to free you of lifestyle disorders such as anxiety, sleeplessness and accumulation of toxins. As you keep your arms straight and streamline your body like a bird, your base (a partner who supports) will keep your balance. You'll need a trained instructor to practise this pose so your local yoga class is your best bet.
Anti-Gravity Yoga
Ever thought of belying gravity? It can be a great way to resolve your back pain issues. This form of yoga requires you to be upside down for better blood circulation, stronger muscles and guess what, a flatter tummy! However, if you're afraid of heights, suffering from a health condition or pregnant, this one is not for you.
Aqua Yoga
Everything gets instantly better when you're doing it in nice, buoyant water! Aqua yoga enthusiasts perform regular yoga poses in water for the extra lift which also keeps you fresh longer. The best part about this form of yoga is how it lets you practice without feeling any pain as the water soothes your aches, frayed muscles and fatigue.
Mommy and Baby Yoga
Imagine practicing yoga with your little bundle of joy! This form of yoga can be your ultimate spiritual connection with your baby. It also starts your kiddo off on a journey to good health and lessons learnt at this age are never forgotten. Your instructor will help the two of you adapt to poses you can do together and ones that will develop motor skills in your child. Chances are he (and in turn you) will also sleep much better.
Restorative Yoga
Sometimes, nothing at all seems to lift your spirits. Mommying can be hard on you physically and mentally and leave you craving for some cheer. This is where restorative yoga can help add fun to your daily routine. This style of yoga is said to focus your breathing and body by letting you periodically practice gentle movement. All you need to do is relax, unwind and be still – a welcome change from the constant flurry of activities your life can be.
Allow these fun yoga poses to enthrall you and take your daily session from mundane to magnificent. While unique yoga styles are now in vogue, it's a good idea to master deep breathing, meditation and muscle flexibility before taking them up. After all, there's no ditching the basics, right? Read more
Dr Disha Patel has added a new answer
Expecting Mom due in 6 months
17 hours ago
Q. can I take medicine pcm n citrazene in pregnancy fir sore throats n fever

Dr Disha Patel
Ayurvedic Physician
12 hours ago
A. dear mom.
better to take tab pcm for time being n do take steam inhakation couple of tines a day, follpw good home renedies for cold, taje more rest .
Swati Kar Samanta has added a new answer
Mom of a 9 m old child
10 hours ago
Q. hi everyone good morning,
sorghum can I give to my 10 month baby is it safe or not please revert I waiting for your reply

Swati Kar Samanta
Mom of a 2 m old girl
8 hours ago
A. Yes but first give in very small quantity to judge the reaction of your baby.
Rashmi has added a new answer
Expecting Mom due this month
8 hours ago
Q. #asktheexperts is it okay that the baby is kicking less than usual?

Rashmi
Mom of a 9 yr 7 m old girl
8 hours ago
A. Yes it is the what part is that your child is kicking if you feel that there is a movement of your child whether it is a cake or slight movement also you know that your child is doing fine so there is no problem in that if the movement is less it’s completely alright
Dr Sameer awadhiya has added a new answer
Guardian of 0 children
7 hours ago
Q. #asktheexperts what to do if the baby’s nose is blovked

Dr Sameer awadhiya
Paediatrician
7 hours ago
A. Nasal blockage is very common, specially in small children because of the narrow nasal cavity. Any kind of saline drops like nasal clear will be helpful in dissolving the stuffy secretions, which can be taken out by vnasal aspirator gently also steam inhalation will be helpful also, try to avoid keeping the child directly under the fan.
Ankita Mehta has added a new answer
Expecting Mom due in 4 months
5 hours ago
Q. 22 week pregnant,baby konse month me or din me kitni baar move kartaa he ,pls bataye abhi sirf 2, 3 baar hi hota he

Ankita Mehta
Mom of a 8 yr 7 m old girl
3 hours ago
A. hi
yes it's enough
and the frequency and timing may vary as we all are different
but yes, the frequency of feeling baby movements will increase now
please go for regular check-up to your gynecologist
and follow his or her suggestions
Rashmi has added a new answer
Trying To Conceive
4 hours ago
Q. hi
need help and advice
my RT 18x16mm and LT 10x16mm ET 6.59
and did ovulation rest also showing fertility test C as if now , pls advice if we intercourse tomorrow then when will be my ovulation start.
Rashmi
Mom of a 9 yr 7 m old girl
3 hours ago
A. You can check with an ovulation kit if it is positive then you can certainly go ahead with the conception because ovulation kit is going to give you 100% clarity whether you are ovulating or not with that you can try practising if you can conceive the same time
Check out this new Memory

Preeti Maitthani
Mom of a 2 yr 7 m old girl
New Memory
#kidno1

Like
Comment
Share
0 Likes
0 Comment
Check out this new Memory

Sk Agarwal
Guardian of a 2 yr old boy
New Memory
#grandphoto

Like
Comment
Share
0 Likes
0 Comment
Check out this new Memory

Rituparna sahoo
Mom of a 7 m old girl
New Milestone

Like
Comment
Share
0 Likes
0 Comment
Check out this new Memory

Manisha verma
Mom of a 2 yr old boy
New Memory
#stylishbaby

Like
Comment
Share
0 Likes
0 Comment
Check out this new Memory

Khushboo vats
Mom of a 7 m old boy
New Memory
#kidno1

Like
Comment
Share
0 Likes
0 Comment
Tell us more about yourself get More Personalised
 Infant0 to 6 Months
 Baby6 Months to 2 Yrs
 Toddler2 to 4 yrs
 Kids4-6 yrs
 Big Kids6+ yrs
 Expecting
 Trying to Conceive

