

.svg)
.svg)
.png)

Enter Child Details

Add Profile Photo


Videos you might be interested in


Videos you might be interested in
Videos you might be interested in
Suggested for you
How to Draw the Indian National Flag
India celebrates its Republic Day on January 26 every year. This day is celebrated to commemorate the day when India's Constitution came into effect after our country gained independence after a very long fight for freedom. January 26 is celebrated with patriotic fervour and festivities all around the country. This is the perfect time to involve your child in activities that teach him about India’s history and its rich cultural heritage. One of these interesting activities can be learning how to draw the Indian national flag. Doing so will serve a dual purpose - your child will hone his creative skills and, also, learn about the significance of our national flag. Flag drawing for children is one of the best and easiest activities. So, let’s get started! Take a look at how to draw the Indian flag step-by-step.
Video: How to Draw Indian Flag - A Simple Step-by-Step Guide for Kids
https://www.youtube.com/watch?v=k1YstllrRIo
What You Will Need for Drawing the Indian Flag
An A4 size plain paper
A pencil
An eraser
A ruler
Colours
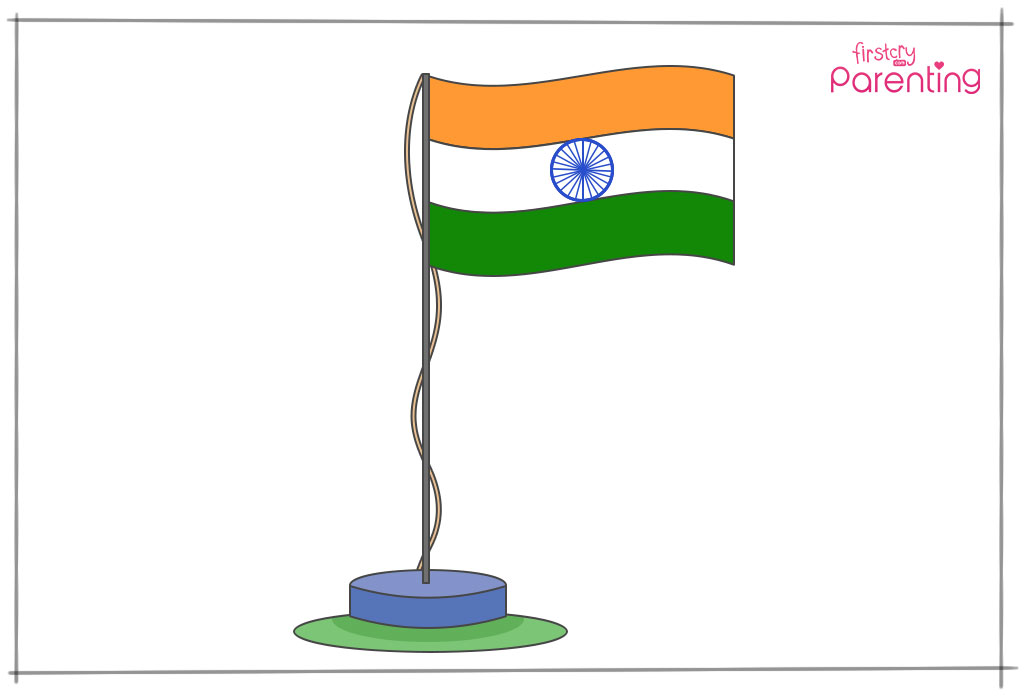
Flag of India Drawing for Kids in 9 Simple Steps
Here’s a step-by-step guide on how to draw the Indian flag.
Step 1: Draw the pole.
Using a ruler, draw a pair of vertical lines that are parallel and close to each other. Join both the ends of these parallel lines. This is the pole that will support the flag.
Step 2: Draw the flag.
Draw a wavy line, extending outwards, from the top portion of the flag pole, and draw a similar line a few inches below, as shown in the illustration. Join the open ends of these wavy lines.
Step 3: Divide the flag into 3 parts.
Divide the flag into 3 proportionate sections by drawing 2 wavy and horizontal lines across the flag, as shown in the image.
Step 4: Draw the circle for the Ashoka Chakra.
Draw a small circle in the centre of the middle section of the flag.
Step 5: Complete the Ashoka Chakra.
From the centre of the circle, draw 24 equidistant lines towards the outline of the circle. These lines will form the 24 spokes of the Ashoka Chakra.
Step 6: Draw the stand for the flag pole.
Draw a flat and slightly elongated oval around the bottom of the flag pole, as shown in the image. Below the oval, draw an arc which is parallel to the oval. Join the arc to the oval with two small vertical lines.
Step 7: Draw the cord/rope.
From the topmost tip of the flag pole, draw a wavy line flowing downwards, towards the bottom tip of the pole. This wavy line will form the rope or cord used for hoisting the flag.
Step 8: Draw the base for the stand.
Draw a second oval below the stand of the flag pole. With this, your flag outline is ready. All that’s left is to colour the flag.
Step 9: Colour the flag.
Colour the topmost section of the flag saffron, and the third section dark green. Colour the lines of the Ashoka Chakra navy blue. For the stand and the base, you can use shades of blue and green. While you’re at it, don’t forget to explain to your child what each colour stands for. Saffron stands for courage and sacrifice, white represents truth and peace, and green stands for faith and chivalry. The Ashoka Chakra stands for continuous progress.
Drawing the Indian flag has never been easier with this step-by-step guide for your child. Not only will it keep him engaged and guarantee a fun-filled time, but also instil a sense of patriotism in him, as he learns about the significance of each and every element of the flag.
Also Read:
How to Draw Lion for Kids
How to Draw Car for Kids
How to Draw an Apple for Kids Read more
Suggested for you
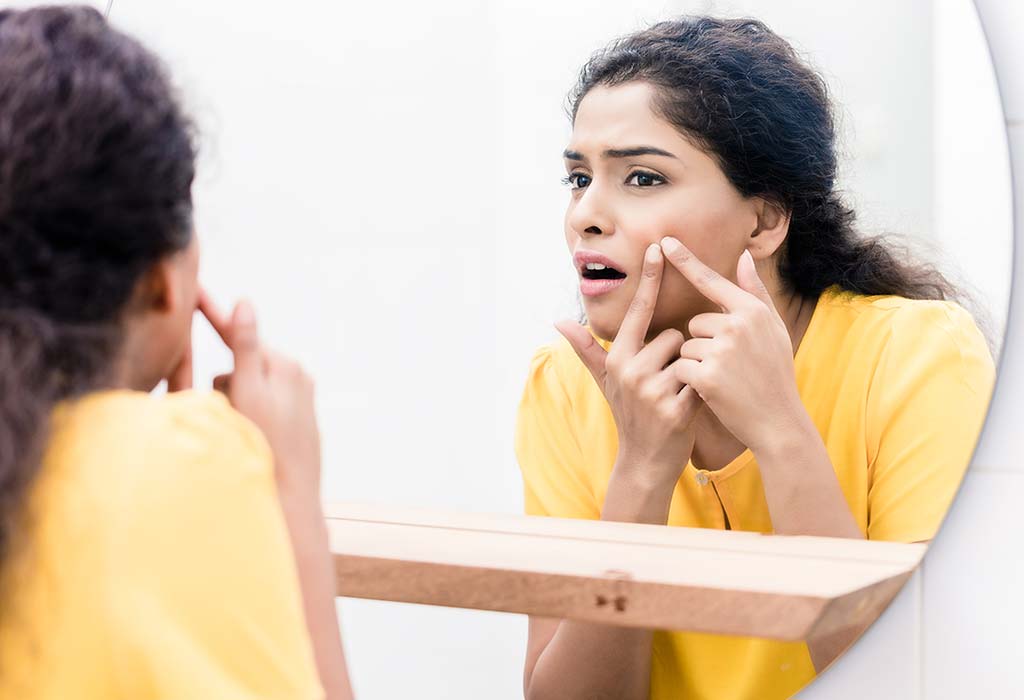
13 Best Home Remedies for Pimples and Acne
When you get pimples, you might feel less beautiful till the pimples go away. Besides the skin irritation and itchiness, acne or pimples sometimes burst and lead to bleeding. They bleed, grow back, and sometimes cause infections, which is not something you want. Here we give you some simple and effectual home remedies to tackle acne and pimples.
What Are the Common Causes of Pimples and Acne?
There are various reasons why acne happens but the most common ones are:
1. Hormonal Fluctuations
Hormones are one of the biggest causes of acne. Hormonal changes that happen during pregnancy and when you take oral contraceptives may also lead to pimples.
2. Poor Diet
If you've been binging on oily, greasy, or fried foods a lot, you're more likely to get acne. This is because the pores of your skin get clogged up by the oils and the sebaceous glands keep producing more on top of that. Those who have lactose intolerance are also known to get acne when they consume dairy products, cheese, milk, and chocolates.
3. Lack of Sleep
If you're not getting your ZZZs, you're going to get acne. This is because sleep deprivation leads to the release of cortisol which could trigger other hormonal responses throughout your body, causing acne.
4. Genetics
If acne runs in your immediate family or previous generations, you're likely to get it too.
5. Stress
Stress doesn't directly cause acne but it does play a part. It could lead to bleeding, infections, or more pimples.
6. Cosmetic Products
Any comedogenic ingredients in skincare or cosmetic products will clog up your pores and worsen acne. To prevent this, always go for water-based products and double check the ingredients list just to be sure.
7. Alcohol-based Cleansers
Alcohol-based cleansers sometimes have harmful ingredients which can irritate the skin and upset the pH balance. This ends up causing acne.
8. Too Much Sun Exposure
Exposing your skin to the sun without wearing good sunscreen can make your skin oily and more prone to acne.
9. Dehydration
Dehydration leads to an electrolyte imbalance and clogs up your pores with excess oils and dirt.
10. Sedentary Lifestyle
A sedentary and inactive lifestyle combined with an unhealthy diet is the main reason why many people get acne.
Types of Acne
There are mainly four kinds of acne which are most common:
1. Whiteheads
Whiteheads appear on oily skin and can be cured with the proper exfoliation treatment.
2. Blackheads
When the oil in your skin gets oxidized and turns dark, you get blackheads.
3. Cysts
Cysts penetrate deep into your skin and heal very slowly. Their main cause is hormonal imbalance and they may sometimes lead to infections.
4. Nodules
Nodules are similar to cysts except that they are very painful when touched. This is a severe case of acne and doesn't always become red. They require intensive treatment by expert dermatologists.
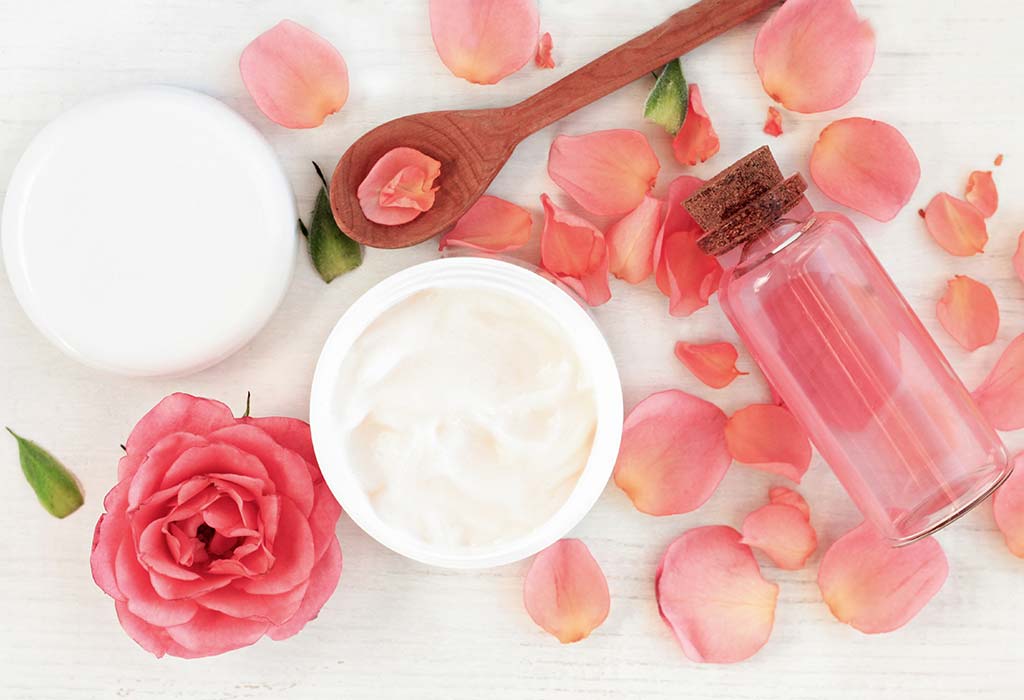
Effective Natural Remedies to Treat Acne and Pimples
Wondering how to treat acne at home? Try out these home remedies and remove pimples naturally.
1. Raw Organic Apple Cider Vinegar
Apple cider vinegar is an easy and fast home remedy for acne. It is basically the juice extracted from fermented apples or the unfiltered juice of raw organic apples.
How It Helps
The lactic acid and the succinic acid content is known to prevent scarring and lessen inflammation.
Ingredients:
Raw organic apple cider vinegar (unfiltered)
Cotton balls
Cold water
Procedure:
Take one part apple cider vinegar and dilute it in three parts water.
Dip cotton balls and apply the solution to the pimple-affected areas.
Wait for 20 seconds, rinse using cold water and pat dry.
Do this twice a day or more depending on how oily your skin is.
Your pimples should go away in 2 to 3 days.
Note: Make sure you dilute it since taking concentrated apple cider vinegar can burn or irritate your skin.
2. Zinc Supplementation
There's a connection between acne and low levels of zinc in people. You can prevent and stop pimples naturally at home using zinc supplements.
How It Helps:
Research shows that people who have low levels of zinc experience acne. Elemental zinc is known to reduce acne in patients.
Ingredients:
Any zinc supplement (doctor-prescribed)
Procedure:
Just take any zinc supplement after consultation with your doctor.
The optimal dosage for elemental zinc per day is 30 to 45 mg.
Your acne should go away in about eight weeks if you take zinc supplements daily.
Note: Don't take more than the prescribed dosage since too much zinc can cause stomach pain and irritation in the gut.
3. Honey and Cinnamon Face Mask
Honey and cinnamon are packed with antioxidants which help in eliminating acne naturally.
How It Helps:
Honey is laden with anti-bacterial properties that kill the bacteria while cinnamon is known to treat inflammation. These are two factors that speed up the treatment of acne.
Ingredients:
2 tablespoons of honey
1 teaspoon of cinnamon
Procedure:
Mix the honey and cinnamon with water to make a paste.
Apply this to your skin and let it sit for 20 minutes.
Rinse your face using cold water and pat dry afterwards.
You may start noticing results in less than a week.
Note: There is no conclusive scientific evidence that shows that honey and cinnamon completely heals acne-prone skin.
4. Non-Toxic Aloe Vera Gel
Non-toxic aloe vera gel has been used since generations for treating pimples and acne.
How It Helps:
Aloe vera gel can moisturize your skin, unclog pores and get rid of dust, dirt, and excess oils, thus balancing your skin's pH.
Ingredients:
Any organic aloe vera gel (non-toxic)
Procedure:
Any organic non-toxic aloe vera gel will do.
Apply that to your face using a skin brush and let it sit for 15 to 20 minutes.
Rinse with cold water and pat dry.
Your pimples should go away in a week. It works in various weather conditions.
Note: Be careful when buying aloe vera gel since commercial products have harmful or toxic chemicals which may lead to scarring and worsen acne.
5. Tea Tree Oil
Tea tree oil is a great remedy for black spots, pimples, and acne.
How It Helps:
Studies show that using tea tree oil on your skin is known to be effective against acne when compared to other commercial products.
Ingredients:
1 part tea tree oil
9 parts water
Cotton balls
Moisturiser
Procedure:
Mix the tea tree oil and water to make a solution.
Apply this to your skin using cotton balls.
Use your moisturiser afterwards.
Repeat this once or twice a day depending on the condition of your skin.
Note: Tea tree oil is highly concentrated and may irritate your skin so make sure to dilute it before applying
6. Green Tea Bags
Green tea is known to have anti-inflammatory properties which are useful in suppressing acne and preventing breakouts.
How It Helps:
Various studies show that green tea extract is beneficial in reducing sebum production in those who have acne.
Ingredients:
Green tea bags
Boiling water
Cotton balls
Procedure:
Soak some bags of green tea in boiling water for a few minutes.
Let it cool down to room temperature and soak the cotton balls in it.
Apply this to your skin or pour the tea over your acne directly.
Let it dry and rinse with water afterwards.
You'll see results in 2-3 days with regular use twice a day.
Note: Don't pour boiled green tea on your skin as it may scald you.
7. Witch Hazel
Witch hazel is a fantastic remedy for healing acne and it is believed to work. However, further research is needed to establish its efficacy.
How It Helps:
Witch Hazel has been shown to possess antibacterial properties, prevent inflammation and speed up healing.
Ingredients:
Organic witch hazel
Water
Cotton balls
Procedure:
Mix a tablespoon of witch hazel bark with a cup of water.
Soak this for 30 minutes and bring to a boil.
Lower the heat, simmer, and cook with the lid covered for 10 minutes.
Remove from the heat and let it sit for 10 minutes.
Strain and apply this solution to your skin using cotton balls up to once or twice a day.
Note: Remember to get organic witch hazel since commercial products don't have the tannins required to fight bacteria and heal the skin.
8. Mint
Mint not only cools and hydrates your skin but also helps to beat acne.
How It Helps:
It removes oils from your pores and unclogs them.
Ingredients:
2 tablespoons of fresh mint (finely chopped)
2 tablespoons of plain yoghurt
2 tablespoons of oatmeal
Water
Procedure:
Put the ingredients in a high-speed blender and run it to make a smooth paste.
Apply this to your skin and leave it on for ten minutes.
Rinse using cold water and you're done.
Do this once or twice a day and you'll see your acne go away.
Note: Don't use hot water for the blending since it may lead to dryness.
9. Holy Basil Essential Oil
Holy basil essential oil is one of the best ways to get rid of acne.
How It Helps:
Holy basil balances your hormonal and blood sugar levels, thus preventing acne.
Ingredients:
Lemon water
Holy basil
Procedure:
Mix a few drops of lemon water with holy basil essential oil.
Apply this to your skin and let it sit for a few minutes.
Rinse using cold water and pat dry.
Note: Make sure to dilute the lemon water since you don't want to scar your skin but just balance your pH levels.
10. Fish Oil Supplementation
Fish oil supplements can be used to prevent acne.
How It Helps:
The Omega-3 fatty acids in fish oil capsules manage the oil production in your skin and have anti-inflammatory benefits.
Ingredients:
Fish oil capsules (500mg)
Procedure:
Buy fish oil capsules after consultation with your doctor.
Take 500 mg fish oil twice a day.
Your acne will go away within one to two weeks.
Note: Be sure that the fish oil capsules are molecularly distilled and free from mercury contamination
11. Low GI Foods
Avoiding processed and simple carbs and reaching out for low GI foods has been a proven way to significantly reduce acne.
How It Helps:
Low GI foods reduce oil production by the sebaceous glands and lower blood sugar levels too. This helps in eliminating acne.
Ingredients:
Fruits and vegetables like bitter greens, red cabbage, apples, bananas, watermelons, etc
Nuts and seeds like chia seeds, flax seeds, almonds, walnuts, etc.
Procedure:
Stock up on foods like fruits, vegetable, nuts, seeds, and minimally processed grain.
Eat these on a regular basis to get a wide variety of nutrients.
Your acne will naturally clear up in 12 weeks.
Note: Avoid processed versions of these foods and anything that's canned or packaged.
12. Chamomile Tea Bags
Chamomile is a plant that has been proven to reduce acne. Here's how you use it.
How It Helps:
Chamomile tea has anti-inflammatory properties which reduce the risk of getting acne.
Ingredients:
Chamomile tea bags
Water
Procedure:
Empty out the contents of the chamomile tea bags and put them into a high-speed blender.
Make a smooth paste by blending it with water.
Use this face mask on your acne to heal it.
Give it a week and your scarring or pimples will start going away.
You can also make chamomile tea and pour it on your face.
Note: Be sure to let it cool and then pour since you don't want to get scalded.
13. Aspirin
Did you know that aspirin can help you treat acne? No, we don't mean drinking it but rather applying to your skin!
How It Helps:
The salicylic acid in aspirin tablets is known to lower inflammation and heal acne.
Ingredients:
2 to 3 aspirin tablets
Procedure:
Crush the aspirin tablets and dissolve the powder in water.
Apply this to your acne-affected skin using cotton balls.
Let it sit for a while and rinse.
Diet and Lifestyle Tips to Get Rid of Acne and Pimples
In terms of dietary and lifestyle tips for getting rid of acne and pimples, here's what we recommend:
Incorporate antioxidant-rich foods like fruits and veggies. Aim for five to six servings of these a day and drink freshly-squeezed juices.
Avoid milk and dairy products like cheese, processed foods, donuts, and unhealthy carbs. Don't opt for simple carbs either. Instead, go for complex carbs like brown rice, quinoa, and oatmeal.
Make sure you exercise every day and drink enough water to hydrate your skin and flush out the excess oils and toxins.
How Long Does It Take for Pimples or Acne to Go Away On Its Own?
Acne usually goes away on its own in 3 to 6 months, with proper treatment, if it's a severe case. For mild cases, it's just 4 to 6 weeks.
That's it. Just try out these home remedies and watch how your pimples disappear over the course of a few weeks!
Also Read:
Foods to Eat & Avoid for Healthy Skin
Home Remedies to Lighten Your Dark Underarms
Home Remedies to Get Rid of Open Pores on Skin Read more
Suggested for you
6 Ways to Make Chemical-free Cosmetics at Home
The pollution we are exposed to every day has caused our skin and hair to become dull, lifeless, and unhealthy. To add to that, the chemicals that are abundant in the products we use have made our hair and skin prone to more damage. How do we tackle this? By making our own cosmetics, of course!
Try These 6 Homemade Cosmetics for Healthy Hair and Skin
Below
is a list of a few basic cosmetics we all use on a daily basis, and
the easy and doable ways to make them at home. These recipes are
completely chemcial-free, so using them regularly will most
definitely help restore the shine and health of your skin and hair.
Read on.
A word
of caution: some of these recipes require the use of fire, so we
suggest that you be extremely careful while trying them. Make sure to
follow proper fire safety rules in order to stay safe.
1.
Moisturiser
Making
this DIY moisturiser is easy and effective.
Ingredients:
1 tbsp aloe vera gel (natural or store bought) 7-10 drops of coconut oil 1 vitamin E capsule (or you can substitute this for about 1 tsp of almond oil) A container for storage
Directions:
Take the aloe vera gel and coconut oil in a bowl and mix thouroughly. Cut the vitamin E capsule and pour its contents in the mixture. You can use almond oil as a substitute. Mix the three ingredients properly and transfer them into a small storage container. Use whenever required. In case you want to make more, simply increase the proportion of ingredients.
2.
Kajal
This
recipe is perfect for those who can never leave their house without
kajal. Now, make your own chemical-free version of the same. However,
be careful during this because it involves fire and the vessels that
you’d be using will get extremely hot during the process. Keep
yourself safe from any burning.
Ingredients:
7-8
almonds
A
small earthern pot or diya
2
glasses (made of glass)
A
few drops of almond or castor oil
A
steel plate
A
spoon
Matches
for lighting
Small
container for storage
Directions:
Take the almonds and put them in the diya. Take a match and light all the almonds till they are completely on fire. Put the two glasses at a short distance from each other, and keep the diya with the burning almonds between them. Rest the steel plate on the glasses and make sure it hovers right above the diya. Try not to leave too much of a distance between the plate and the diya, as the soot is what we want for the kajal. Let the diya burn till it dies out. Let the plate cool for a couple of hours. Flip the plate once it is completely cool. The plate should have a lining of black soot. Take a few drops of almond or castor oil, put them on the soot, and scrape it off the plate. The soot mixed with the oil should look like a thick paste. Transfer the mixture into a small container. Add a little more almond or castor oil to adjust the thickness of the kajal. Let it sit for some time. Your kajal is ready. You can use it as a liner as well.
3. Lip
Balm
Another
staple in our purses is lip balm, as it helps us with dry and chapped
lips. Read to know how you can make your own natural lip balm using
simple ingredients.
Ingredients:
1
tbsp coconut oil
1
tbsp beeswax
A
few drops of essential oil of your choice (jasmine, lavendar,
peppermint)
A
small cut part of your lipstick (optional)
Directions:
Take coconut oil and beeswax in a bowl. Put the bowl over a pot of boiling water, and stir till the two melt. Add a few drops of your favourite essential oil for fragrance. Add the small piece of lipstick for tint. Store in a container and let solidify. Your lip balm is ready.
4.
Hair Mask (for Oily and Dry Hair)
Using a
hair mask at least once in two weeks is a great way to maintain the
health of your hair. Instead of spending a hefty amount of money on
parlour treatments, read on to see a great DIY trick for soft and
silky hair.
Ingredients:
1
egg white (for dry hair, use the whole egg)
3
tbsp curd
1
tsp lemon juice
2
tbsp coconut oil/almond oil
Directions:
Break an egg (just the white for oily hair, and whole for dry hair) in a bowl. Whisk. Add the curd and whisk till there are no lumps. Add the lemon juice and coconut/almond oil and mix to form a mixture. Make sure it’s not too runny. Apply from roots to the tips and keep for at least 2 hours. Wash your hair with shampoo and conditioner.
5. Shampoo
Ayurveda
has all the answers to our different ailments and problems, and yes,
there is a recipe to make chemical-free cosmetics too. Read on to
know how to make your own shampoo. Note that these ingredients are
available both in market and online.
Ingredients:
2
tbsp shikakai powder - for short hair (use more for longer hair)
1
tbsp reetha powder (adjust according to hair length)
1
tbsp amla powder (adjust according to hair length)
Water
Directions:
In
a bowl, mix the shikakai, amla, and reetha powder.
Add
water gradually and keep stirring the mixture to adjust the
consistency. The mixture should be like a paste and not watery.
Your
mixture is ready.
On reaching the desired consistency, use it exactly as a shampoo – wet your hair, and apply this mixture from root to tip and massage it in. The reetha powder in the mixture causes a lather.
An important thing to note: when applying this mixture on wet hair the first time, there is a chance that it may not lather. This simply means that there is a lot of dirt/oil in your scalp and hair, so continue massaging it in your hair and wash it off as usual. Keep applying and washing the mixture till you see lather. Once you do, it means your scalp and hair are clean and fresh.
6.
Leave-in Conditioner/Hair Serum
A good
leave-in conditioner is supposed to help in keeping the hair soft and
frizz-free in the pollution and bad weather. Here is how you can make
an effective hair serum at home.
Ingredients:
2
tbsp coconut oil
1/2
cup aloe vera gel
1
tbsp almond oil
A
few drops of essential oil for fragrance
3/4th
cup water
Spray
bottle
Directions:
In a bowl or jar, put water and aloe vera gel. Mix thoroughly. Add the coconut and almond oils and mix. Add a few drops of your favourite essential oil and mix. Transfer the mixture into a spray bottle, and use on wet/damp hair.
These were a few homemade recipes for your most commonly used cosmetics. Who said you need to pay a great amount of money on chemical procedures and products? You can find most of these ingredients in your home, and the others are present with minimal chemicals. You can make these cosmetics at home for healthy and glowing hair and skin. Try these DIY recipes for a (good) change – it will be fun!
Also Read:
Homemade Shampoo Recipes for All Hair TypesHomemade Bleaching Face Packs for Skin LighteningNatural Homemade Hair Dye Recipes
Read more
Suggested for you
Suggested for you

How to raise a happy kid , happy kid beautiful family
We all try are best to foster happiness and give our children enjoyable experience. One of the fact is this also that happiness cannot be wrapped in a box to anyone..It should be inculcate to ourselves.
If you want to make our child happy , then we should spend some time to them .So that we can understand them in a better way . What they like to do or not .
Few things that I follow to make my kids happy
1. Go out - Going out doesn't mean that you have to be out whole day , it means that we should go out with our kid in evening , so that they can play outside for their mental and physical development.We all three try to go out for swings in the evening , as it bring smile to them.
2. Music - Music is a key to happiness to everyone. It has the capability of enhancing immune system, lowering blood pressure and stress level as well. I usually keep on singing with them while cooking and playing.
3. Dance - Dancing is a best therapy to everyone either kid or adult . My little one love to move on his favourite song .They both love to dance .
4. Make some Quiet time - It is very difficult to make children sit quietly, but I try to make them sit for some time and we all mediate and now my kids love to meditate , and it work wonders on their overall development.
One thing that help children feel happy and satisfied is when they know that their parents are at their back always and they are happy too. Tell your spouse also to spend some time with them . Talking to them and sharing your stories with them will make them develop confidence in you and this will not only make them happy, but also enhance the bonding between you all as a happy family. Read more
Suggested for you

With a Newborn, Life Revolves Completely Around the Baby's Feeding and Sleeping Patterns
We often hear that being a mom is a beautiful feeling. Of course, it is a wonderful experience, but nobody talks about the transition that a mother goes through from being a woman to a completely responsible mother. A woman learns responsibility on seeing a tiny little human who is totally dependent on her. That human needs her the most. And when it comes to a child's needs, it’s completely a mother’s choice whether to breastfeed or formula feed her baby. A new mom goes through body changes too, and they can be distressing. A mom may be tired and exhausted, but people still come and visit her and the child. People also advise you regarding feeding and sleeping patterns of your baby. However, only the mother knows about what is suitable for her baby.
The mother has to take care of the baby despite latching problems among other things. Baby's feeding, massages, diaper changes, sleeping, bathing, changing clothes, burping, cleaning and entertaining are all the things a mom has to do every single day. A mom also has to do research on baby products to find out which ones are best suited for her little one.
Everyone comes and holds the baby, but who will hold the mother?
A woman needs love and support from her friends and family at this time. If you are in this phase, always remember to be clear and firm with your thoughts regarding how you want to nurture your baby. Take help and hire help if you need to. Share your difficulties and weaknesses with your friends and family. Reach out when you need to.
For me, initially, breastfeeding was a big problem. Even the nurses weren't supportive. I was told that I need to express milk either by hand or through a syringe barrel till the milk settles. It became so painful for me that I wanted to cease breastfeeding completely. I was so naive that I had no knowledge about breastfeeding pumps and how easy they can be. After I got discharged, I researched and learnt about them and life got easier.
So moms, if you want to share your experiences about what you have gone through or help other moms with helpful messages, do it in any way you can.
Disclaimer: The views, opinions and positions (including content in any form) expressed within this post are those of the author alone. The accuracy, completeness and validity of any statements made within this article are not guaranteed. We accept no liability for any errors, omissions or representations. The responsibility for intellectual property rights of this content rests with the author and any liability with regards to infringement of intellectual property rights remains with him/her.
Read more
shilpi Bhandari has added a new answer
Guardian of 0 children
9 hours ago
Q. Hello
What is better normal or csec?

shilpi Bhandari
Mom of 2 children
9 hours ago
A. hello dear this is not about which is better this is all about your body and the condition of the baby no doubt the normal procedure is the painful but side effect are not there but after C6 you have to be little more careful and you have to take more precaution but again I am saying that this is not about the better one this is about the condition of your pregnancy
Santu has added a new answer
Expecting Mom due this month
7 hours ago
Q. #asktheexpert
1) till how many days after delivery baby needs to keep on uterus temperatures/warm temperature?
2) Can baby & mother both take bath after 24 hours of delivery?

Santu
Mom of 2 children
7 hours ago
A. It depends on moms and babys health I feel and suggest It's better to check with your doctor and follow their advise. That would be one of the best and safest option for your baby as of now. Take care.
shilpi Bhandari has added a new answer
Guardian of 0 children
6 hours ago
Q. dual marker test is for what purpose??
shilpi Bhandari
Mom of 2 children
6 hours ago
A. The double marker test helps determine whether the unborn baby has any risk of developing neurological abnormalities or mental disorders
Dr Sameer awadhiya has added a new answer
Mom of a 7 m old child
1 hour ago
Q. #asktheexperts
How to cure constipation in Babies

Dr Sameer awadhiya
Paediatrician
1 hour ago
A. Constipation in Babies less than 1 year is very common and more in formula fed babies and also when initially the semi solid food has been started after 6 months .
you can give bonnisan drops and some enzyme preparations in proper dose suggested by doctor angyd cow's milk should be avoided before 1 year of age . Medications are required but it shobuld be given only in medical supervision .
Rashmi has added a new answer
Trying To Conceive
1 hour ago
Q. Hello, I'm a hypothyroidism patients consumes 25mg tab,
can I take apple cider vinegar?

Rashmi
Mom of a 9 yr 8 m old girl
53 mins ago
A. I don’t think so ACv is going to be a problem but it would be better that you check with your doctor because Apple cider vinegar has couple of side-effects also also which a lot of people are not aware about so do not take it without your doctors advice and consent
Rashmi has added a new answer
Guardian of 0 children
21 mins ago
Q. #asktheexperts can i go for long trips with my 7 months old baby
Rashmi
Mom of a 9 yr 8 m old girl
19 mins ago
A. Going to be dependent on your comfort because now your child would be eating semisolid food as well so not totally dependent on you so if you are comfortable with it then you can go because the child is dependent on you so you just have to see if you can manage semisolid food and the feeding for the child comfortably
Check out this new Memory
Shubhangi Aney
Mom of a 1 yr old girl
2 mins ago
#babyphotochallenge

Like
Comment
Share
0 Likes
0 Comment
Check out this new Memory
Anjali Sharma
Mom of a 4 yr 1 m old girl
2 mins ago
#grandphoto

Like
Comment
Share
0 Likes
0 Comment
Check out this new Memory

Ranjan
Guardian of a 6 m old boy
2 mins ago

Like
Comment
Share
0 Likes
0 Comment
Check out this new Memory

Pavithra Harishkumar
Mom of a 2 m old boy
3 mins ago

Like
Comment
Share
0 Likes
0 Comment
Check out this new Memory

Shweta Sinha
Mom of a 1 yr 6 m old boy and 6 m old boy
3 mins ago
#babyphotochallenge

Like
Comment
Share
0 Likes
0 Comment
Tell us more about yourself get More Personalised
 Infant0 to 6 Months
 Baby6 Months to 2 Yrs
 Toddler2 to 4 yrs
 Kids4-6 yrs
 Big Kids6+ yrs
 Expecting
 Trying to Conceive

