

.svg)
.svg)
.png)

Enter Child Details

Add Profile Photo


Videos you might be interested in


Videos you might be interested in
Videos you might be interested in
Suggested for you

Beautiful Tattoo Designs with Kids Name to Cherish the Love
A tattoo holds both emotional and artistic significance as it is usually an extension of an individual’s belief, attitude and self-expression. A person often chooses to get inked of things they honour and adore. Parents may relish the idea of inking their kids’ name to value and treasure their love for them. Parents do tend to devote their lives to children. So, tattooing their name as eternal remembrance is a great way to acknowledge the beautiful bond parents share with their kids. It is certainly becoming a popular means to pay a compliment to loved ones.
10 Stunningly Attractive Kids' Name Tattoo Ideas and Design
Kids’ name tattoos are truthfully no less than a masterpiece for parents as there is no other bond like that of a child-parent one. There can be varied designs and patterns from bold prints to elaborate drawings with elegant framing and add-ons in different styles. Some parents may elect to include their child’s portrait along with the inked name while others may opt for lovely motifs like butterflies, flowers, birds. Some interesting tattoo ideas can be:
1. Mother Kissing Her Child Design
This endearing tattoo of a mother kissing her child depicts the everlasting love a mother feels for her child. It echoes the solace and bliss the child seems to bring to her soul. This meaningful tattoo is a delightful way to let your kid know that his mom will always love and dote on him.
2. Baby Sleeping on Mom's Shoulder Tattoo
If you prefer children's name tattoos on arm, you can go for a pleasing depiction of a baby sleeping on a mother’s shoulder. It mirrors the serene emotion that a mom is an ultimate nurturer and protector. She is a source of unending comfort, warmth and support for her baby.
3. Infinity Tattoos With Kids Names
A simple yet telling infinity tattoo with kids’ names is a beautiful way to represent the love which will last forever. You can proudly flaunt it on the neck, wrist or the forearm.
4. Heart Tattoo Design
Kids’ names in the form of a heart can be a charming way of denoting a parent’s love and darling relationship with their children. It aptly conveys that parents will always nourish their kids with absolute love and care.
5. Cross Tattoo Design
This strong yet humble design can be brilliant kids name tattoos for men. You can ink your child’s name along with his date of birth to complete the image.
6. Cute Star Tattoo Design
In case you like small tattoos with kids’ names, this loveable star tattoo may be just the one for you! You can ink as many stars as per the number of kids you have.
7. Two-Colour Tattoos
You can show your love via two-colour tattoos. They not only look fantastic but may appropriately depict your feelings through your favourite colours. In the case of two kids, you can assign each a vibrant colour of your choice.
8. Footprint Tattoo Design
Inking your child’s footprints along with his name can be an appealing way to declare your love for him and commemorate his birth. It can feature on the neck or even the forearm.
9. Floral-Print Name Tattoo
Floral motifs with children's name tattoos for moms can be an excellent choice. You can consider a garland of flowers to get a wholesome image or pick your solo favourite flower like rose, orchids to adorn your child’s name.
10. Kids Name Tattoo on Back
Tattoos with kids’ names for dad on the back are also a wonderful idea. You can choose a colourful one or keep it simple to signify your strong and pure bond with your child.
Tattooing kids’ name can be a wonderful way to celebrate the child’s birth or a cherished parenting milestone. It can also indicate a parent’s unconditional love for their kids. So, go ahead and get inked to immortalise your little one’s existence in your life! Read more
Suggested for you

Should You Use Mineral Oil for Babies?
The skin of babies is super sensitive and delicate. This is due to the initial developing stage that your little one goes through. The oversensitive skin, thus calls for extra care and precautions that one must take as a parent. This includes using the right kind of products on the skin.
Mineral oil, for instance, has been widely used for babies. But the question is whether it is safe or not. Before you apply anything on your baby’s skin, knowing the pros and cons can come in handy.
What is Mineral Oil?
Mineral oil or aptly the white mineral oil is a by-product that is derived from refining crude oil that is further used for making petroleum-based products and gasoline. Mineral oil is a transparent liquid that appears to be colourless and is an ingredient in a lot of baby cosmetic products, including the baby oil. When you browse through the ingredients of your baby’s oil, you’ll find “paraffinum liquidum” listed on it. This is what signifies the concentration of mineral oil in the oil.
Is Mineral Oil Safe for Babies?
No, mineral oil isn’t safe for babies. Whether you are using mineral oil for babies’ hair or for their body, it is considered to be unsafe. Mineral oil may lead to toughening of skin that may further lead to dryness. This mineral oil tends to clog your baby’s skin pores that, in turn, suffocate the skin.
The reason behind it is simple. The skin requires space for breathing. It does that with the help of minute pores on the skin. But, when the skin’s surface is covered with a layer of mineral oil, the skin dirt tends to settle down. Such a situation is not at all ideal in case of babies as the dirt may transform into the toxins that may harm the baby later.
When wondering “is mineral oil safe for babies with constipation”, it has a dicey perspective. On the one hand, mineral oil is considered to be a great remedy for constipation. It is believed; when mineral oil is massaged over the intestinal surface which, in turn, averts water absorption.
On the other side, mineral oil is not safe for infants and is not even recommended by doctors for babies under the age of six. Even if you are using mineral oil based products on kids, it is highly advised to minimize it or stop it altogether.
What are the Side-Effects of Using Mineral Oil on Infants?
Mineral oil has a number of side effects when baby health is the matter of concern. Some of which, include:
1. Skin Pore Clogging
Skin requires breathing for its normal functioning. When mineral oil is applied to a baby’s body, the skin develops a layer that obstructs the dirt and other impurities from escaping.
2. Digestion Issues
Babies have a tendency to put anything and everything in the mouth. Be it hands or the feet; babies can be seen putting them in the mouth. And, when you have recently massaged their hands and feet, the mineral oil is likely to get into the system, which, in turn, leads to indigestion.
3. Negative Impact on Cell Development
For your surprise, the mineral oil does not moisturize your baby’s skin. On the other side, mineral oil also resists the moisture absorption from around the air, thus, negative impact on the normal cell development.
4. Candidiasis Vulnerability
In case you apply mineral oil to your baby’s skin; that are lower in weight there are possibilities that they may develop candidiasis or yeast infection.
5. Nutritional Deficiencies
When mineral oil for baby massage is used, the skin usually absorbs it. Once the oil gets absorbed, it makes its way to the intestinal system. In turn, the vitamins get saturated, thus the nutritional deficiencies.
Looking into how mineral oil can harm your baby, try to shift over to safer alternatives such as the flax-seed oil. And, in case you observe any of the mentioned side effects in your baby, do not hesitate to contact a dermatologist.
Also Read:
Benefits Of Using Almond Oil For Babies
Top Baby Massage Oils Read more
Suggested for you
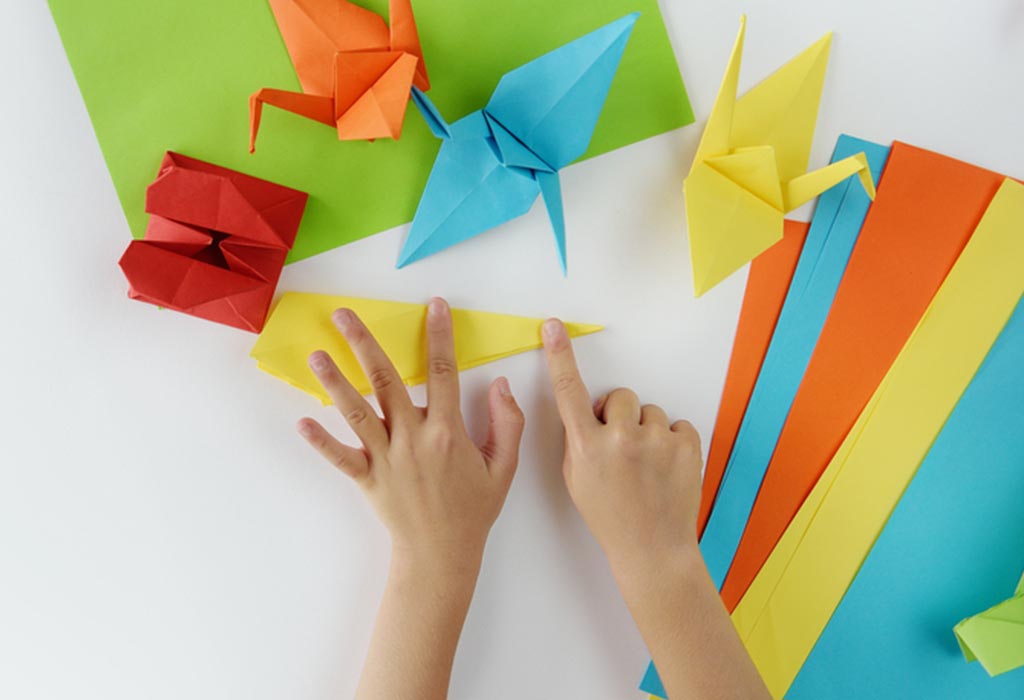
15 Easy Origami Crafts for Kids
Origami is the ancient art of paper folding without cutting, glueing, pasting and marking. It is a great way to improve the aesthetic sensibilities of children.
Origami Crafts for Children - Step by Step Instructions
Origami for kids is a fun activity. Listed below are 15 origami ideas for kids with simple origami instructions for kids.
1. Rose
Awaken the botanist in your child with this rose origami.
How To Make It
Take a square paper and fold in half horizontally.
Unfold and fold vertically.
Fold each corner into the middle crease blitz base.
Fold each corner into the middle crease making a double blitz.
Fold again, in the same way, making a triple blitz.
Press down over the folds to make creases.
Curl back the layers of the paper.
2. Fox
The fox is very simple to fold and very easy for the beginners.
How To Make It
Fold the square paper in half diagonally.
Fold in half again.
Open up the last fold. With the long side of the triangle in the bottom, fold it so that the top and bottom points touch.
Draw eyes and nose.
3. Simple Paper Plane
Paper planes are the first origami models most kids learn to make.
How To Make It
Fold a rectangular paper lengthwise and make a crease in the middle.
Unfold and fold the two corners towards the crease.
Fold the corners again, but this time the folds should be lengthier than the earlier fold. It should resemble a roof of a hut with steep sides.
Fold again in the middle but this time outwards.
Fold the sides down so that they are aligned with the bottom of the object and make sharp creases.
Lift the sides up to form wings.
4. Boat
A boat is the most well-known origami art for kids.
How To Make It
Fold a rectangular paper in the middle.
Keeping the paper folded, make another fold vertically.
Open the fold and then using the crease fold the bottom corners up to the middle.
Fold one layer from the bottom up along the bottom of the front flaps.
Repeat the step for the opposite sides.
Unfold and then fold the bottom corners along the crease.
Unfold and insert the overlapping flap on the left underneath the right section.
Open the bottom and fold it making a crease.
The fold one layer up to the top and repeat the same on the other side too.
Pull open the right and the left flaps and flatten it in the shape of a boat.
5. Japanese Fan
Japanese fans are one of the simplest origami creations.
How To Make It
Take a rectangular shape paper.
Start folding in long skinny folds using your fingers.
Fold till the end of the paper.
Once the folding is completed, press it to make a crease on each fold.
Keeping the folds all together and vertically, make a fold in the middle.
6. Penguin
It has easy folds and can be made by small children.
How To Make It
Take a square piece of paper (black on one side and white on the other side).
Make a crease by folding (it will look like a triangle after folding) at the centre with the black portion inwards and white portion outwards.
Unfold it again. Then fold the bottom corner just below the crease.
Turn the paper over (white portion upwards).
Fold in the left and right sides keeping enough space to create an invisible triangle.
Fold the pointed top downwards (this will be the head).
Tugging at the middle crease, fold the sides back.
Pull out the beak and flatten the back of the head.
7. Fortune Teller
The Fortuneteller is easy to make, and children have a great time playing with it.
How To Make It
Take a square white sheet of paper.
Join the upper half of the paper with the lower half.
Unfold. Then fold the left corner of the upper half and bringing the base till the crease line.
Do the same in the right corner.
Continue with the same process in the lower half as well bringing both the corner bases to the crease line.
Turn the side and again fold the corners bringing all the corners to the centre.
Colour all the triangles in different colours.
Write a fortune underneath each flap.
Fold the bottom half to the top
8. Cup
An easy to do origami model.
How To Make It
Take a square piece of paper, preferably origami paper.
Fold the bottom corner to the top corner.
Fold the left edge of the triangle to the bottom edge, and then unfold.
Fold the left end corner of the triangle to the end of the crease line on the right.
Fold the right corner to the left corner.
Fold the top flap down and turn the paper over.
Do the same on the other side too.
Open up the pocket
9. Elephant
Help your kids get close to nature by teaching them to make an origami elephant in very simple steps.
How To Make It
Take a square paper.
Fold the paper in half by folding the top corner to the bottom corner.
Press with your fingers and create a crease.
Unfold. Then again fold from the left side to the right side. The again unfold.
Fold the left and right edges of the triangle to the centre crease.
Fold both top corners and bring them to the side.
Fold the left and right corners in.
Turn the figure over.
Fold up the elephant’s trunk and fold in. Then bring the trunk down keeping a bit of the trunk folded in.
Fold the trunk in an out like an accordion or just the way we do while making a fan.
Pull the trunk down and add eyes with a marker.
10. Butterfly
The origami butterfly’s wings spread out nicely and look really realistic.
How To Make It
Take a big square piece of paper.
Fold along the diagonals and then unfold.
Fold along the other diagonal and then again unfold.
Fold the square horizontally and then unfold.
Fold the square vertically and again unfold.
Holding the two sides, push the centre together.
Flatten the sides above and below until it becomes a flat triangle with layers.
Take the bottom corners of the top layer triangle and fold them to meet at the top corner.
Turn it over and fold the top of the triangle backwards over the bottom edge so that the tip sticks out a little bit.
Insert the tip that sticks out over the side and turn the card over.
Make a fold in the middle.
11. Tulip
This easy origami Tulip can easily be made by kids.
How To Make It
Place a square paper with colour side downwards.
Fold it in half making a triangle.
Fold into another triangle and unfold it.
From the right corner, make an angled fold diagonally upwards on each side.
From the left corner, wrap the flap around the rest of the object.
Fold the cornerback behind the figure.
12. Hat
A cool hat made out of paper.
How To Make It
Take a rectangular paper.
Fold the paper lengthwise into two equal halves and then unfold.
Fold the paper in half – top to bottom and then unfold.
Make a triangle by folding the right and left corners to the centre.
Fold up the bottom flaps in the front as well as in the back.
13. Shirt
An origami shirt can be used to make a cute card.
How To Make It
Take a rectangular paper and fold 1/3rd of the paper (from the edge upwards).
Turn it over and fold it lengthwise. Make a crease and unfold.
Fold in both the sides to meet the centre line.
Fold the two bottom corners outwards.
Turn it over and turn the top edge (about 1/4th).
Turn over again. Fold the top two corners diagonally making them meet the straight line at the centre.
Fold up the bottom edge and tuck it under the collar.
14. House
Make an origami house in simple and easy steps.
How To Make It
Take a square sheet of paper with the colour side down.
Fold the paper from the left to the right edge and unfold.
Fold from top to bottom.
Fold both the edges bringing each to the centre crease.
Turn it over and fold the left and right edges to the centre.
Open the top right and left flaps, spread out the corners to the side and flatten them down.
Turn it over and draw the door and window.
15. Lady Bug
Make a pretty ladybird in a coloured paper or a polka dotted paper.
How To Make It
Take a paper (square in shape) with the white side up and fold it diagonally.
Fold the triangle in half and unfold.
Fold the top two corners downwards, but the flaps should not be in line with the centre crease. Leave a gap in the middle.
Turn it around and fold down the top corner to the centre point.
Fold a little of the folded down top corner and flatten it.
Origami as an art can be enjoyed by children as well as adults. It is an excellent activity for developing the attention span, fine motor skills and the ability to follow instructions.
Also Read: Greeting Card Making Ideas for Kids Read more
Suggested for you

Suggested for you
Reflexology to Induce Labour - How Does It Work?
At 40 weeks of your pregnancy, your baby is all set to make its grand entry into the world anytime soon. More and more visitors will come to your house to check on you and no wonder you will be anxious, stressed and worried. This is something most, if not every expecting mother goes through.
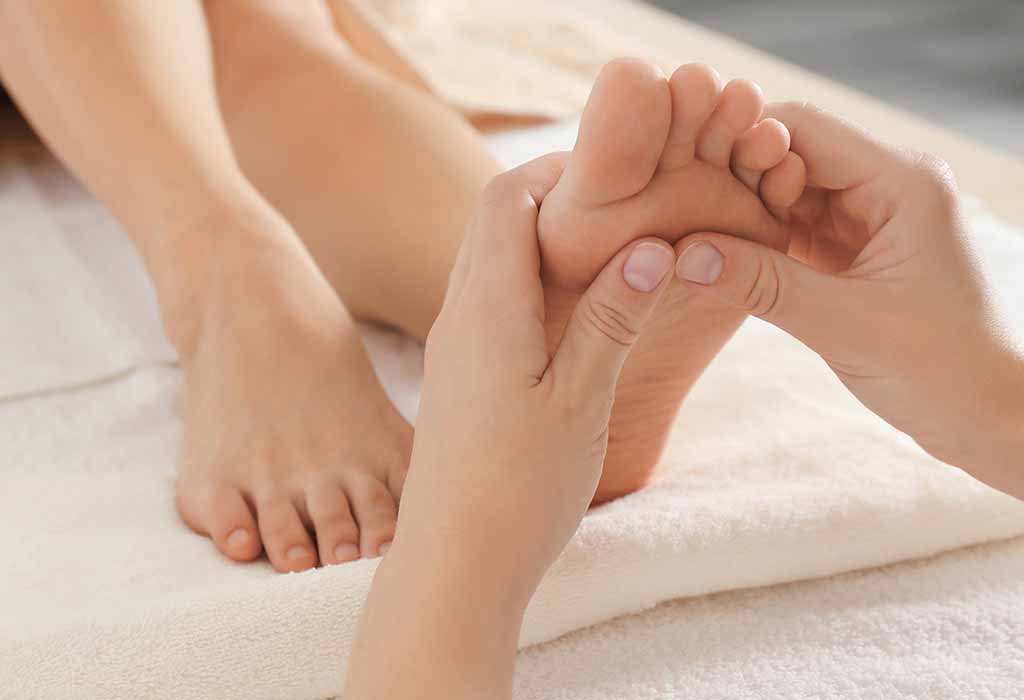
What Is Reflexology?
Reflexology, also called zone therapy, is an alternative medicine therapy that involves the stimulation of the body, by applying pressure on the feet, using your fingers and hands.
How Does Reflexology Help Induce Labour?
The days prior to labour can be extremely stressful for a mother-to-be. The struggle is real. Reflexology involves applying pressure on certain points of the foot pad to produce a calming effect on the body. But can reflexology induce labour? The few days leading to labour are the most stressful but undergoing reflexology treatment can have a calming effect on an expecting mother. This process kick starts several conditions and helps improve and stimulate labour. In addition to this, reflexology can help pregnant women administer their energies towards a more positive side as well.
Reflexology Points for Labour Induction
These are the reflex points to induce labour -
The adrenal gland - The adrenal gland is a key player in giving the body endurance and energy. It also strengthens the immune system and increases the ability to manage stress. Reflexology can help induce the secretion of adrenaline from the adrenal gland.
The pituitary gland - Found at the base of the brain and known as the ‘master gland’, the pituitary gland is responsible for the secretion and management of all the hormones in your body. Applying pressure on the centre of the toe pads has an effect on the pituitary gland. A light but effective pressure of two to three minutes is applied to the centre of each toe, first on the right foot, and then on the left. When this is done, the brain produces oxytocin, which is responsible for uterine contractions. Uterine contractions are essential during labour. You might feel your baby move a lot during the treatment, and you do not have to worry as this is normal.
Spleen 6 - Stimulating the spleen can induce uterine contractions as well. Pressure is applied at Spleen 6 to reduce labour pain. For this, the pressure is applied a little above the inside of the ankles.
How Many Session Will You Need?
Reflexology has been gaining popularity. If you have been administered with this treatment throughout your pregnancy, then the chances are that the process of inducing labour will be much easier and effective on you. However, if you are new to this, then indulging in this process three to four weeks before your due date, about once or twice a week is recommended. If you are overdue, then you can have a two-hour session, until you feel that your contractions are coming.
Who Should Avoid Reflexology?
Firstly, everyone must consult a gynaecologist or a family doctor before going in for these sessions. Women with a history of miscarriage must avoid reflexology, as well as women who have had other pregnancy complications like pre-eclampsia and the likes. Women who have deep-vein thrombosis need to avoid this as well. Make sure you do not undertake this treatment if you have any kind of foot injury.
Can Reflexology Ease Your Labour Pain?
While doctors have considered reflexology to start labour, it is yet to be found whether it can ease your labour pain. No two women are the same. It is said that the benefits of reflexology help in easing labour pains. Women who have undergone this treatment have said that it has a calming effect on them and that their labour was shorter and easier.
Pregnancy can be an overwhelming time, especially when the due date is looming near. At this time, reflexology and a lot of tender loving care is probably everything that you need. Go ahead and get yourself this treatment.
Also Read:
Exercises to Bring Labour Naturally
Can Acupuncture Induce Labour?
How Does Acupressure Points Help to Induce Labour? Read more
Suggested for you
Vaccum (Ventouse) Assisted Delivery - All You Need To Know
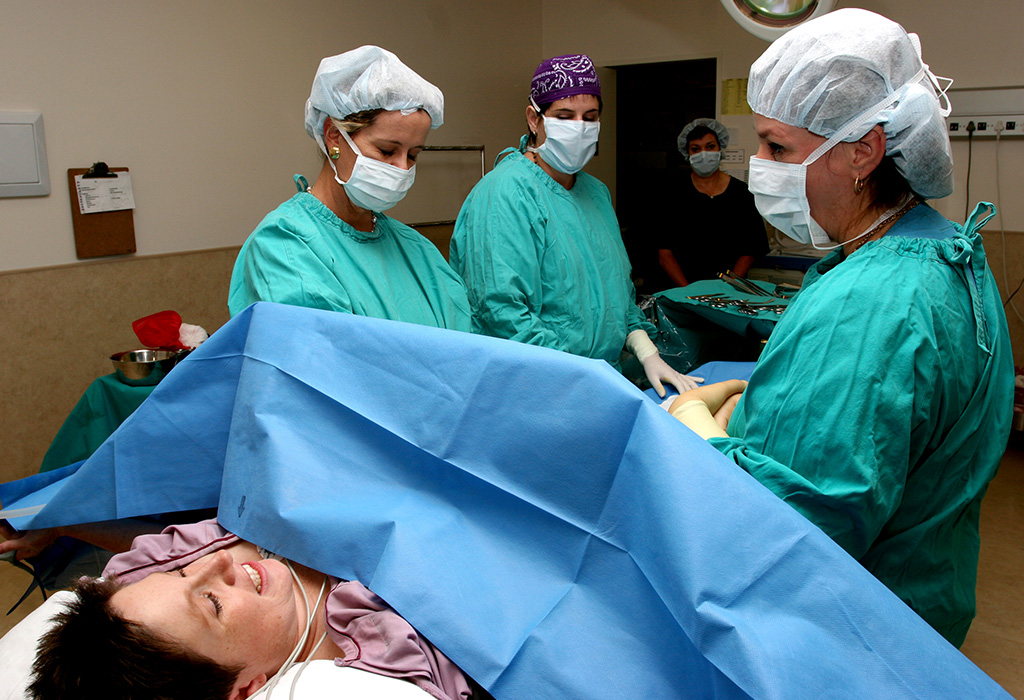
Giving birth to a child is one of the most wonderful feelings a woman can experience. A healthy pregnancy and childbirth are what every expectant mother wishes for. However, giving birth involves many medical procedures and sometimes complications such as a slow labour may require a Vaccum assisted birth. Well, if you are new to this term, then this article will provide you with all the information that you need to know about Vaccum-assisted delivery.
What Is Vaccum Assisted Delivery?
During Vaccum-assisted delivery or ventouse delivery, your doctor or midwife will make use of a Vaccum to help your baby move through the birth canal. This technique involves the use of a ventouse extractor that is placed over baby’s head for suction. The doctor helps the baby move through the birth canal while you push during the labour contractions. When the baby’s head is out, the rest of the body comes out naturally. The Vaccum delivery procedure is sometimes referred to as Kiwi delivery. This is because Kiwi is a major manufacturer of Vaccum devices.
When Is Vaccum Extraction Delivery Performed?
The need for Vaccum delivery can be indicated by any of the below-listed obstetric conditions:
Slow progressing labour: There are situations when the mother has been pushing for hours and there is no substantial progress in labour.
Maternal health complications or fatigue: If the mother has some health issues where she is unable to push during labour or gets too tired.
Baby may show signs of distress: Your doctor may notice changes in your baby’s heartbeat or other non-reassuring symptoms that show that the baby is in distress.
Your Doctor Will Alert Against Vaccum Extraction If
Though Vaccum extraction delivery is a safe procedure, there are certain times when your doctor will alert you against it. A few such situations are listed below:
The baby is in a breech position (the baby is not in a head down position).
The unborn child has some health complications such as a bleeding disorder like haemophilia which can be fatal in case of an injury during Vaccum extraction.
The baby’s skeletal strength is low because of some health condition.
The baby has not descended midway through the birth canal.
The baby has undergone some scalp sampling.
The mother has not completed the 34th week of pregnancy.
The mother’s pelvis is too narrow for the baby to come out.
How to Prepare For Ventouse Delivery?
When your doctor suggests a ventouse delivery, the below listed preparations are done before initiating a Vaccum assisted birth:
Epidural or spinal anaesthesia: If anaesthesia is not given to the mother, then the doctor will go for a spinal or epidural anaesthesia, provided there is no medical situation causing danger to the health of the mother and baby.
Catheter: Acatheter will be inserted to empty the bladder.
Episiotomy: Your doctor may make an incision between your vagina and anus for the easy delivery of the baby.
Your doctor may also suggest various other options for delivery such as a caesarean delivery.
What Is Vaccum Delivery Procedure?
After preparing you for the Vaccum delivery, you will be made to lie down with your legs apart while firmly gripping the handles of the birthing bed or table. The Vaccum cup for delivery will be inserted into your vagina and placed on your baby’s head. The doctor will check to see that there isn’t any tissue between the cup and baby’s head. A suction is created by a Vaccum pump onto the cup. In coordination with the labour contractions, the doctor rapidly increases the Vaccum suction pressure to help the baby move through the birth canal while you push. As soon as the baby’s head is out, the suction and the cup is removed and the rest of the body is delivered naturally.
What Are The Possible Complications Of Vaccum Assisted Birth?
Some of the Vaccum extraction risks to baby as well as complications of Vaccum assisted birth for mother have been discussed below.
Risks for mother
Vaccum-assisted delivery can cause pain in the perineum, which is a very common problem and it subsides with time.
Urinary incontinence or involuntary urine leakage.
Some tears may result in anal incontinence or involuntary defecation.
Prolapse of pelvic organs can occur which leads to weakened muscles and ligaments of the pelvic region.
Risks for baby
If blood vessels in the head get damaged during the procedure, accumulation of blood between the skull and inner layers of skin can occur (cephalohematoma).
A swelling or chignon can appear at the place where suction cup is placed which resolves within a couple of days.
Blood vessels can get damaged which may cause an increased level of bilirubin resulting in neonatal jaundice.
Retinal haemorrhage can also occur due to increased pressure to the baby’s head.
Long term effects of Vaccum extraction may be caused by conditions such as intracranial haemorrhage which can lead to serious complications such as speech or memory loss etc.
How To Avoid A Vaccum Assisted Vaginal Delivery?
Vaccum-assisted vaginal delivery has been in practice for a long time now, and when used properly, poses no serious threat to you or your baby. However, if used incorrectly, Vaccum extractors can cause head trauma and brain damage that can lead to serious health conditions in the baby like cerebral palsy, intellectual and developmental disabilities and other disabilities.
One can avoid Vaccum delivery by:
Saying no to epidural: Use of painkillers can prevent your vaginal muscles from working well and thereby hindering a normal delivery. Therefore, epidurals should be avoided unless they become unavoidable.
By being patient: If both the mother and baby are healthy and there are no signs of potential complications then it is advisable to wait for the birth to happen naturally.
Being active during labour: It is also recommended to be active during labour and try different positions that will ease the process of pushing out the baby.
Recovering From Vaccum Assisted Birth
If you have had a vaginal tear or episiotomy, then the wound will be sore for a few days and recovery should take place within a week. Bigger or extensive tears may take longer to heal. Listed below are some of the methods to recover from the Vaccum delivery side effects.
Sit carefully: It is advised that you sit on a cushioned surface or place a soft pillow before sitting. Refrain from sitting on a hard surface. This will help in reducing the strain on the tear.
Avoid any pressure to the pelvic region: Do not apply any unnecessary pressure in the pelvic region. Do not try too hard during bowel movement as it may strain your vaginal area causing pain.
Apply an ice pack to the wound: You may apply ice packs to the wounded area to ease the pain.
Clean after urinating: Pouring warm water while urinating over your vulva may provide you relief from the stinging feeling.
Home remedies: You may also use home remedial measures like applying coconut oil on affected areas; but these must be done only after consulting with your doctor.
Though the discomfort and pain will be present for a few days after the Vaccum delivery, the tips mentioned above may help ease your discomfort. It is also recommended to get in touch with your doctor if you notice any fever, intense pain, or pus oozing out from the wound.
Conclusion: Vaccum-assisted delivery must only be used as a last resort due to some of the complications that arise while trying for a natural birth. However, this does not mean that every Vaccum-assisted delivery is risky. If one has a reliable doctor and is placed in a reputed nursing home or hospital, the risks should be minimal. Read more
Rashmi has added a new answer
Expecting Mom due this month
9 hours ago
Q. #asktheexperts is it okay that the baby is kicking less than usual?

Rashmi
Mom of a 9 yr 7 m old girl
9 hours ago
A. Yes it is the what part is that your child is kicking if you feel that there is a movement of your child whether it is a cake or slight movement also you know that your child is doing fine so there is no problem in that if the movement is less it’s completely alright
Dr Sameer awadhiya has added a new answer
Guardian of 0 children
8 hours ago
Q. #asktheexperts what to do if the baby’s nose is blovked

Dr Sameer awadhiya
Paediatrician
8 hours ago
A. Nasal blockage is very common, specially in small children because of the narrow nasal cavity. Any kind of saline drops like nasal clear will be helpful in dissolving the stuffy secretions, which can be taken out by vnasal aspirator gently also steam inhalation will be helpful also, try to avoid keeping the child directly under the fan.
Ankita Mehta has added a new answer
Expecting Mom due in 4 months
6 hours ago
Q. 22 week pregnant,baby konse month me or din me kitni baar move kartaa he ,pls bataye abhi sirf 2, 3 baar hi hota he

Ankita Mehta
Mom of a 8 yr 7 m old girl
3 hours ago
A. hi
yes it's enough
and the frequency and timing may vary as we all are different
but yes, the frequency of feeling baby movements will increase now
please go for regular check-up to your gynecologist
and follow his or her suggestions
Rashmi has added a new answer
Trying To Conceive
5 hours ago
Q. hi
need help and advice
my RT 18x16mm and LT 10x16mm ET 6.59
and did ovulation rest also showing fertility test C as if now , pls advice if we intercourse tomorrow then when will be my ovulation start.
Rashmi
Mom of a 9 yr 7 m old girl
4 hours ago
A. You can check with an ovulation kit if it is positive then you can certainly go ahead with the conception because ovulation kit is going to give you 100% clarity whether you are ovulating or not with that you can try practising if you can conceive the same time
Dr Ghouse has added a new answer
Guardian of 0 children
1 hour ago
Q. Bread feeding mother can have green tea

Dr Ghouse
Paediatrician
37 mins ago
A. absolutely no problem to have green tea ok. if there is no relief it is better you see your doctor for proper examination particularly physical examination if there is need for doing investigations to find out the problem and treatment ok
Rashmi has added a new answer
Guardian of 0 children
28 mins ago
Q. In my growth scan doctor found that 2 round cord has been partly around baby necks. Is there any problem with this. will I get normal delivery?
Rashmi
Mom of a 9 yr 7 m old girl
25 mins ago
A. A lot of times normal delivery is actually seen in these cases also if the doctor is quick and the child cooperate then yes normal delivery is very much possible but some doctors don’t take a chance with the health of your child and so they normally suggest C-section so let’s see what’s your situation by the end when you are into your labour
Check out this new Memory
Kartikeya Goyal
Father of a 3 m old boy
New Memory
#babyphotochallenge

Like
Comment
Share
0 Likes
0 Comment
Check out this new Memory

Prerna Chaudhary
Mom of a 9 yr 2 m old girl
New Memory
#walloffame

Like
Comment
Share
0 Likes
0 Comment
Check out this new Memory
Kartikeya Goyal
Father of a 3 m old boy
1 min ago
#grandphoto

Like
Comment
Share
0 Likes
0 Comment
Check out this new Memory
Kalyani Bidve
Guardian of a 9 m old boy
1 min ago
#stylishbaby

Like
Comment
Share
0 Likes
0 Comment
Check out this new Memory

Aparna Malviya
Mom of a 1 yr old boy
1 min ago
#MamyPokoMilestoneMemories

Like
Comment
Share
0 Likes
0 Comment
Tell us more about yourself get More Personalised
 Infant0 to 6 Months
 Baby6 Months to 2 Yrs
 Toddler2 to 4 yrs
 Kids4-6 yrs
 Big Kids6+ yrs
 Expecting
 Trying to Conceive

