

.svg)
.svg)
.png)

Enter Child Details

Add Profile Photo


Videos you might be interested in


Videos you might be interested in
Videos you might be interested in
Suggested for you
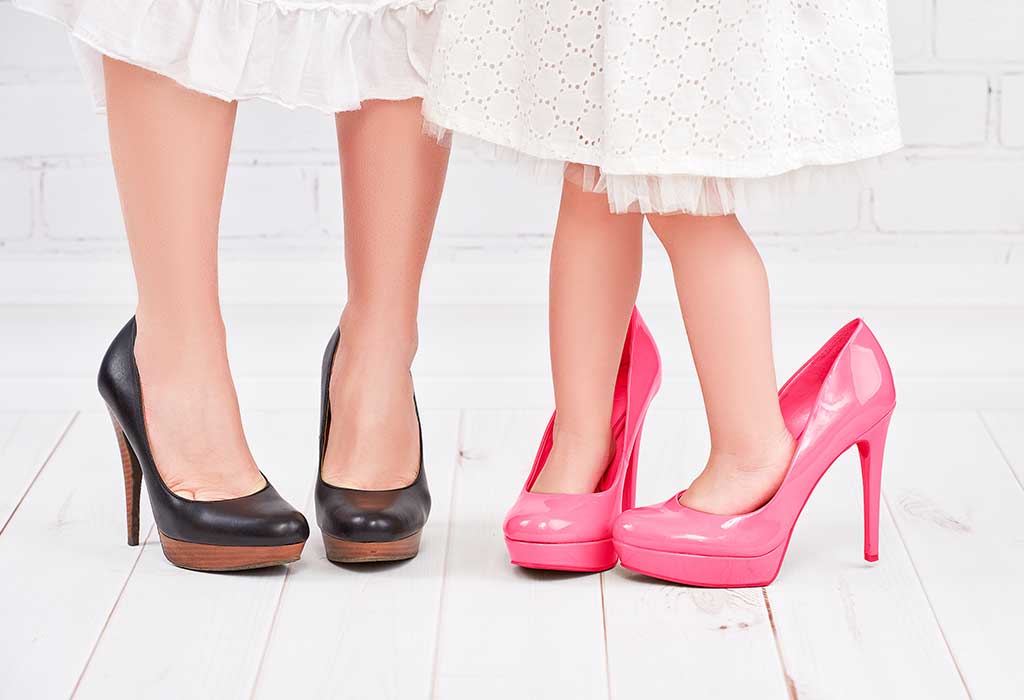
Kids' Shoe Size by Age Guide - How to Measure and Convert Kids' Shoe Size
From sporty sneakers to luxury designer shoes, kids have plenty of options these days when it comes to comfortable footwear. If you can't take your kid to the store and are wondering how to measure your child's feet, we've got good news - you can do it at home. And it's not super hard, either.
Here are some of our favourite ways.
Ways to Measure Your Child's Foot Size
There are two main ways to measure your child's foot size. For this first one which is popularly called the 'tracing method' or the 'brand method', all you need is a printout of a child shoe size measuring chart, a ruler and paper. The second one is also straightforward but needs a bit of extra help.
Take a look at them below.
1. The Brand Method
Most brands manufacture shoes based on their sizing standards. You'll find a printable chart on their website, in many cases. Download that, print it out and let's get started.
What You Will Need
Pen
A piece of paper
A printed sizing chart
A ruler
Step-by-Step Procedure
Tape the piece of paper on the floor and place your child's foot on it.
Make sure the foot is flat and the toes aren't curled up.
Start by drawing an outline from the heel to their longest toe.
Remove the toe and measure the space drawn in inches using a ruler.
Add 1/4" to your measurement for legroom and you're done.
If you plan to make your child wear socks, repeat this process while wearing socks to get accurate measurements.
Print out the brand's chart and find the measurement according to the one you recorded for comparison.
When you're printing out the chart, make sure to uncheck "page scaling" in the print preferences and set the scale to a 100%
2. The Tape Measure Method
This is a bit old school but it works like a charm. You'll need someone's help to hold your child's feet still due to the squirming and fidgeting.
What You Will Need
A measuring tape
Paper
Pen
Step-by-Step Procedure
Position your child up against the wall with the measuring tape on the floor.
Place your child's foot on the 1" mark and make sure it's flat.
Get someone to hold your child during this so that they don't move or wiggle.
Note the measurement by recording from the 1" mark to the back of the heel, get out a piece of paper and convert it to centimetres and other units for reference.
Visit your nearest store and shop for shoes by handing them over that size or select the measurements online for home delivery.
Baby's Shoe Size Guide by Age Chart
You can't tell a boy's shoe size by just looking at their feet! And that's exactly why we have this handy sizing measurement chart for your reference.
Age of Boy
U.S. Measurement
U.K. Measurement
E.U. Measurement
3 years
8 to 10 (C)
7 to 9
23 to 26
4 years
10 to 11 (C)
9 to 10
26 to 27.5
5 years
11 to 11.5 (C)
10 to 10.5
27.5 to 28
6 years
12 to 13 (C)
11 to 12
29 to 30.5
7 years
13 (C) to 1 (Y)
12 to 13
30.5 to 31
8 years
2 to 3 (Y)
1 to 2 (Y)
33 to 34
Source: https://www.shoesize.com/children/sizechart/
Girl's Shoe Size Guide by Age Chart
Just like before, you don't have to visit your nearest store for a measurement chart. Take note of this reference sheet and you'll be good to go at the time of your baby girl's shoe-shopping.
Age of Boy
U.S. Measurement
U.K. Measurement
E.U. Measurement
3 years
8 to 9 (C)
7 to 8
23 to 25
4 years
10 (C)
9
26
5 years
11 to 11.5 (C)
10 to 10.5
27.5 to 28
6 years
12 to 13 (C)
11
29
7 years
12 to 13 (C)
11 to 12
29 to 30.5
8 years
1 to 2 (Y)
13 to 1(Y)
31 to 32
Source: https://www.shoesize.com/children/sizechart/
FAQs
Parents often ask how often to measure kids' feet or what to do if the fit isn't too comfy. We answer some of the most commonly asked questions below.
1. How Often Should I Measure My Kid's Feet?
You should measure your kids' feet every two to three months during the first 2 years and once every six months after that. When you do measure your kids' feet, make sure to record the measurements and use a bigger size. That way, you ensure a smooth and comfortable fit.
2. What Can I Do if My Kid is Between Sizes?
If your kid is between sizes, go for a snug fit instead of a loose one. Or simply change the shoe style or go for another brand if you don't find something that's working for them.
3. How Fast Do My Child's Feet Grow?
Kids' feet grow half their current size every three months. Their feet are at their biggest during the afternoons after they spend a day of standing tall. Measure it during that time and be sure to triple-check the measurements after you take them for best results. If your kid plans to wear socks, take the measurements with the socks on (unless you want a tight fit).
Although it's nice to eyeball measurements and ask your relative to do your kids' shoe shopping for you, you'll realize that doing some researching and taking them yourself pays off. This way, every time your kids' feet grow bigger, you know what to do and are not at the mercy of going to the store.
Plus, taking measurements at home is also time-saving and doesn't involve a lot of running around. And the fun part is in the shopping once you take care of the number crunching stuff.
Also Read:
Causes of Toe Walking in Kids
How to Teach Your Child to Tie Shoelaces
Effective Tips for Buying Rain Boots for Kids Read more
Suggested for you
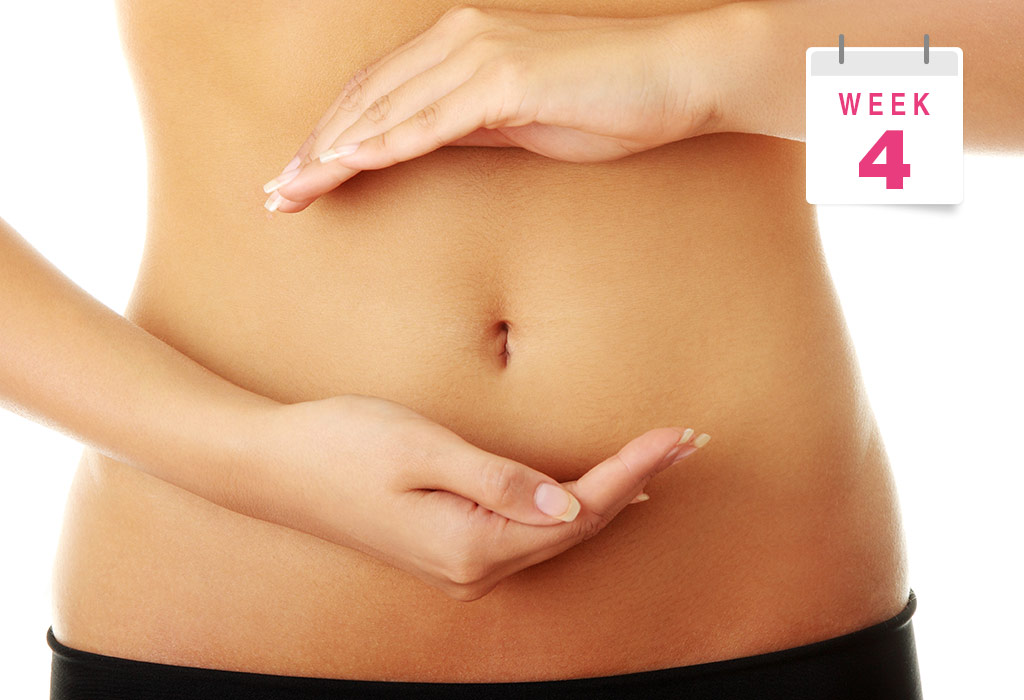
4 Weeks Pregnant: What to Expect
Congratulations! So, you found out that you are pregnant? You must be elated and dying to break the news to your partner and loved ones. Why not! But, maybe, you should first confirm the same through a blood test at a medical centre. This week literally marks the beginning of your pregnancy because you have just missed your period and found out that you are pregnant. You must be elated!
Video: 4 Weeks Pregnant - What to Expect
https://www.youtube.com/watch?v=_jeR49X4O2U
Your Baby’s Growth during Pregnancy - Week 4
4th week of pregnancy is a week for implantation. The blastocyst finally sets itself up in the uterine lining and splits into two to form placenta and embryo. This is the week when the amniotic sac or the bag of water and the yolk sac, a part of your baby’s digestive system, forms around the little embryo. Your little embryo also grows into three distinct parts during the 4th week. These three parts of the embryo, endoderm (the inner layer), mesoderm (the middle layer) and ectoderm (out layer), later form your baby’s body organs. No doubt, it’s an important week for the growth and development of your little wonder.
What is the Baby’s Size?
This week is a critical week as it marks the onset of the embryonic period. Right now, the size of your baby, which is the embryo, is that of a poppy seed. This poppy seed has two layers, the epiblast and the hypoblast, that will go on to grow into your little one’s body parts. While the size of the baby when you are 4 weeks pregnant is practically microscopic, it is going through some major developments which are definitely noteworthy.
Common Body Changes
The various pregnancy hormones have been released in your body and your body this week is busy gearing up to adjust to these hormonal changes. You will soon start experiencing the early pregnancy symptoms. You will start feeling irritated and exhausted. You will feel the working of some chemical reactions inside your body, and it is but obvious to feel this way. After all, the blastocyst, your baby, in other words, is finally making contact with the uterus and settling down! It has been observed that 30% of the time, during the 4th week of pregnancy, implantation bleeding may occur in the form of spotting. This is not periods and there is nothing to worry about. Due to this, you may feel cramps in your stomach or even tenderness of breasts. But don’t worry, your body is made to withstand the body changes during pregnancy. You just revel in the good news and prepare yourself to become a mommy soon.
Symptoms of Pregnancy at Week 4
The release of various pregnancy hormones in the 4th week makes your body behave weirdly. Some of the common 4-week pregnancy symptoms are:
Due to the release of progesterone in your body, you may feel puffed up and bloated.
Mild cramping in the stomach is a result of implantation and you must not worry about it. But if you experience severe cramping then, do tell your doctor all about it.
Implantation of the blastocyst into the uterus may also cause mild spotting which may be of pink, light red or brownish red colour. Again, there is nothing to worry about till it lasts for more than a couple of days.
The fluctuating hormones will cause your mood to go on full swing. You will have no control of it. Just pray that people around you understand what you are going through and cooperate! After all, they will only last for about 12 weeks!
Morning sickness is one of the most common symptoms. About 90% of women get some sort of morning sicknesses like nausea or vomiting. It gets better after 9 weeks, so, just hold on!
Your body is really working hard to grow that small embryo into a healthy baby. It is but obvious that you will feel very exhausted. But it will get better after the first trimester.
The ever-increasing pregnancy hormones will also make your breasts feel sore and tender.
Belly at 4 Weeks of Pregnancy
Your stomach will bloat during the 4th week of pregnancy due to the release of progesterone in your body but it is still not the time for you to look pregnant. Your baby is just the size of a poppy seed this week, so, rest assured, your secret is kept!
4 Weeks Ultrasound
There is so much happening inside your body this week. The blastocyst in settling down in the uterine lining, and it is also splitting up to form embryo and placenta. The building block of your baby’s spine, brain, and backbone, i.e. baby’s neural tube is already formed. The amniotic sac and fluid are at work to form a protective cushioning for your baby, and all you can see in the 4-week ultrasound is a tiny dot like thing which is called the gestational sac. Disappointed? Don’t be. Just keep patience. You will see and feel everything as your pregnancy progresses.
What to Eat
Eating healthy is a key to delivering a healthy baby. Whole wheat, leafy vegetables, legumes, water, meat, fish, dairy products, and 5 servings of fruits should become a part and parcel of your diet for the next nine months now. If you haven’t started taking prenatal vitamins with folic acid or folate, then start right away. All this is critical for the healthy growth and development of your little one.
But there is one thing that you need to kick out from your diet starting today and that is caffeine. Caffeine is an abstergent that washes calcium and other key pregnancy nutrients and hence, must be avoided. If caffeine is what gets you started in the morning, then you may find it a little difficult to let it go. Don’t give it all up at one go. Just take it slow. Replace caffeine with some healthy drinks and some yummy protein snacks. You must be very careful about what you eat from now on.
Tips & Care
If you have been able to successfully conduct the test this week and have also discovered that you are pregnant, then it’s time not only to meet and finalise your doctor, but also to check your medical insurance: and start digging into it, and learn how you will be covered from prenatal to delivery. Other dos and don’ts include:
Do's
Get yourself a home pregnancy test kit.
Eat healthy food.
Eat five servings of fruits and vegetables daily.
Get yourself a supplement of prenatal vitamin with folic acid.
Don’ts
Avoid junk food.
Quit smoking, drinking or using drugs.
Quit caffeine.
Stay relaxed and take rest when your body craves for it.
Be in touch with your doctor and avoid taking medicines of any kind.
What You Need to Shop for
Your shopping bucket for week 4 stays uncomplicated. A book on pregnancy, a pregnancy test kit and comfortable cotton bra if what you may what to pick if you haven’t bought anything yet. What you may want to add to this list are stretchy pants, leggings, and anything else that’s loose on the tummy. Your skinny jeans’ buttons may feel a little uncomfortable on your bloated tummy. So, don’t shy away from indulging in some extra shopping.
Previous Week: 3 Weeks Pregnant
Next Week: 5 Weeks Pregnant Read more
Check out this new Memory

Prathima Sampara
Mom of a 1 yr 9 m old boy
2 mins ago
#cutestbaby

Like
Comment
Share
1 Likes
0 Comment
Suggested for you

Is Your Baby Sleeping Enough for His Age? 5 Tips to Help Your Baby Sleep Peacefully!
Learn everything about baby sleep. How many hours of sleep does a newborn need? What can hinder a peaceful sleep? How can you help your baby make the transition to peaceful night sleep? Here are the answers of all your questions.
You must have heard horror stories of sleepless nights and insomniac babies. Some of it are definitely true. However, with a night-time routine in place and some luck, within a few months of bringing your baby home, you can look forward to happier nights.
How Much Sleep is Enough?
The good news is that a newborn sleeps for about 16 hours a day. The bad news is it’s never at a stretch. In the first few months, he will probably nap for two or three hours only. His stomach is small and needs frequent refills. Don't look forward to more than 6 hours of uninterrupted sleep even at night, the first 6 months. Generally, babies between 2 and 12 months sleep for 9-12 hours, most of which will be at night. Don’t try a sleep routine too soon. Let the baby decide when he wants to wake up – whether due to hunger, wet diapers or simply because he’s had his fill of sleep.
Deconstructing Baby Sleep
Like adults, babies also experience sleep cycles from drowsiness to light sleep, deep sleep and dream sleep (REM – a state when his eyes are active under his closed eyelids, but the rest of his body is still) and then all the way back from dream sleep to wakefulness. When he returns to being awake, if there are no distractions (like an empty stomach) he slips back into sleep. Some babies are self-soothers and do it on their own, while others may need to be patted or fed before they fall asleep again. During quiet sleep, it is normal for the baby to have some sudden starts called hypnagogic startles. Hynagonic startles means the sudden movements of the baby’s body in quiet sleep.
Baby Sleep and New Skills
Some of the baby’s newfound skills might interfere with his sleep patterns.
1. Crawling
As the baby learns to crawl, his brain stimulation increases and even though he might be tired, he may find it tough to sleep.
2. Object Permanence
As he turns six months old, he realizes that things do not cease to exist when he cannot see them. He might refuse to sleep when you’re not around.
3. Separation Anxiety
He will start missing you, and might insist on you being around each time he opens his eyes.
Co-sleeping
Traditionally in India, co-sleeping has been propagated and it does lead to stronger emotional - parental bonds. However, if you find it uncomfortable, especially in the case of multiple babies, you can move them from the crib to the bed.
A Few Tips to Make the Night Time Easier
Create a soothing environment. Remove bright colours and noisy toys.
Soft toys, heavy blankets or pillows aren’t a good idea for small babies, as they act as hindrances and offer risk of suffocation.
The mattress should be firm, and the baby should be put to sleep on his back to avoid Sudden Infant Death Syndrome (SIDS).
Swaddling the baby with his arms inside the blanket gives him a sense of familiarity, mimicking the pressure he feels in the womb, and helps him sleep longer.
Establishing a night time routine between two and three months is a good idea.Parents need not panic about sleepless nights, with some patience and efforts, you can solve your baby’s sleeping problems.
Parents need not panic about sleepless nights, with some patience and efforts, you can solve your baby’s sleeping problems. Read more
Suggested for you
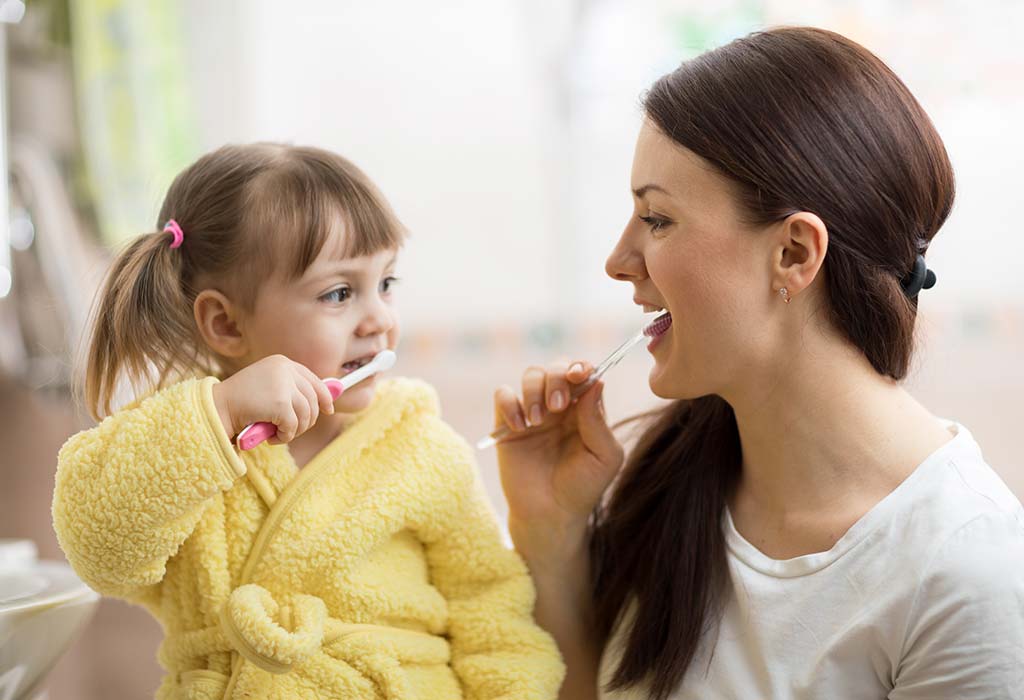
Oral Hygiene Instructions for Infants to School-going Children
Oral Hygiene is the practice of keeping the oral cavity, which includes the teeth, gums,and tongue clean. Parents should start maintaining oral hygiene of their child within a week after birth. The best time to counsel parents regarding oral hygiene is when the mother is expecting because parents to be more receptive at the time. As a dentist, I am here with some oral hygiene instructions for all age groups of kids.
1. Infants (0-1 year old )
Clean and massage the gums with a moistened gauze piece or wet cloth after every feed.
This helps in enhancing blood circulation in the gums and promotes growth of healthy bacteria.
In some kids, the first tooth comes at six months of age, whereas for others, it may come at around one year. So, on the basis of number of teeth erupted, use of a soft toothbrush is advised.
2. Toddlers (1-3 years old )
This is the best age to introduce your child to a tooth brush, if you have not done it earlier.
Brushing should be done by the parents, as the motor skills of children in this age group are not as developed.
Brush your child's teeth only with an infant sized toothbrush with soft bristles.
Only a non-fluoride toothpaste is advisable for kids under three years of age.
3. Preschoolers (3-6 years old)
A fluoride toothpaste can be introduced to kids, once they turn three years old.
The brushing technique of the child should be properly supervised by parents, or parents must assist their children in brushing teeth.
4. School-going kids (6-12 years old )
At this age, children now possess the dexterity to brush their teeth by themselves, but initially still require monitoring and reinforcement.
A fluoride rinse and floss can also be introduced to kids in this age group
The ideal time to replace your child's tooth brush is every three months or when you see the bristles appearing worn out, whichever comes sooner. Oral hygiene practices at home from an early age is very important to prevent condition like cavities and gingivitis in kids.
Disclaimer: The views, opinions and positions (including content in any form) expressed within this post are those of the author alone. The accuracy, completeness and validity of any statements made within this article are not guaranteed. We accept no liability for any errors, omissions or representations. The responsibility for intellectual property rights of this content rests with the author and any liability with regards to infringement of intellectual property rights remains with him/her.
Read more
Suggested for you
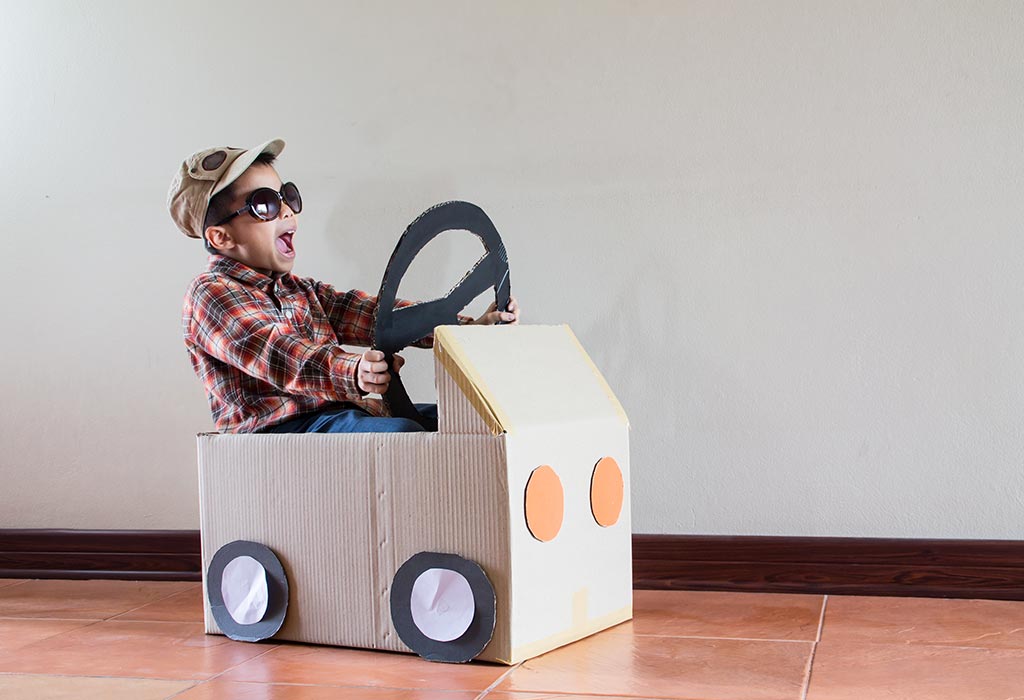
10 Creative Cardboard Crafts for Kids
Engaging your kids in creative art and crafts helps to develop their creativity. Art and crafts activities also help to break the monotony of the regular study routine.
10 Fun and Easy Cardboard Crafts for Children
Here are 10 cardboard craft ideas for kid:
1. Cardboard Box Television
What you need
Microwave box, pipe cleaner, buttons, pompom, utility knife, tin foil and paint
How to make
Take a microwave box and cut out a square from it. Remember to leave about four inches of space on all sides.
Then paint the box with the colour of your choice.
Stick some buttons on any one side of the television. These will act as your television keys.
Stick a pompom on top of the pipe cleaner with the help of a hot gun.
Stick the tin foil on the inner part of the box.
To make the remote control, take a piece of cardboard and glue buttons on it.
2. Cardboard Box Rocket
What you need
Two same sized cardboards, a pair of scissors and packing tape
How to make
Cut the edges of both the box to make one flat sheet of cardboard. Tap over the gaps and seams to provided more support to the cardboard.
Draw a rocket top at the top of the flat sheet of cardboard. Then, cut the cardboard into the shape of the rocket with the help of scissors.
Bind the boxes together into a cylindrical shape using tape. Tap the nose of the rocket in the end.
For the wings of the rocket, use the leftovers from the cardboard and stick it at the bottom.
Your basic rocket model will be ready!
3. Red Cardboard Barn
What you need
Microwave box, pipe cleaner, buttons, pompom, utility knife, tin foil and paint
How to make
Shape the cardboard in the shape of a barn. Then, make the door using the utility knife.
Now the barn is ready to be painted with primer and allow it to dry overnight.
Paint the barn surface with red colour and roof with black colour. Allow it to dry.
You can outline the door with white tape. Your Cardboard barn is ready!
4. Big Foot Shoe
What you need
Microwave box, pipe cleaner, buttons, pompom, utility knife, tin foil and paint
How to make
Cut a hole in a shoe box. It should be big enough for your kid’s feet to slip in. You can decorate the shoebox by painting it or making patterns on it.
Do this for another shoebox and you pair of BIG FOOT SHOE is ready.
5. Diy Cardboard Pirate Ship
What you need
Microwave box, pipe cleaner, buttons, pompom, utility knife, tin foil and paint
How to make
On a flat cardboard piece, sketch one side of the ship.
You will need two sides, one base and one back to make your pirate ship.
Glue the back piece onto the side pieces of the ship. Stick these on the base by glueing along each side.
Apply glue on the base up to the front of the boat. In case you manage to align the base and the front, the front of the ship will have a nice, straight edge.
Get an L-shaped piece of cardboard, a stick to mark the mast. You can place a small piece of Styrofoam to firmly hold the mast in place.
Stick the L- shaped piece of cardboard inside the back of the boat to make the cabin. Now stick the Styrofoam on the base of the ship pressing against the cabin and stick the mast into the Styrofoam.
You can use a square piece of felt for the sail and design them according to your wish.
Make holes on the lower and the top edge of the felt. Insert small pieces of rope into each one of these and fasten them to stick to make the sail.
Put a small cardboard for the plank and mark small holes for canon holes.
Your DIY cardboard pirate ship is ready!
6. Cardboard Car
What you need
Microwave box, pipe cleaner, buttons, pompom, utility knife, tin foil and paint
How to make
First place three boxes on a plane surface. Now, start from the left and shut the first box using tape. Tape the bottom portion of the second box and tape the top portion only of the third box.
Now, with the help of adhesive book covering cover the top portion of boxes 1 and 3.
Use the adhesive covering to cover the long sides. It will tape the three boxes together.
Cut off or bend one of the flaps of the second box. The remaining flap will act as a windscreen.
Draw a door on the cardboard and cut it out, leaving one side attached to the hinge. With the help of adhesive book covering, neaten the raw edges. Make the door only on one side of the car. Don’t forget to attach the handle to the door.
Draw a windscreen on the cardboard box and cut it out with the help of the X-Acto Knife. With the help of the packaging tape, stick the windscreen to the fold of the box. Cover the windscreen with a different coloured book covering.
Cut out the shapes of a wheel from A3 black card to make the wheel. To make the hubcaps, cut a circle from the grey book covering. Attach the hubcaps to the wheels using the craft glue.
Cut out circles from a white piece of paper and attach it to the car using craft glue. This will act as the headlights for the car.
Fill the shoe box with some heavy unused stuff and put it in the car for the car seat.
For the steering wheel, draw and cut out a steering wheel shape from the cardboard. Paint it black to give it a realistic look.
Attach it inside the car and glue a small bottle cap in the middle for the horn.
Your Cardboard car is ready!
7. Cardboard Box Guitar
What you need
Microwave box, pipe cleaner, buttons, pompom, utility knife, tin foil and paint
How to make
Take the cardboard box and cut big pieces of it.
You can trace and cut out three pieces of ukulele shapes from the pieces of cardboard. Make a circle at the centre of the body of the cut-outs of the guitar and then cut them out.
Then, trace and cut out two smaller pieces of cardboard again.
Attach two big pieces of cardboard together using a hot glue gun.
Cut two wooden dowels. First of one-and-a-half-inch size and the second of two-and-three-quarters-inch.
Make a five-inch line two to three inch below the circle. Now make four dots half an inch below the line. Using a utility knife, make a slit in the line. Then push a dent in it and lay the bigger dowel piece. Secure all these with the help of a hot glue gun.
Now drill two holes on the 2 layers of the cardboard. Make sure that you drill the holes exactly where you made the dots.
Make a one-and-a-half-inch line just under the guitar neck curves on the top. Then make four dots above the line, one-third of an inch apart. Now follow the previous method, make a shallow cut along the line and glue the smaller dowel piece into the crease. You have to make small dents on the dowel to secure the guitar strings in place.
Cut open a few rubber bands and attach the bands along the longer side of the one-inch paper clip.
Thread the other end of the rubber band through the four holes of the guitar neck from the back of the guitar.
Pull the rubber band one by one along the front of the guitar and through the drill holes towards the bottom.
Knot the other end of the rubber band to a paper clip stuck on the back side of the guitar. Trim the excess part of the rubber band.
Stick the third full-sized guitar with the help of glue.
Attach the two smaller pieces of the guitar to the back portion of it. This will provide durability and thickness to the guitar. Use a utility knife to trim off the extra edges.
The Cardboard box guitar is ready! This is one of the best ideas of cardboard box craft for kids.
8. Cardboard Bunny
What you need
Microwave box, pipe cleaner, buttons, pompom, utility knife, tin foil and paint
How to make
Download a bunny template from the internet or draw a bunny on a sheet of paper. Trace the template on the pieces of cardboard.
Now, cut out three pieces of bunny shaped cardboard from the larger cardboard.
Now punch holes on the bunny shaped cut-out randomly.
Glue the three different pieces of bunny shaped cut-outs and allow it to dry for some time.
Thread the shoelace with the help of a needle.
Your kid can lace in and out however he wants. This cardboard bunny is a perfect craft for your child to develop his creativity.
9. Cardboard Box Dollhouse
What you need
Microwave box, pipe cleaner, buttons, pompom, utility knife, tin foil and paint
How to make
Stack the shoe boxes and glue them all together with the help of tape. The shape and configuration of your dollhouse will be determined by the number of shoe boxes you have used.
Add a paper Mache film to bind the structure together and then allow it to dry. You can also make use of emulsion to paint the paper Mache structure. The emulsion gives an even finish to the structure and then dries to give a matte finish.
Glue your kid’s favourite scrapbook paper and glue to the inside region using standard craft glue.
You Cardboard Box Dollhouse is ready!
10. Cardboard Castle
What you need
Microwave box, pipe cleaner, buttons, pompom, utility knife, tin foil and pain
How to make
Make small rectangles by cutting small flaps from the box on top of the castle to make the battlement.
Cut two paper rolls tubes in half. Now place the four tubes on each corner of the box and also mark the area where the tube meets the box.
Cut some triangles from the coloured craft paper to make the flag. Stick the triangle to one end of the straw using the tape. Fix the straw to the tubes.
Now make some doors and windows by drawing them on the craft paper and cutting them out.
You can make some treetops using the green craft paper.
Make two-inch slits opposite to each other on the paper rolls. Slip the treetops into the top of the paper rolls. This is one of the best ideas of cardboard box craft for toddlers.
So, take some cardboard boxes from the store and use the ideas above for some creative crafts. Make sure that you or someone older is accompanying them when they are using objects like hot glue, knife, or scissors.
Also Read:
Summer Crafts for Toddlers to Keep Them Busy
Plastic Bottle Crafts for Children
Craft Ideas from Waste Material for Kids Read more
Suggested for you

Happy Mother Means a Happy Child
When you bring a life into this world, it gives you an amazing feeling which is very difficult to describe. When you see the face of your child for the first time, you forget all the pain and worries you had. We all try to give the best to our child but to the moms who are doing all these things, do not forget about yourself as a lot of things change after childbirth.
Firstly, there is no personal or me time. We all need to be on our toes. Raising children is not an easy task, so mothers need to be happy. Do things which make you happy even if it's something like reading a beauty blog, article, or book.
When my child was born, for the first few months, I was struggling to keep up with my physical, mental and emotional health. My family is very supportive but still, I was missing something. Everyone just said, it's just a phase, it will pass, and I thought why should I wait for this to pass; it's a part of life, cherish it to the fullest. I used to travel a lot, meet different people from all around the world as part of my job. Like any other new mother, I felt tired mentally, physically and emotionally; so I decided to join the class. I didn't have much time, so I joined the dance class near my house. There were some family members and relatives who were not happy as they thought that I am wasting my time and strength and also losing weight (I don't have to lose any extra weight).
My husband was very supportive of this. He encouraged me to join the class and I did which I think is a good decision. I feel tired physically but I am happy as my child sees my happy face every day. It is not about dance it's about something I do which makes me happy at the end of the day. Mothers, do whatever you can do to make you happy. If you cannot go out alone, take your child to the park, maybe you will find another new mom you can share all experience of motherhood with. And if not the park, go for a manicure or facial, something which makes you feel good. So mothers be proud to be happy and do whatever makes you happy.
Disclaimer: The views, opinions and positions (including content in any form) expressed within this post are those of the author alone. The accuracy, completeness and validity of any statements made within this article are not guaranteed. We accept no liability for any errors, omissions or representations. The responsibility for intellectual property rights of this content rests with the author and any liability with regards to infringement of intellectual property rights remains with him/her. Read more
Rashmi has added a new answer
Guardian of 0 children
19 hours ago
Q. #asktheexpert hi this is Sarika here . my question is how to encourage my baby to latch because he get irritated whenever I try to latch him
Rashmi
Mom of a 9 yr 7 m old girl
19 hours ago
A. It’s very important that when you ask a question please provide us the age of the child currently I would say that if your child is unable to latch properly so whenever you’re feeding Press your breast with your hands for the feeding of the milk is better because the milk flow is going to be better and hopefully that you do the trick
Mohammad amin has added a new answer
Guardian of 0 children
8 hours ago
Q. my baby have gastric problem..

Mohammad amin
Guardian of a 2 yr 11 m old boy
7 hours ago
A. use colimex df drops
Rashmi has added a new answer
Expecting Mom due in 1 month
8 hours ago
Q. #asktheexperts red scretch marks
Rashmi
Mom of a 9 yr 7 m old girl
8 hours ago
A. You can mix coconut oil and Kapoor together and that is what you can apply regularly want to your stretch marks is one of the best options that you can use currently other than that also I would recommend you that if you feel any kind of a burning sensation or irritation then you can have a word with your gynaecologist
Dr Vandan H Kumar has added a new answer
Guardian of 0 children
4 hours ago
Q. left side pain kyu hota h

Dr Vandan H Kumar
Paediatrician
4 hours ago
A. many times and the most common cause would be due to accumulation of milk clots and sometimes it can be neurogenic pain and sometimes it might be a partx any local mass like lymph nodes or tissue pain.
if it is not improving with simple massage as well as simple hot compressesx and expression of accumulated milk then meet your doctor at the earliest for local examination.
you can take paracetamol for pain.
Sai Prasanthi R L has added a new answer
Expecting Mom due in 7 months
3 hours ago
Q. I got chicken pox in my 8th week..it's just started how I can deal with it?

Sai Prasanthi R L
Mom of a 10 yr 2 m old boy
3 hours ago
A. Hello dear! Chicken pox during pregnancy is a matter of concern. Consult your doctor for personal evaluation and seek medical advice. Maintain a good personal hygiene routine and follow your doctor’s advice. Good luck and take care
Dr Laxmi Chavan-Sawant has added a new answer
Guardian of 0 children
2 hours ago
Q. is sesame seeds healthy in 37th week of pregnancy

Dr Laxmi Chavan-Sawant
Ayurvedic Gynaecologist
1 hour ago
A. yes you can have but limited .
During pregnancy it is always advisable to have your normal routine foods and include more of sprouted grains along with green leafy vegetables and adequate water intake which helps maintain good health
Do have regular daily walking
Check out this new Memory

Jyoti
Guardian of a 8 m old boy
New Milestone

Like
Comment
Share
0 Likes
0 Comment
Check out this new Memory
Aparna Ch
Mom of a 6 m old boy
New Memory
#walloffame

Like
Comment
Share
0 Likes
0 Comment
Check out this new Memory
Divya MRG
Mom of a 1 yr 7 m old girl and 1 yr 7 m old girl
New Memory
#cutestbaby

Like
Comment
Share
0 Likes
0 Comment
Check out this new Memory
Sunita
Guardian of a 2 yr 4 m old girl
2 mins ago

Like
Comment
Share
0 Likes
0 Comment
Tell us more about yourself get More Personalised
 Infant0 to 6 Months
 Baby6 Months to 2 Yrs
 Toddler2 to 4 yrs
 Kids4-6 yrs
 Big Kids6+ yrs
 Expecting
 Trying to Conceive

